Java 在运算时,自我类型提升 python 在加法运算时,提升的是结果变量的类型,而 Java 提升的是自己的类型 。
Python:X = 1.5+4,1.5 和 4 都保持原先的 float 类型和 int 类型,其结果 X 升级为 float 类型
Java:int X = byte 1 + int 2,byte 1 自己变成 int 1。
1
2
3
4
5
6
7
8
class hello public static void main (String[] args) byte a = 3 ; int b = 4 ; byte x = a + b; System.out.println(x); } }
1
2
3
4
5
6
7
8
class hellojava public static void main (String[] args) byte a = 3 ; int b = 4 ; int x = a + b; System.out.println(x); } }
为什么byte,short,char类型在运算的时候会自动转换成int?
本质上说,在定义byte,short类型时,他们接受的是一个int类型的数据,然后自己把它们截成了自己的类型 。(如果数据超出了他们的范围,那么就会报错)
x+=1 与 x=x+1 的区别 使用 x=x+1 可能会有损失精度问题,但是 x+=1 并没有。
原因:a += 1 并不是等价于 a = a + 1,而是等价于 a = (a的数据类型)(a + 1)
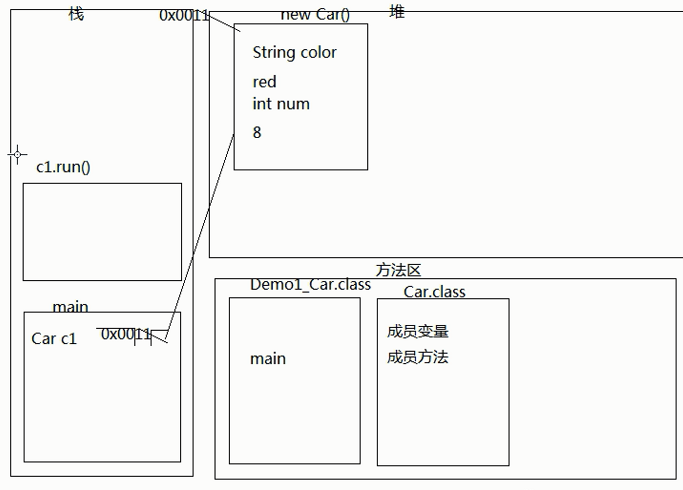
内存结构图 1 2 3 4 5 6 7 8 9 10 11 12 13 14 15 16 17 18 19 public class Testing3 public static void main (String[] args) Car car = new Car("red" ,8 ); car.run(); } } class Car String color; int num; public void run () System.out.println(this .color + "..." + this .num); } public Car (String color , int num) this .color = color; this .num = num; } }
this的功能 和python的self差不多,Java的this用于区分成员变量和局部变量
this:代表当前对象的引用,谁来调用我,我就代表谁 。
super:代表当前对象父类的引用
Student s = new Student()做了什么
student class加载进内存
声明一个 Student类型引用s
在堆内存创建对象
给对象中属性默认初始化值
属性进行显示初始化
构造方法进栈对对象中的属性赋值,构造方法弹栈
将对象的地址值赋值给s
工具类的私有构造方法 如果一个类中所有的方法都是静态的,一般都要设置私有构造方法,目的是不让其他类创建本类对s直接用类名。
1 2 3 4 5 6 7 8 9 10 11 12 13 14 15 16 17 18 19 20 21 22 23 24 25 26 27 28 29 30 31 32 33 34 35 36 37 38 public class student5 public static void main (String[] args) int [] arr = { 1 , 2 , 3 , 4 , 5 , 6 , 7 }; System.out.println(ArrayTool.getMax(arr)); ArrayTool.reverse(arr); System.out.println(arr); } } class ArrayTool private ArrayTool () public static int getMax (int [] arr) int max_num; if (arr != null ) { max_num = arr[0 ]; for (int i = 0 ; i < arr.length; i++) { if (max_num < arr[i]) { max_num = arr[i]; } } return max_num; } else { return -1 ; } } public static void reverse (int [] arr) for (int i = 0 ; i < (arr.length / 2 ); i++) { int tmp = arr[i]; arr[i] = arr[arr.length - 1 - i]; arr[arr.length - 1 - i] = tmp; } } }
构造代码块 构造代码块:每创建一次对象就会执行一次,优先于构造函数执行。
静态构造代码块:优先于主方法执行 ,随着类加载而加载,且只执行一次 (作用:用来给类进行初始化,一般用来加载驱动)
1 2 3 4 5 6 7 8 9 10 11 12 13 14 15 16 17 18 19 20 21 22 23 24 25 26 27 28 29 30 31 32 33 34 35 class Student static { System.out.println("Student 静态代码块" ); } { System.out.println("Student 构造代码块" ); } public Student () System.out.println("Student 构造方法" ); } } class Demo2_Student static { System.out.println("Demo2_Student静态代码块" ); } public static void main (String[] args) System.out.println("我是main方法" ); Student s1 = new Student(); Student s2 = new Student(); } }
继承的执行顺序 先执行祖先的,再执行父亲的
1 2 3 4 5 6 7 8 9 10 11 12 13 14 15 16 17 18 19 20 21 22 23 24 25 26 27 28 29 30 31 32 33 34 35 36 class Demo2_Extends public static void main (String[] args) DemoC d = new DemoC(); d.show(); } } class DemoA public void show () System.out.println("DemoA" ); } } class DemoB extends DemoA public void method () System.out.println("DemoB" ); } } class DemoC extends DemoB public void print () System.out.println("DemoC" ); } }
继承的注意事项
子类只能继承父类所有非私有的成员 (成员方法和成员变量)
子类不能继承父类的构造方法,但是可以通过super关键字去访问父类构造方法
不要为了部分功能而去继承大项目
子父类的构造方法调用顺序 所有的构造方法默认都会访问父类中空参数的构造
因为子类会继承父类中的数据,可能还会使用父类的数据,所以,子类初始化之前,一定要先完成父类数据的初始化。
每一个构造方法的第一条语句默认都是:super()。
Object类最顶层的父类。
1 2 3 4 5 6 7 8 9 10 11 12 13 14 15 16 17 18 19 20 public class Testing public static void main (String[] args) Student s = new Student(); } } class Person public Person () System.out.println("Person.__init__" ); } } class Student extends Person public Student () System.out.println("Student.__init__" ); } }
所以:
1 2 3 4 5 class Student extends Person public Student () System.out.println("Student.__init__" ); } }
其实就是:
1 2 3 4 5 6 class Student extends Person public Student () super (); System.out.println("Student.__init__" ); } }
其中,super代表的就是Person类,就是调用父类的构造方法
父类没有无参构造方法,子类怎么办 1 2 3 4 5 6 7 8 9 10 11 12 13 14 15 16 17 18 19 20 21 22 23 24 25 26 27 28 29 30 31 32 33 34 35 36 37 public class Testing public static void main (String[] args) Student s = new Student(); System.out.println("---------" ); Student s2 = new Student("hyl" ); } } class Person String name; public Person () System.out.println("Person空参构造" ); } public Person (String name) this .name = name; System.out.println("Person有参构造" ); } } class Student extends Person public Student () System.out.println("Student空参构造" ); } public Student (String name) this .name = name; System.out.println("Student有参构造" ); } }
如果注释掉
1 2 3 public Person () System.out.println("Person空参构造" ); }
那么就会报错.
根本原因就是public Student() 和 public Student(String name) 的第一句都是super();
所以如果父类没有空参构造 , 只要将super();改为super(name);就可以了
1 2 3 4 5 6 7 8 9 10 11 12 13 14 15 16 17 18 19 20 21 22 23 24 25 26 27 28 29 30 31 32 33 34 35 public class Testing public static void main (String[] args) Student s = new Student(); System.out.println("---------" ); Student s2 = new Student("hyl" ); } } class Person String name; public Person (String name) this .name = name; System.out.println("Person有参构造" ); } } class Student extends Person public Student () super ("unname" ); System.out.println("Student空参构造" ); } public Student (String name) super (name); this .name = name; System.out.println("Student有参构造" ); } }
其中,子类除了调用父类的构造方法 , 还可以改为自己的构造方法 .
1 2 3 4 5 6 7 8 9 10 11 12 13 14 15 16 17 18 class Student extends Person public Student () super ("unname" ); System.out.println("Student空参构造" ); } class Student extends Person public Student () this ("uname" ); System.out.println("Student空参构造" ); } public Student (String name) super (name); this .name = name; System.out.println("Student有参构造" ); } }
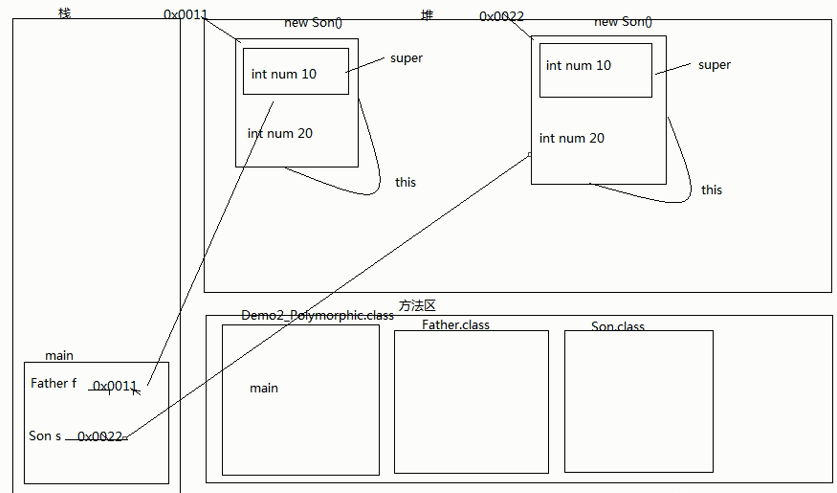
this和super 1 2 3 4 5 6 7 8 9 10 11 12 13 14 15 16 17 18 19 20 21 22 23 24 25 26 27 28 29 30 31 32 33 34 35 36 37 class Fu public int num = 10 ; public Fu () System.out.println("fu" ); } } class Zi extends Fu public int num = 20 ; public Zi () System.out.println("zi" ); } public void show () int num = 30 ; System.out.println(num); System.out.println(this .num); System.out.println(super .num); } } class Test1_Extends public static void main (String[] args) Zi z = new Zi(); z.show(); } }
子父类执行的执行顺序
jvm调用了main方法,main进栈
遇到Zi z = new Zi();会先将Fu.class和Zi.class分别加载进内存,再创建对象,当Fu.class加载进内存,
走Zi类的构造方法,因为java中是分层初始化的,先初始化父类,再初始化子类,所以先走的父类构造,但是在执行,
Fu类初始化结束,子类初始化,第五个输出的是构造代码块Zi,构造方法Zi
1 2 3 4 5 6 7 8 9 10 11 12 13 14 15 16 17 18 19 20 21 22 23 24 25 26 27 28 29 30 31 32 33 34 35 36 37 38 39 class Test2_Extends public static void main (String[] args) Zi z = new Zi(); } } class Fu static { System.out.println("静态代码块Fu" ); } { System.out.println("构造代码块Fu" ); } public Fu () System.out.println("构造方法Fu" ); } } class Zi extends Fu static { System.out.println("静态代码块Zi" ); } { System.out.println("构造代码块Zi" ); } public Zi () System.out.println("构造方法Zi" ); } }
重写的限制
父类中私有方法不能被重写
子类重写父类方法时,访问权限不能更低
父类静态方法,子类也必须通过静态方法进行重写
子类重写父类方法的时候,最好声明一模一样。
Override和Overload的区别
overload可以改变返回值类型,只看参数列表
方法重写:子类中出现了和父类中方法声明一模一样的方法。与返回值类型有关,返回值是一致(或者是子父类)的
方法重载:本类中出现的方法名一样,参数列表不同的方法。与返回值类型无关。
子类对象调用方法的时候:
final修饰
final的本质就是定死了变量的地址值 .
final修饰变量的初始化时机
1 2 3 4 5 6 7 8 9 10 11 class Demo final int num; public Demo () num = 10 ; } public void print () System.out.println(num); } }
多态是方法的多态,不是属性的多态 1 2 3 4 5 6 7 8 9 10 11 12 13 14 15 16 17 public class Testing2 public static void main (String[] args) Father f = new Son(); System.out.println(f.num); Son s = new Son(); System.out.println(s.num); } } class Father int num = 10 ; } class Son extends Father int num = 20 ; }
注意
System.out.println(f.num);打印的是10 System.out.println(s.num);打印的是20
得出结论 :
多态指的是同一个方法调用,由于对象不同可能会有不同的行为。
多态是方法的多态,不是属性的多态 (多态与属性无关)
java中,向上造型呈现的多态性仅仅针对成员函数 ,成员属性不具有多态性 ,
例如:
1 2 3 4 Father fs = new Son(); fs.m1(); fs.a;
成员变量 : 编译看左边(父类),运行看左边(父类)
成员方法 : 编译看左边(父类),运行看右边(子类)
静态方法 : 编译看左边(父类),运行看左边(父类)
抽象类 一个抽象类如果没有抽象方法,可不可以定义为抽象类?如果可以,有什么意义?可以,这么做目的只有一个,就是不让其他类创建本类对象,交给子类完成
abstract不能和哪些关键字共存?
abstract 和 static :类名.调用,但是类名.调用抽象方法是没有意义的
abstract和final :
abstract和 private :
接口
接口的方法都是 抽象方法。
接口的子类:
可以是抽象类。但是意义不大
可以是具体类。要重写接口中的所有抽象方法。(推荐方案)
构造方法:接口没有构造方法
成员变量:只能是常量,并且是静态的并公共的。
接口之间可以单继承 , 还可以多继承
包 1 2 3 4 hyl |-- com |-- baidu |--add.java
这就是个给这个模块取一个名字 .
同时 ,以后只能在hyl目录下运行 .
就算再baidu目录下执行java add也不行。必须在hyl目录下执行java com.baidu.add
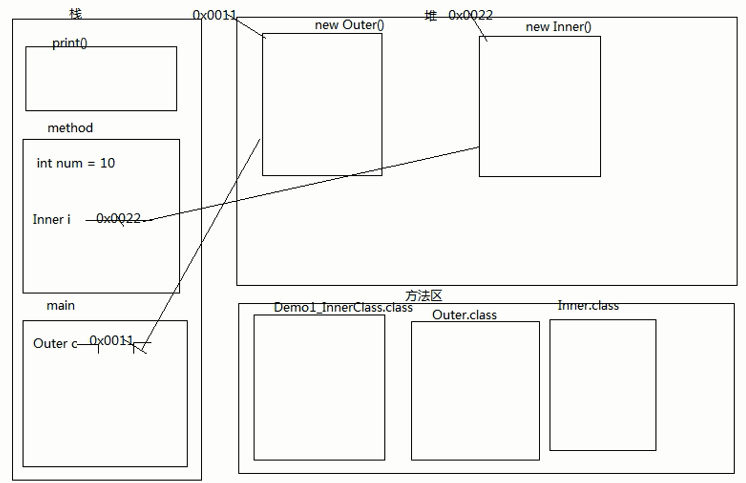
内部类 内部类访问特点
内部类可以直接访问外部类的成员,包括私有。
外部类要访问内部类的成员,必须创建对象外部类名 内部类名.对象名=外部类对象 内部类对象;
1 2 3 4 5 6 7 8 9 10 11 12 13 14 15 16 17 class Demo1_InnerClass public static void main (String[] args) Outer.Inner oi = new Outer().new Inner () ; oi.method(); } } class Outer private int num = 10 ; class Inner public void method () System.out.println(num); } } }
局部内部类的final问题 1 2 3 4 5 6 7 8 9 10 11 12 13 14 15 16 17 18 19 20 21 class Demo1_InnerClass public static void main (String[] args) Outer o = new Outer(); o.method(); } } class Outer public void method () final int num = 10 ; class Inner public void print () System.out.println(num); } } Inner i = new Inner(); i.print(); } }
final int num = 10;使用final的原因 :
延长num的生命周期 .
局部内部类在访问他所在方法中的局部变量必须用final修饰,为什么?
因为当调用这个方法时,局部变里如果没有用1na1final修饰,他的生命周期和方法的生命周期是一样的,当方法弹栈,这个局部变量也会消失,
那么如果局部内部类对像还没有马上消失想用这个局部变量就没有了,如果用final修饰会在类加载的时候进入常量池,即使方法弹栈,常量池的常量还在,也可以继续使用
获取类 1 2 3 4 5 6 7 8 9 10 public class Student public static void main (String[] args) Person person = new Person(); Class cls = person.getClass(); System.out.println(cls.getName()); } } class Person }
equals
普通的equals比较的是地址值
但是String类的equals比较的是值
1 2 3 4 5 6 7 8 9 10 11 12 13 14 15 16 17 18 19 20 21 22 23 public class Testing2 public static void main (String[] args) Person p1 = new Person("hyl" ); Person p2 = new Person("hyl" ); boolean flag = p1.equals(p2); System.out.println(flag); } } class Person String name; public Person (String name) this .name = name; } @Override public boolean equals (Object obj) Person p = (Person) obj; return this .name.equals(p.name); } }
==号和equals方法的区别
==是一个比较运算符号,既可以比较基本数据类型,也可以比较引用数据类型,
基本数据类型比较的是值,
引用数据类型比较的是地址值
equals方法是一个方法,只能比较引用数据类型,所有的对象都会继承Object类中的方法,如果没有重写Object类中的equals方法,equals方法和==号比较引用数据类型无区别 ,重写后的equals方法比较的是对象中的属性
Scanner 1 2 3 4 5 6 7 8 9 10 11 12 13 14 import java.util.Scanner;public class Testing public static void main (String[] args) Scanner sc = new Scanner(System.in); if (sc.hasNextInt()){ int i = sc.nextInt(); System.out.println(i); }else { System.out.println("输入类型错误" ); } } }
注意:
1 2 3 4 5 6 7 8 9 10 11 12 import java.util.Scanner;public class Testing public static void main (String[] args) Scanner sc = new Scanner(System.in); int i = sc.nextInt(); String j = sc.nextLine(); System.out.println(i + "..." + j + "+++" ); } }
当我们键入99后直接就会打印99...+++
原因:
nextInt()是键盘录入整数的方法,当我们录入10的时候其实在键盘上录入的是10和\r\n,nextInt()方法只获取10就结束了
nextLine()是键盘录入字符串的方法,可以接收任意类型, 只要遇到\r\n就证明一行结束
解决方法 : 创建两个Scanner
1 2 3 4 5 6 7 8 9 10 11 12 13 import java.util.Scanner;public class Testing2 public static void main (String[] args) Scanner sc1 = new Scanner(System.in); Scanner sc2 = new Scanner(System.in); int i = sc1.nextInt(); String j = sc2.nextLine(); System.out.println(i + "..." + j + "+++" ); } }
String类 构造器
public String():空构造
public String(byte[] bytes):把字节数组转成字符串
public String(byte[] bytes,int index,int length):把字节数组的一部分转成字符串
public String(char[] value):把字符数组转成字符串
public String(char[] value,int index,int count):把字符数组的一部分转成字符串
public String(String original):把字符串常量值转成字符串
1 2 3 4 5 6 7 8 9 10 11 12 13 14 15 16 17 18 19 20 21 22 23 24 25 public class Demo2_StringCon public static void main (String[] args) String s1 = new String(); System.out.println(s1); byte [] arr1 = {97 ,98 ,99 }; String s2 = new String(arr1); System.out.println(s2); byte [] arr2 = {97 ,98 ,99 ,100 ,101 ,102 }; String s3 = new String(arr2,2 ,3 ); System.out.println(s3); char [] arr3 = {'a' ,'b' ,'c' ,'d' ,'e' }; String s4 = new String(arr3); System.out.println(s4); String s5 = new String(arr3,1 ,3 ); System.out.println(s5); String s6 = new String("heima" ); System.out.println(s6); } }
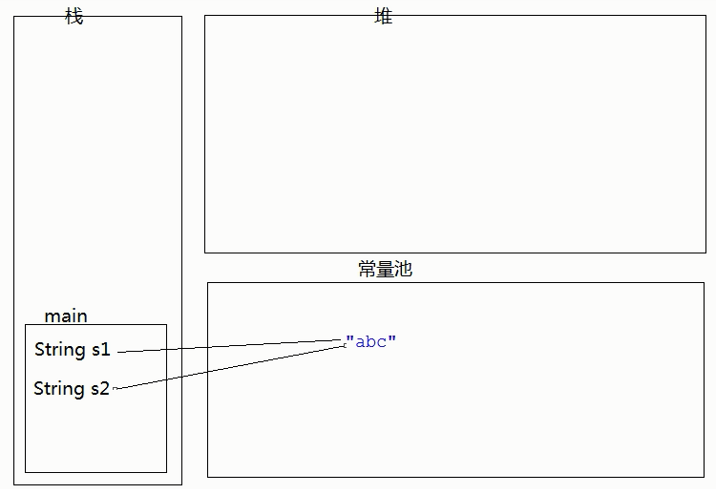
String的== 1 2 3 4 String s1 = "abc" ; String s2 = "abc" ; System.out.println(s1==s2);
的原因:
String s1 = new String(“abc”) 与 String s1 = “abc”的区别 1 2 3 4 5 6 7 8 9 public class Student public static void main (String[] args) String str1 = "abc" ; String str2 = new String("abc" ); System.out.println(str1 == str2); System.out.println(str1.equals(str2)); } }
String str1 = "abc" : 记录的是堆内存对象的地址值String str2 = new String("abc") : 记录的是常量池中的地址值
1 2 3 4 5 6 7 8 9 10 11 public class Testing public static void main (String[] args) String s1 = "a" + "b" + "c" ; String s2 = "abc" ; System.out.println(s1==s2); String s3 = "ab" ; String s4 = s3 + "c" ; System.out.println(s2==s4); } }
原因 : Java的常量 优化机制
当两边都是常量,在编译的时候会自动合并String s1 = "a" + "b" + "c"; 自动变成 String s1 = "abc";
StringBuffer StringBuffer和String的区别
String是一个不可变的字符序列
StringBuffer是一个可变的字符序列
StringBuffer的添加功能 1 2 3 4 5 6 7 8 9 10 11 12 13 public class Testing public static void main (String[] args) StringBuffer sb = new StringBuffer(); StringBuffer sb2 = sb.append(true ); StringBuffer sb3 = sb.append("hyl" ); StringBuffer sb4 = sb.append(10 ); System.out.println(sb.toString()); System.out.println(sb2.toString()); System.out.println(sb3.toString()); System.out.println(sb4.toString()); } }
上面都是返回truehyl10 . 原因:
append把任意类型数据添加到字符串缓冲区里面,并返回字符串缓冲区本身 . 所以sb,sb2,sb3,sb4都是同一个
sb.insert同理
StringBuffer是字符串缓冲区,当new的时候是在堆内存创建了一个对象,底层是一个长度为16的字符数组当调用添加的方法时,不会再重新创建对象,在不断向原缓冲区添加字符
StringBuffer和String对象的互转 1 2 3 4 5 6 7 8 9 10 11 12 13 14 15 16 17 18 19 20 21 22 23 24 public class Testing2 public static void main (String[] args) StringBuffer sb1 = new StringBuffer("hyl" ); System.out.println(sb1); StringBuffer sb2 = new StringBuffer(); sb2.append("hyl2" ); System.out.println(sb2); String str1 = new String(sb1); System.out.println(str1); String str2 = sb2.toString(); System.out.println(str2); String str3 = sb2.substring(0 ); System.out.println(str3); } }
Int与String的互转 1 2 3 4 5 6 7 8 9 10 11 12 13 14 15 16 17 18 public class Testing4 public static void main (String[] args) int i = 100 ; String str1 = i + "" ; String str2 = String.valueOf(i); String str3 = new Integer(i).toString(); String str4 = Integer.toString(i); System.out.println(str4); } }
1 2 3 4 5 6 7 8 9 10 11 12 public class Testing5 public static void main (String[] args) String str = "200" ; int i1 = new Integer(str).intValue(); int i2 = Integer.parseInt(str); System.out.println(i2); } }
自动装箱和自动拆箱
自动装箱:把基本类型转换为包装类类型
自动拆箱:把包装类类型转换为基本类型
1 2 3 4 5 Integer i = 100 ; int z = i+ 100 ;
Java的小整数静态内存区
-128到127是byte的取值范围,如果在这个取值范围内,自动装箱就不会新创建对象,而是从常量池中获取
如果超过了byte取值范围就会再新创建对象
1 2 3 4 5 6 7 8 9 10 11 12 13 14 15 public class student5 public static void main (String[] args) Integer i5 = 127 ; Integer i6 = 127 ; System.out.println(i5 == i6); System.out.println(i5.equals(i6)); System.out.println("-----------" ); Integer i7 = 128 ; Integer i8 = 128 ; System.out.println(i7 == i8); System.out.println(i7.equals(i8)); } }
异常 直接子类:Error,Exception
JVM默认是如何处理异常的
main函数收到这个问题时,有两种处理方式:
自己将该问题处理,然后继续运行
自己没有针对的处理方式,只有交给调用main的jvm来处理
JVM有一个默认的异常处理机制,就将该异常进行处理 . 并将该异常的名称,异常的信息.异常出现的位置打印在了控制台上,同时将程序停止运行
1 2 3 4 5 6 7 8 9 10 11 12 13 14 public class Testing public static void main (String[] args) try { int a = 10 / 0 ; System.out.println(a); } catch (ArithmeticException e) { System.out.println("除数为零" ); } catch (Exception e) { System.out.println("其他错误" ); } } }
编译期异常和运行期异常的区别 Java中的异常被分为两大类:编译时异常和运行时异常。
所有的RuntimeException类及其子类的实例被称为运行时异常,其他的异常就是编译时异常
编译时异常:Java程序必须显式处理,否则程序就会发生错误,无法通过编译
运行时异常:无需显式处理,也可以和编译时异常一样处理
简单来说:
编译时异常:就是未雨绸缪的异常
运行时异常:就是程序员所犯得错误,需要回来修改代码
异常的方法
e.getMessage() : 获取异常信息,返回字符串。
e.toString() : 获取异常类名和异常信息,返回字符串。
e.printStackTrace() : 获取异常类名和异常信息,以及异常出现在程序中的位置。返回值void。
1 2 3 4 5 6 7 8 9 10 11 12 13 14 15 16 public class Testing public static void main (String[] args) try { int a = 10 / 0 ; System.out.println(a); } catch (ArithmeticException e) { System.out.println(e.getMessage()); System.out.println(e.toString()); e.printStackTrace(); } } }
自定义异常 1 2 3 4 5 6 7 8 9 10 11 12 13 14 15 16 17 18 19 public class Testing2 public static void main (String[] args) throws MyException throw new MyException("this is msg" ); } } class MyException extends Exception public MyException () super (); } public MyException (String msg) super (msg); } }
异常注意事项
原则 : 如果该功能内部可以将问题处理,用try,如果处理不了,交由调用者处理,这是用throws
子类重写父类方法时,子类的方法必须抛出相同的异常或父类异常的子类 。(子类的异常要更为细致)
如果父类抛出了多个异常,子类重写父类时,只能抛出相同的异常或者是他的子集,子类不能抛出父类没有的异常
如果被重写的方法没有异常抛出,那么子类的方法绝对不可以抛出异常,如果子类方法内有异常发生,那么子类只能try,不能throws
finally注意 1 2 3 4 5 6 7 8 9 10 11 12 13 14 15 16 17 18 19 20 public class Testing public static void main (String[] args) System.out.println(demo()); } public static int demo () int a = 10 ; try { a = 20 ; System.out.println(a / 0 ); return a; } catch (Exception e) { a = 30 ; return a; } finally { a = 40 ; } } }
装饰器 1 2 3 4 5 6 7 8 9 10 11 12 13 14 15 16 17 18 19 20 21 22 23 24 25 26 27 28 29 30 31 32 33 34 35 36 37 38 39 public class Demo6_Wrap public static void main (String[] args) HeiMaStudent hms = new HeiMaStudent(new Student()); hms.code(); } } interface Coder public void code () } class Student implements Coder @Override public void code () System.out.println("javase" ); System.out.println("javaweb" ); } } class HeiMaStudent implements Coder private Student s; public HeiMaStudent (Student s) this .s = s; } @Override public void code () s.code(); System.out.println("ssh" ); System.out.println("数据库" ); System.out.println("大数据" ); System.out.println("..." ); } }
对比python
1 2 3 4 5 6 7 8 9 10 def deco (func ): def wrapper (*args,**kwargs ): return func(*args,*kwargs) + 100 return wrapper @deco def func (): return 10 print (func())
python和Java在装饰器的异同
python是使用函数作为装饰器的参数 , java是使用类实例作为装饰器的参数
python是在闭包里面调用原函数 , java是在类方法里面调用原类方法
java的装饰器模式有点类似于Python的has a模式
has a模式是 : Car类的wheel属性是Wheel类实例 , 在Car类的run()方法里在调用wheel属性的roll()方法
java装饰器模式是 : SuperMan类的man属性是Man类实例 , 在SuperMan类的work()方法里调用man属性的work()方法
1 2 3 4 5 6 7 8 9 10 11 12 13 14 15 16 17 18 19 20 class Car : def __init__ (self,wheel ): self.wheel = wheel def run (self ): self.wheel.roll() class Wheel : def __init__ (self,size ): self.size = size def roll (self ): print ('the wheel has rolled' ) wheel = Wheel(18 ) mycar = Car(wheel) mycar.run()
1 2 3 4 5 6 7 8 9 10 11 12 13 14 15 16 17 18 19 20 21 22 23 24 25 26 27 28 29 30 31 32 33 34 35 public class Testing3 public static void main (String[] args) Man man = new Man("hyl" ); SuperMan me = new SuperMan(man); me.work(); } } class Man public String name; public Man (String name) this .name = name; } public void work () System.out.println(this .name + " is workding" ); } } class SuperMan public Man man; public SuperMan (Man man) this .man = man; } public void work () String msg = "this is a Superman. " ; System.out.println(msg); this .man.work(); } }
正则 简单使用 1 2 3 4 5 6 7 8 public class Testing public static void main (String[] args) String re = "[1-9]\\d{4,14}" ; boolean flag = "123456789" .matches(re); System.out.println(flag); } }
Java的split的参数既可以是普通字符也可以是正则
1 2 3 4 5 6 7 8 9 import java.util.Arrays;public class Testing public static void main (String[] args) String msg = "hyl_dsz+czj*gzr" ; String[] arr = msg.split("[_+*]" ); System.out.println(Arrays.toString(arr)); } }
使用模板 1 2 3 4 5 6 7 8 9 public class Testing2 public static void main (String[] args) Pattern p = Pattern.compile("a*b" ); Matcher m = p.matcher("aaaaab" ); boolean b = m.matches(); System.out.println(b); } }
Java特有正则
[a-d[m-p]] : 等同于 [a-dm-p] ,a到d或m到p.(交集)[a-z && [def]] : d或e或f(交集)
Math类 1 2 3 4 5 6 7 8 9 10 11 12 13 14 15 public class Testing public static void main (String[] args) System.out.println(Math.PI); System.out.println(Math.abs(-10 )); System.out.println(Math.ceil(13.9 )); System.out.println(Math.floor(-11.5 )); System.out.println(Math.max(1 , 2 )); System.out.println(Math.pow(2 , 3 )); System.out.println(Math.random()); System.out.println(Math.round(12.5f )); System.out.println(Math.sqrt(4 )); } }
Random类 1 2 3 4 5 6 7 8 9 10 11 12 import java.util.Random;public class Testing2 public static void main (String[] args) Random r = new Random(); for (int i = 0 ; i < 10 ; i++) { System.out.println(r.nextInt(100 )); } } }
System类 System类全部都是静态方法 ,不能被实例化。在System类提供的设施中,有
标准输入、标准输出和错误输出流;
对外部定义的属性和环境变量的访问;
加载文件和库的方法;
还有快速复制数组的部分的实用方法。
方法
public static void gc() : 运行垃圾回收机制public static void exit(int status) : 终止当前正在运行的Java虚拟机。根据惯例,非0的状态码表示异常终止public static long currentTimeMillis() : 返回以毫秒为单位的当前时间。pubiic static void arraycopy(Object src, int srcPos, Object dest, int destPos, int length)
1 2 3 4 5 6 7 8 9 10 11 12 13 14 15 16 17 18 19 20 21 22 23 24 public class Testing4 public static void main (String[] args) for (int i = 0 ; i < 100 ; i++) { new Demo(); System.gc(); } } } class Demo @Override public void finalize () System.out.println("垃圾被清扫了" ); } }
1 2 3 4 5 6 7 8 9 10 public class Testing4 public static void main (String[] args) System.out.println("1111" ); System.exit(1 ); System.out.println("2222" ); } }
1 2 3 4 5 6 7 public class Testing5 public static void main (String[] args) long start = System.currentTimeMillis(); System.out.println(start); } }
1 2 3 4 5 6 7 8 9 10 11 12 13 14 15 16 17 18 19 20 21 import java.util.Arrays;public class Testing4 public static void main (String[] args) int [] src = {11 ,22 ,33 ,44 ,55 }; int [] dest = new int [8 ]; System.out.println(Arrays.toString(src)); System.arraycopy(src, 0 , dest, 0 , src.length); System.out.println(Arrays.toString(dest)); } }
BigInteger类 超过Integer范围内的数据进行运算
public BigInteger add(BigInteger val)
public BigInteger subtract(BigInteger val)
public BigInteger multiply(BigInteger val)
public BigInteger divide(BigInteger val)
public BigInteger[] divideAndRemainder(BigInteger val)
1 2 3 4 5 6 7 8 9 10 11 12 13 import java.math.BigInteger;import java.util.Arrays;public class Testing public static void main (String[] args) BigInteger bi1 = new BigInteger("100" ); BigInteger bi2 = new BigInteger("10" ); System.out.println(bi1.subtract(bi2)); BigInteger[] a = bi1.divideAndRemainder(bi2); System.out.println(Arrays.toString(a)); } }
BigDecimal类 为了能精确的表示、计算浮点数,Java提供了BigDecimal
public BigDecimal add(BigDecimal augend)
public BigDecimal subtract(BigDecimal subtrahend)
public BigDecimal multiply(BigDecimal multiplicand)
public BigDecimal divide(BigDecimal divisor)
1 2 3 4 5 6 7 8 9 10 11 12 13 14 15 16 17 18 19 20 public class Demo5_BigDecimal public static void main (String[] args) System.out.println(2.0 - 1.1 ); BigDecimal bd1 = new BigDecimal(2.0 ); BigDecimal bd2 = new BigDecimal(1.1 ); System.out.println(bd1.subtract(bd2)); BigDecimal bd1 = new BigDecimal("2.0" ); BigDecimal bd2 = new BigDecimal("1.1" ); System.out.println(bd1.subtract(bd2)); BigDecimal bd1 = BigDecimal.valueOf(2.0 ); BigDecimal bd2 = BigDecimal.valueOf(1.1 ); System.out.println(bd1.subtract(bd2)); } }
Date类 类 Date 表示特定的瞬间,精确到毫秒。
构造方法
public Date()
public Date(long date)
成员方法
public long getTime()
public void setTime(long time)
1 2 3 4 5 6 7 8 9 10 11 12 13 14 15 16 17 18 19 import java.util.Date;public class Testing2 public static void main (String[] args) Date d1 = new Date(); System.out.println(d1); Date d2 = new Date(59 ); System.out.println(d2); System.out.println(d1.getTime()); System.out.println(System.currentTimeMillis()); d2.setTime(10 ); System.out.println(d2); } }
DateFormat 是日期/时间格式化子类的抽象类,它以与语言无关的方式格式化并解析日期或时间。
DateFormat 子类是 SimpleDateFormat
构造方法
成员方法
1 2 3 4 5 6 7 8 9 10 import java.text.SimpleDateFormat;import java.util.Date;public class Testing3 public static void main (String[] args) Date d = new Date(); SimpleDateFormat sdf = new SimpleDateFormat("yyyy年MM月dd日 HH:mm:ss" ); System.out.println(sdf.format(d)); } }
1 2 3 4 5 6 7 8 9 10 11 12 13 import java.text.ParseException;import java.text.SimpleDateFormat;import java.util.Date;public class Testing2 public static void main (String[] args) throws ParseException String str = "2000年08月08日 08:08:08" ; SimpleDateFormat sdf = new SimpleDateFormat("yyyy年MM月dd日 HH:mm:ss" ); Date d = sdf.parse(str); System.out.println(d); } }
Calendar类 Calendar 类是一个抽象类,它为特定瞬间与一组诸如 YEAR、MONTH、DAY_OF_MONTH、HOUR 等日历字段之间的转换提供了一些方法,并为操作日历字段(例如获得下星期的日期)提供了一些方法。
成员方法
public static Calendar getInstance()
public int get(int field)
public void add(int field,int amount)
public final void set(int year,int month,int date)
1 2 3 4 5 6 7 8 9 import java.util.Calendar;public class Testing3 public static void main (String[] args) Calendar c = Calendar.getInstance(); System.out.println(c.get(Calendar.YEAR)); System.out.println(c.get(Calendar.MONTH)); } }
1 2 3 4 5 6 7 8 9 10 11 12 13 14 15 16 17 18 import java.util.Calendar;public class Testing4 public static void main (String[] args) Calendar c = Calendar.getInstance(); System.out.println(c.get(c.YEAR)); c.add(Calendar.YEAR,1 ); System.out.println(c.get(c.YEAR)); c.set(c.YEAR, 2009 ); System.out.println(c.get(c.YEAR)); c.set(2009 ,8 ,6 ); System.out.println(c.get(c.YEAR) + " " + c.get(c.MONDAY) + " " + c.get(c.DAY_OF_MONTH)); } }
判断平年润年 :
通过set方法设置为那一年的3月1日 , 将日向前减去1判断日是多少天,如果是29天返回true否则返回false
1 2 3 4 5 6 7 8 9 10 11 12 13 14 15 16 17 18 19 20 import java.util.Calendar;import java.util.Scanner;public class Testing5 public static void main (String[] args) Scanner sc = new Scanner(System.in); System.out.println("请输入年份" ); int year = sc.nextInt(); boolean b = getYear(year); System.out.println(b); } public static boolean getYear (int year) Calendar c = Calendar.getInstance(); c.set(year,2 ,1 ); c.add(Calendar.DAY_OF_MONTH,-1 ); return c.get(Calendar.DAY_OF_MONTH) == 29 ; } }