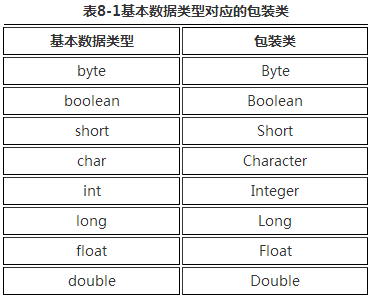
包装类 Java是面向对象的语言,但并不是纯面向对象的,因为我们经常用到的基本数据类型就不是对象 。
但是我们在实际应用中经常需要将基本数据转化成对象,以便于操作。比如:将基本数据类型存储到Object[]数组或集合中的操作等等。
为了解决这个不足,Java在设计类时为每个基本数据类型设计了一个对应的类进行代表,这样八个和基本数据类型对应的类统称为包装类(Wrapper Class)。
在这八个类名中,除了Integer和Character类以外,其它六个类的类名和基本数据类型一致,只是类名的第一个字母大写而已。
在这八个类中,除了Character和Boolean以外,其他的都是数字型,
“数字型”都是java.lang.Number的子类。Number类是抽象类,因此它的抽象方法,所有子类都需要提供实现。
Number类提供了抽象方法:intValue()、longValue()、floatValue()、doubleValue(),意味着所有的“数字型”包装类都可以互相转型。
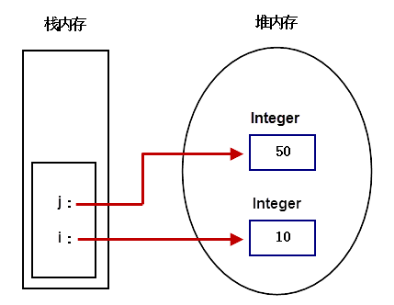
1
2
3
4
5
6
public class WrapperClassTest public static void main (String[] args) Integer i = new Integer(10 ); Integer j = new Integer(50 ); } }
字符串、基本类型、包装类互转 1 2 3 4 5 6 7 8 9 10 11 12 13 14 15 16 17 18 19 20 import java.util.Arrays;public class student4 public static void main (String[] args) Integer a = new Integer(3 ); int b = a.intValue(); double c = a.doubleValue(); Integer d = new Integer("9999" ); Integer e = Integer.parseInt("9998" ); String str = e.toString(); } }
自动装箱和拆箱 自动装箱和拆箱就是将基本数据类型和包装类之间进行自动的互相转换。
自动装箱过程是通过调用包装类的valueOf()方法实现的,而自动拆箱过程是通过调用包装类的 xxxValue()方法实现的(xxx代表对应的基本数据类型,如intValue()、doubleValue()等)。
1 2 3 4 5 6 7 8 9 10 Integer i = 100 ; Integer i = Integer.valueOf(100 ); Integer i = 100 ; int j = i;int j = i.intValue();
包装类的缓存问题
整型、char类型所对应的包装类,在自动装箱时,对于-128~127之间的值会进行缓存处理,其目的是提高效率。
缓存处理的原理为:如果数据在-128~127这个区间,那么在类加载时就已经为该区间的每个数值创建了对象,并将这256个对象存放到一个名为cache的数组中 。每当自动装箱过程发生时(或者手动调用valueOf()时),就会先判断数据是否在该区间,如果在则直接获取数组中对应的包装类对象的引用,如果不在该区间,则会通过new调用包装类的构造方法来创建对象。
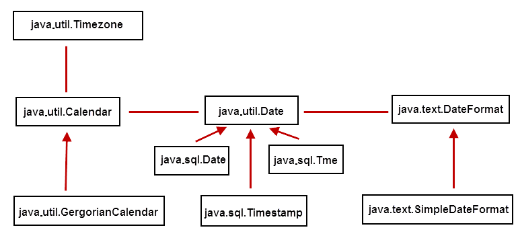
时间相关类的转化关系
Date时间类(java.util.Date)
Date() 分配一个Date对象,并初始化此对象为系统当前的日期和时间,可以精确到毫秒)。
Date(long date) 分配 Date 对象并初始化此对象,时间戳
boolean after(Date when) 测试此日期是否在指定日期之后。
boolean before(Date when) 测试此日期是否在指定日期之前。
boolean equals(Object obj) 比较两个日期的相等性。
long getTime() 返回自 1970 年 1 月 1 日 00:00:00 GMT 以来此 Date 对象表示的毫秒数。
String toString() 把此 Date 对象转换为以下形式的 String:
1 2 3 4 5 6 7 8 9 10 11 12 13 14 15 import java.util.Date;public class Student public static void main (String[] args) Date d = new Date(); System.out.println(d); System.out.println(d.getTime()); Date d2 = new Date(2000 ); System.out.println(d2.getTime()); Date d3 = new Date(2020 -1900 ,9 ,21 ); System.out.println(d3.getTime()); } }
DateFormat类的作用
把时间对象转化成指定格式的字符串。反之,把指定格式的字符串转化成时间对象。
DateFormat是一个抽象类,一般使用它的子类SimpleDateFormat类来实现。
1 2 3 4 5 6 7 8 9 10 11 12 13 14 15 16 17 18 19 20 21 22 23 24 import java.text.ParseException;import java.text.SimpleDateFormat;import java.util.Date;public class student4 public static void main (String[] args) throws ParseException SimpleDateFormat s1 = new SimpleDateFormat("yyyy-MM-dd hh:mm:ss" ); SimpleDateFormat s2 = new SimpleDateFormat("yyyy-MM-dd" ); String daytime = s1.format(new Date()); System.out.println(daytime); System.out.println(s2.format(new Date())); System.out.println(new SimpleDateFormat("hh:mm:ss" ).format(new Date())); String time = "2007-10-7" ; Date date = s2.parse(time); System.out.println("date1: " + date); time = "2007-10-7 20:15:30" ; date = s1.parse(time); System.out.println("date2: " + date); } }
format : 时间对象转为字符串
parse : 字符串转为时间对象
有点类似于Python中的strftime()和strptime()
Calendar日历类 Calendar 类是一个抽象类,为我们提供了关于日期计算的相关功能,比如:年、月、日、时、分、秒的展示和计算。
GregorianCalendar 是 Calendar 的一个具体子类,提供了世界上大多数国家/地区使用的标准日历系统。
注意月份的表示,一月是0,二月是1,以此类推,12月是11。
因为大多数人习惯于使用单词而不是使用数字来表示月份,这样程序也许更易读,父类Calendar使用常量来表示月份:JANUARY、FEBRUARY等等。
1 2 3 4 5 6 7 8 9 10 11 12 13 14 15 16 17 18 19 20 21 22 23 24 25 26 27 28 29 30 31 32 33 34 35 36 37 38 39 40 41 import java.util.Calendar;import java.util.Date;import java.util.GregorianCalendar;public class student4 public static void main (String[] args) Calendar calendar = new GregorianCalendar(2019 , 10 , 9 , 22 , 10 , 55 ); System.out.println(calendar); int year = calendar.get(Calendar.YEAR); int month = calendar.get(Calendar.MONTH); int day = calendar.get(Calendar.DATE); int week = calendar.get(Calendar.DAY_OF_WEEK); System.out.println(year); System.out.println(week); Calendar calendar2 = new GregorianCalendar(); System.out.println(calendar2.get(Calendar.YEAR)); calendar2.set(Calendar.YEAR, 2020 ); System.out.println(calendar2.get(Calendar.YEAR)); Calendar calendar3 = new GregorianCalendar(); System.out.println(calendar3.get(Calendar.DATE)); calendar3.add(Calendar.DATE, 3 ); System.out.println(calendar3.get(Calendar.DATE)); calendar3.add(Calendar.DATE, -3 ); System.out.println(calendar3.get(Calendar.DATE)); Calendar c = new GregorianCalendar(); Date d = c.getTime(); System.out.println(d); Calendar c2 = new GregorianCalendar(); c2.setTime(new Date()); } }
Math类 java.lang.Math提供了一系列静态方法用于科学计算;其方法的参数和返回值类型一般为double型。如果需要更加强大的数学运算能力,计算高等数学中的相关内容,可以使用apache commons下面的Math类库。
abs 绝对值
acos,asin,atan,cos,sin,tan 三角函数
sqrt 平方根
pow(double a, double b) a的b次幂
max(double a, double b) 取大值
min(double a, double b) 取小值
ceil(double a) 大于a的最小整数
floor(double a) 小于a的最大整数
random() 返回 0.0 到 1.0 的随机数
long round(double a) double型的数据a转换为long型(四舍五入)
toDegrees(double angrad) 弧度->角度
toRadians(double angdeg) 角度->弧度
1 2 3 4 5 6 7 8 9 10 11 12 13 14 15 16 17 18 19 public class TestMath public static void main (String[] args) System.out.println(Math.ceil(3.2 )); System.out.println(Math.floor(3.2 )); System.out.println(Math.round(3.2 )); System.out.println(Math.round(3.8 )); System.out.println(Math.abs(-45 )); System.out.println(Math.sqrt(64 )); System.out.println(Math.pow(5 , 2 )); System.out.println(Math.pow(2 , 5 )); System.out.println(Math.PI); System.out.println(Math.E); System.out.println(Math.random()); } }
Random类 1 2 3 4 5 6 7 8 9 10 11 12 13 14 15 16 17 18 19 20 import java.util.Random;public class TestRandom public static void main (String[] args) Random rand = new Random(); System.out.println(rand.nextDouble()); System.out.println(rand.nextInt()); System.out.println(rand.nextFloat()); System.out.println(rand.nextBoolean()); System.out.print(rand.nextInt(10 )); System.out.print(20 + rand.nextInt(10 )); System.out.print(20 + (int ) (rand.nextDouble() * 10 )); } }
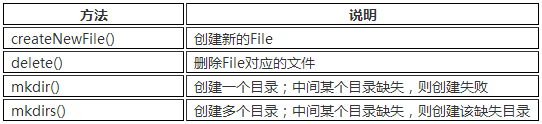
File类 java.io.File类:代表文件和目录。在开发中,读取文件、生成文件、删除文件、修改文件的属性时经常会用到本类。
1 2 3 4 5 6 7 8 9 10 import java.io.File;public class TestFile1 public static void main (String[] args) throws Exception System.out.println(System.getProperty("user.dir" )); File f = new File("a.txt" ); f.createNewFile(); File f2 = new File("d:/b.txt" ); f2.createNewFile(); } }
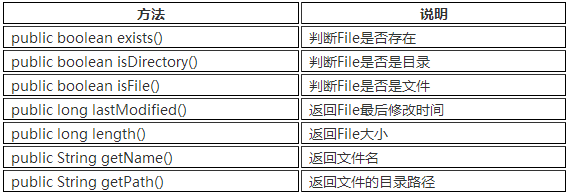
File类访问属性的方法列表:
1 2 3 4 5 6 7 8 9 10 11 12 13 14 15 import java.io.File;import java.util.Date;public class TestFile2 public static void main (String[] args) throws Exception File f = new File("d:/b.txt" ); System.out.println("File是否存在:" +f.exists()); System.out.println("File是否是目录:" +f.isDirectory()); System.out.println("File是否是文件:" +f.isFile()); System.out.println("File最后修改时间:" + new Date(f.lastModified())); System.out.println("File的大小:" +f.length()); System.out.println("File的文件名:" +f.getName()); System.out.println("File的目录路径:" +f.getPath()); } }
通过File对象创建空文件或目录(在该对象所指的文件或目录不存在的情况下):
1 2 3 4 5 6 7 8 9 10 11 12 13 import java.io.File;public class TestFile3 public static void main (String[] args) throws Exception File f = new File("d:/c.txt" ); f.createNewFile(); f.delete(); File f2 = new File("d:/电影/华语/大陆" ); boolean flag = f2.mkdir(); System.out.println(flag); } }
使用递归算法,以树状结构展示目录树:
1 2 3 4 5 6 7 8 9 10 11 12 13 14 15 16 17 18 19 20 21 22 23 24 25 26 27 28 import java.io.File;public class TestFile6 public static void main (String[] args) File f = new File("d:/电影" ); printFile(f, 0 ); } static void printFile (File file, int level) for (int i = 0 ; i < level; i++) { System.out.print("-" ); } System.out.println(file.getName()); if (file.isDirectory()) { File[] files = file.listFiles(); for (File temp : files) { printFile(temp, level + 1 ); } } } }
枚举 枚举体就是放置一些常量。所有的枚举类型隐性地继承自 java.lang.Enum。
枚举实质上还是类!而每个被枚举的成员实质就是一个枚举类型的实例,他们默认都是public static final修饰的。可以直接通过枚举类型名使用它们。
1 2 3 enum Season SPRING, SUMMER, AUTUMN, WINDER }
1 2 3 4 5 6 7 8 9 10 public class student2 public static void main (String[] args) throws Exception System.out.println(Season.SPRING); } } enum Season SUMMER, AUTUMN, WINTER; }
异常 1 2 3 4 5 try { copyFile("d:/a.txt" ,"e:/a.txt" ); } catch (Exception e) { e.printStackTrace(); }
Java是采用面向对象的方式来处理异常的。处理过程:
抛出异常:在执行一个方法时,如果发生异常,则这个方法生成代表该异常的一个对象,停止当前执行路径,并把异常对象提交给JRE。
捕获异常:JRE得到该异常后,寻找相应的代码来处理该异常。JRE在方法的调用栈中查找,从生成异常的方法开始回溯,直到找到相应的异常处理代码为止。
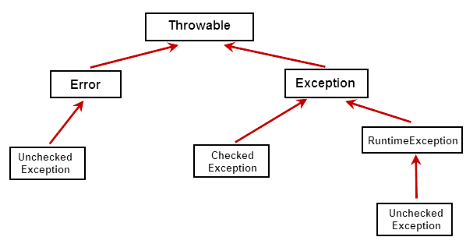
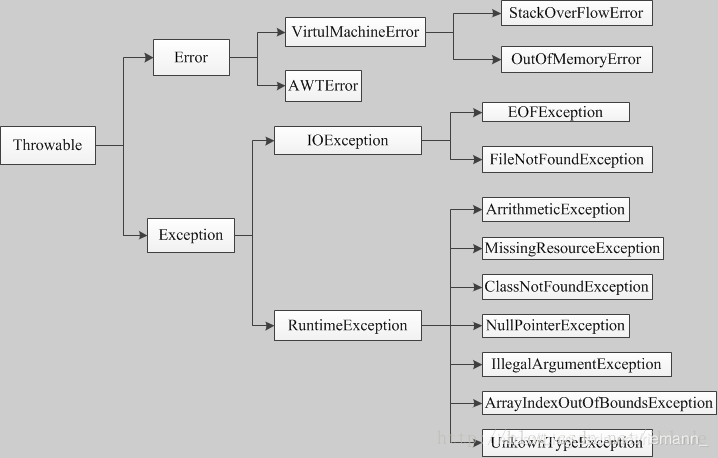
异常分类
Error是程序无法处理的错误 ,表示运行应用程序中较严重问题。
大多数错误与代码编写者执行的操作无关,而表示代码运行时 JVM(Java 虚拟机)出现的问题。
例如,Java虚拟机运行错误(Virtual MachineError),当 JVM 不再有继续执行操作所需的内存资源时,将出现 OutOfMemoryError。这些异常发生时,Java虚拟机(JVM)一般会选择线程终止。
Error表明系统JVM已经处于不可恢复的崩溃状态中。我们不需要管它。
Error与Exception的区别:
我开着车走在路上,一头猪冲在路中间,我刹车。这叫一个异常。
我开着车在路上,发动机坏了,我停车,这叫错误。
Exception可分为:
RuntimeException 运行时异常
CheckedException 已检查异常
runtime exception: 运行时异常是可能被程序员避免的异常 。与检查性异常相反,运行时异常可以在编译时被忽略。不需要try-catch;
checked exception:最具代表的检查性异常是用户错误或问题引起的异常,这是程序员无法预见的 。例如要打开一个不存在文件时,一个异常就发生了,这些异常在编译时不能被简单地忽略。需要try-catch;
checked exception,也就是我们经常遇到的IO异常,以及SQL异常都是这种异常。
对于这种异常,JAVA编译器强制要求我们必需对出现的这些异常进行catch。
所以,面对这种异常不管我们是否愿意,只能自己去写一大堆catch块去处理可能的异常。
这类异常一般是外部错误,例如试图从文件尾后读取数据等**,这并不是程序本身的错误,而是在应用环境中出现的外部错误**.
runtime exception,也称运行时异常,我们可以不处理 。
当出现这样的异常时,总是由虚拟机接管。
比如:我们从来没有人去处理过NullPointerException异常,它就是运行时异常,并且这种异常还是最常见的异常之一。
RuntimeException体系包括错误的类型转换、数组越界访问和试图访问空指针等等.
处理RuntimeException的原则是 : 假如出现RuntimeException,那么一定是程序员的错误 . 例如,可以通过检查数组下标和数组边界来避免数组越界访问异常.
出现运行时异常后,系统会把异常一直往上层抛,一直遇到处理代码。
如果没有处理块,到最上层,
如果是多线程就由Thread.run()抛出,如果是单线程就被main()抛出。抛出之后,如果是线程,这个线程也就退出了。
如果是主程序抛出的异常,那么这整个程序也就退出了。
运行时异常是Exception的子类,也有一般异常的特点,是可以被Catch块处理的。只不过往往我们不对他处理罢了。也就是说,你如果不对运行时异常进行处理,那么出现运行时异常之后,要么是线程中止,要么是主程序终止。
1 2 3 4 5 6 7 8 9 10 11 12 13 14 15 16 17 18 19 20 21 22 23 24 25 26 27 28 29 30 import java.io.FileNotFoundException;import java.io.FileReader;import java.io.IOException;public class Test8 public static void main (String[] args) FileReader reader = null ; try { reader = new FileReader("d:/a.txt" ); char c = (char ) reader.read(); char c2 = (char ) reader.read(); System.out.println("" + c + c2); } catch (FileNotFoundException e) { e.printStackTrace(); } catch (IOException e) { e.printStackTrace(); } finally { try { if (reader != null ) { reader.close(); } } catch (Exception e) { e.printStackTrace(); } } } }
声明异常(throws子句) 当CheckedException产生时,不一定立刻处理它,可以再把异常throws出去。在方法中使用try-catch-finally是由这个方法来处理异常。但是在一些情况下,当前方法并不需要处理发生的异常,而是向上传递给调用它的方法处理。
如果一个方法中可能 产生某种异常,但是并不能确定如何处理这种异常,则应根据异常规范在方法的首部声明该方法可能抛出的异常。
1 2 3 4 5 6 7 8 9 10 11 12 13 14 15 16 17 18 19 20 21 22 23 24 25 26 27 28 29 30 31 32 33 import java.io.FileNotFoundException;import java.io.FileReader;import java.io.IOException;public class Test9 public static void main (String[] args) try { readFile("joke.txt" ); } catch (FileNotFoundException e) { System.out.println("所需文件不存在!" ); } catch (IOException e) { System.out.println("文件读写错误!" ); } } public static void readFile (String fileName) throws FileNotFoundException, IOException { FileReader in = new FileReader(fileName); int tem = 0 ; try { tem = in.read(); while (tem != -1 ) { System.out.print((char ) tem); tem = in.read(); } } finally { in.close(); } } }
自定义异常 自定义异常类只需从Exception类或者它的子类派生一个子类即可。
如果继承Exception类,则为受检查异常,必须对其进行处理;
如果不想处理,可以让自定义异常类继承RuntimeException类。
习惯上,自定义异常类应该包含2个构造器:
默认的构造器,
带有详细信息的构造器。
1 2 3 4 5 6 7 8 9 10 11 class IllegalAgeException extends Exception public IllegalAgeException () } public IllegalAgeException (String message) super (message); } }
示例:
1 2 3 4 5 6 7 8 9 10 11 12 13 14 15 16 17 18 19 20 21 22 23 24 25 26 27 28 29 30 31 32 33 34 35 36 37 class Person private String name; private int age; public void setName (String name) this .name = name; } public void setAge (int age) throws IllegalAgeException if (age < 0 ) { throw new IllegalAgeException("人的年龄不应该为负数" ); } this .age = age; } public String toString () return "name is " + name + " and age is " + age; } } public class TestMyException public static void main (String[] args) Person p = new Person(); try { p.setName("Lincoln" ); p.setAge(-1 ); } catch (IllegalAgeException e) { e.printStackTrace(); System.exit(-1 ); } System.out.println(p); } }
使用异常机制的建议
要避免使用异常处理代替错误处理,这样会降低程序的清晰性,并且效率低下。
处理异常不可以代替简单测试,只在异常情况下使用异常机制。
不要进行小粒度的异常处理,应该将整个任务包装在一个try语句块中。
异常往往在高层处理 。
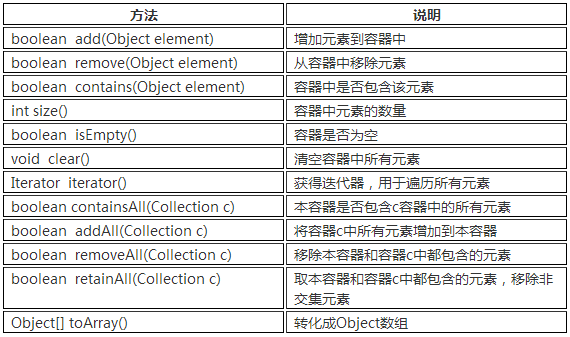
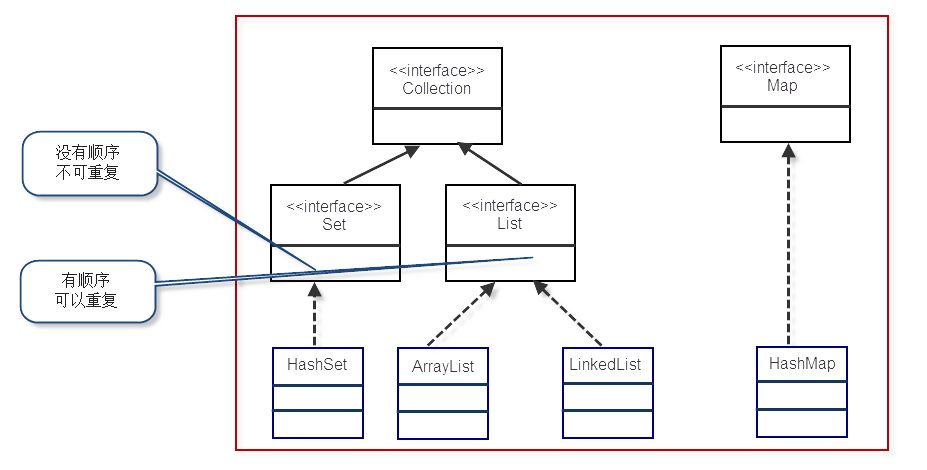
容器 容器,也叫集合(Collection)。我们一般通过容器来容纳和管理数据。数组就是一种容器,可以在其中放置对象或基本类型数据。
泛型 泛型帮助我们建立类型安全的集合。在使用了泛型的集合中,遍历时不必进行强制类型转换。JDK提供了支持泛型的编译器,将运行时的类型检查提前到了编译 时执行,提高了代码可读性和安全性。
泛型的本质就是数据类型的参数化。 我们可以把“泛型”理解为数据类型的一个占位符(形式参数),即告诉编译器,在调用泛型时必须传入实际类型。
泛型就是一种不确定的数据类型。
假如你写了一个链表类,存放的数据是int,然后过了几天你突然有地方又用到链表了,但是这次存的是double。怎么办?重写一遍,就把数据类型改成double?太蠢了,所以这就是泛型存在的意义,只要你声明的时候指定一下,想用double用double,想存int存int。
简单来讲,比如说一个容器中可以放一些规定的东西,但是规定之外的就不能放进去,这时候就需要泛型加以限制 。
比如集合中只能存放对象,就可以使用泛型List list,为了更确定存储的类型,比如只能存储字符串,这时List list.除了泛型规定之外的东西就不能存放到容器中去。总之就是用来限制一定的范围。
泛型的好处:
省略了强转的代码。
可以把运行时的问题提前到编译时期。
1 2 3 4 5 6 7 8 9 10 11 12 13 14 15 16 17 18 19 20 21 22 23 24 25 26 27 28 29 30 31 32 public class student5 public static void main (String[] args) MyCollection<String> mc = new MyCollection<String>(); mc.set("hyl" , 0 ); String a = mc.get(0 ); System.out.println(a); MyCollection<Integer> mc2 = new MyCollection<Integer>(); mc2.set(777 , 0 ); int b = mc2.get(0 ); System.out.println(b); } } class MyCollection <E > Object[] arr = new Object[5 ]; public void set (E e, int idx) arr[idx] = e; } public E get (int idx) return (E) arr[idx]; } }
在类的声明处增加泛型列表,如:<T,E,V>。此处,字符可以是任何标识符,一般采用这3个字母。
ArrayList的接口
1 2 3 4 5 6 7 8 9 10 11 12 13 14 15 16 17 import java.util.ArrayList;public class student2 public static void main (String[] args) ArrayList<String> a = new ArrayList<>(); System.out.println(a.size()); System.out.println(a.isEmpty()); boolean c = a.add("hyl" ); System.out.println(c); boolean d = a.remove("hyl" ); System.out.println(d); Object[] obj = a.toArray(); System.out.println(obj); } }
1 2 3 4 5 6 7 8 9 10 11 12 13 14 15 16 17 18 19 20 21 22 import java.lang.reflect.Array;import java.util.ArrayList;public class student2 public static void main (String[] args) ArrayList<String> a = new ArrayList<>(); a.add("aa" ); a.add("bb" ); a.add("cc" ); ArrayList<String> b = new ArrayList<>(); b.add("aa" ); b.add("dd" ); b.add("ee" ); System.out.println(a); a.addAll(b); System.out.println(a); } }
Set和List的接口 由于List、Set是Collection的子接口,意味着所有List、Set的实现类都有上面的方法。
List接口常用的实现类有3个:ArrayList , LinkedList , Vector
ArrayList和Vector底层是用数组实现 的,因此可以用序号下标来访问他们,查找的效率高,一般数组的大小比要插入的数据大数量要大。
LinkedList的底层使用双向链表实现 的,因此插入和删除的效率高。
List是有序、可重复的容器。
有序: List中每个元素都有索引标记。可以根据元素的索引标记(在List中的位置)访问元素,从而精确控制这些元素。可重复: List允许加入重复的元素。更确切地讲,List通常允许满足 e1.equals(e2) 的元素重复加入容器。
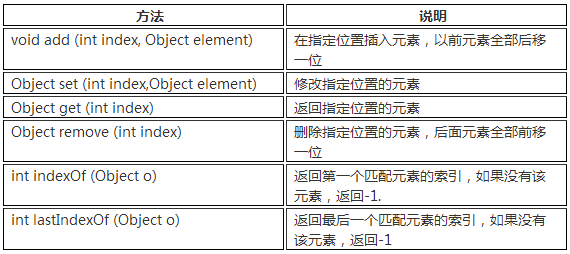
除了Collection接口中的方法,List多了一些跟顺序(索引)有关的方法
1 2 3 4 5 6 7 8 9 10 11 12 13 14 15 16 17 18 19 20 21 22 23 24 25 public class TestList public static void test01 () List<String> list = new ArrayList<String>(); System.out.println(list.isEmpty()); list.add("高淇" ); System.out.println(list.isEmpty()); list.add("高小七" ); list.add("高小八" ); System.out.println(list); System.out.println("list的大小:" + list.size()); System.out.println("是否包含指定元素:" + list.contains("高小七" )); list.remove("高淇" ); System.out.println(list); Object[] objs = list.toArray(); System.out.println("转化成Object数组:" + Arrays.toString(objs)); list.clear(); System.out.println("清空所有元素:" + list); } public static void main (String[] args) test01(); } }
1 2 3 4 5 6 7 8 9 10 11 12 13 14 15 16 17 18 19 20 21 22 23 24 25 26 27 28 29 30 31 public class TestList public static void main (String[] args) test03(); } public static void test03 () List<String> list = new ArrayList<String>(); list.add("A" ); list.add("B" ); list.add("C" ); list.add("D" ); System.out.println(list); list.add(2 , "高" ); System.out.println(list); list.remove(2 ); System.out.println(list); list.set(2 , "c" ); System.out.println(list); System.out.println(list.get(1 )); list.add("B" ); System.out.println(list); System.out.println(list.indexOf("B" )); System.out.println(list.lastIndexOf("B" )); } }
ArrayList特点和底层实现 ArrayList底层使用Object数组来存储元素数据。 特点:查询效率高,增删效率低,线程不安全。我们一般使用它。
所有的方法,都围绕这个核心的Object数组来开展。数组长度是有限的,而ArrayList是可以存放任意数量的对象,长度不受限制,那么它是怎么实现的呢?本质上就是通过定义新的更大的数组,将旧数组中的内容拷贝到新数组,来实现扩容。 ArrayList的Object数组初始化长度为10,如果我们存储满了这个数组,需要存储第11个对象,就会定义新的长度更大的数组,并将原数组内容和新的元素一起加入到新数组中。
Vector向量 Vector底层是用数组实现的List,相关的方法都加了同步检查,因此线程安全,效率低。 比如,indexOf方法就增加了synchronized同步标记。
1 2 3 public synchronized int indexOf (Object o , int index) }
如何选用ArrayList、LinkedList、Vector
需要线程安全时,用Vector。
不存在线程安全问题时,并且查找较多用ArrayList(一般使用它)。
不存在线程安全问题时,增加或删除元素较多用LinkedList。
Map接口 Map 接口的实现类有HashMap、TreeMap、HashTable、Properties等。
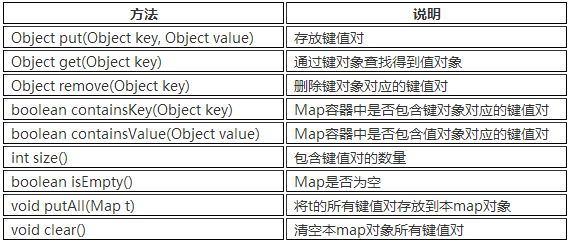
Map接口中常用的方法:
HashMap和HashTable HashMap采用哈希算法实现,是Map接口最常用的实现类。
1 2 3 4 5 6 7 8 9 10 11 12 13 14 15 16 17 18 19 20 21 22 23 24 25 26 27 import java.util.HashMap;import java.util.Map;public class student3 public static void main (String[] args) Map<Integer, String> m1 = new HashMap<Integer, String>(); Map<Integer, String> m2 = new HashMap<Integer, String>(); m1.put(1 , "one" ); m1.put(2 , "two" ); m1.put(3 , "three" ); m2.put(1 , "1" ); m2.put(2 , "2" ); System.out.println(m1.size()); System.out.println(m1.containsKey(1 )); System.out.println(m2.containsValue("two" )); m1.put(3 , "third" ); Map<Integer, String> m3 = new HashMap<Integer, String>(); m3.putAll(m1); m3.putAll(m2); System.out.println("m1:" + m1); System.out.println("m2:" + m2); System.out.println("m3:" + m3); } }
HashMap与HashTable的区别:
HashMap: 线程不安全,效率高。允许key或value为null。
HashTable: 线程安全,效率低。不允许key或value为null。
HashTable类和HashMap用法几乎一样,底层实现几乎一样,只不过HashTable的方法添加了synchronized关键字确保线程同步检查,效率较低。
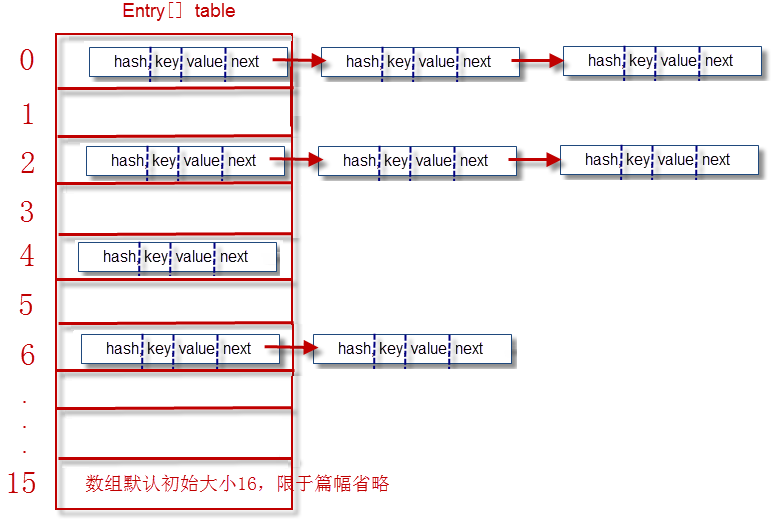
HashMap底层实现详解 HashMap底层使用拉链法 . 本质就是“数组+链表”。
一个Entry对象包含4部分:
key对象、
value对象、
hash值、
指向下一个Entry对象的引用。
红黑二叉树 红黑二叉树(简称:红黑树),它首先是一棵二叉树,同时也是一棵自平衡的排序二叉树。
红黑树在原有的排序二叉树增加了如下几个要求:
每个节点要么是红色,要么是黑色。
根节点永远是黑色的。
所有的叶节点都是空节点 (即 null),并且是黑色的。每个红色节点的两个子节点都是黑色。(从每个叶子到根的路径上不会有两个连续的红色节点)
从任一节点到其子树中每个叶子节点的路径都包含相同数量的黑色节点。
这些约束强化了红黑树的关键性质:从根到叶子的最长的可能路径不多于最短的可能路径的两倍长。这样就让树大致上是平衡的。红黑树是一个更高效的检索二叉树,JDK 提供的集合类 TreeMap、TreeSet 本身就是一个红黑树的实现。
TreeMap的使用和底层实现 TreeMap是红黑二叉树的典型实现。
TreeMap和HashMap实现了同样的接口Map,因此,用法对于调用者来说没有区别。HashMap效率高于TreeMap;在需要排序的Map时才选用TreeMap。
TreeMap实现Comparable接口:
1 2 3 4 5 6 7 8 9 10 11 12 13 14 15 16 17 18 19 20 21 22 23 24 25 26 class Emp implements Comparable <Emp > int id; String name; double salary; public Emp (int id , String name , double salary) this .id = id; this .name = name; this .salary = salary; } public int compareTo (Emp e) if (this .salary > e.salary){ return 1 ; }else if (this .salary < e.salary){ return -1 ; }else { if (this .id > e.id){ return 1 ; }else if (this .id < e.id){ return -1 ; } } } }
Set接口 Set容器特点:无序、不可重复。
HashSet基本使用 1 2 3 4 5 6 7 8 9 10 11 12 13 14 15 16 17 import java.util.HashSet;import java.util.Set;public class student3 public static void main (String[] args) Set<String> s = new HashSet<String>(); s.add("hello" ); s.add("world" ); System.out.println(s); s.add("hello" ); System.out.println(s); s.add(null ); System.out.println(s); s.add(null ); System.out.println(s); } }
HashSet底层实现 HashSet是采用哈希算法实现,底层实际是用HashMap实现的(HashSet本质就是一个简化版的HashMap),因此,查询效率和增删效率都比较高。
TreeSet的使用和底层实现 TreeSet底层实际是用TreeMap实现的,内部维持了一个简化版的TreeMap,通过key来存储Set的元素。
TreeSet内部需要对存储的元素进行排序,因此,我们对应的类需要实现Comparable接口。这样,才能根据compareTo()方法比较对象之间的大小,才能进行内部排序。
1 2 3 4 5 6 7 8 9 10 11 12 13 14 15 16 17 18 19 20 21 22 23 24 25 26 27 28 29 30 31 32 33 34 public class Test public static void main (String[] args) User u1 = new User(1001 , "高淇" , 18 ); User u2 = new User(2001 , "高希希" , 5 ); Set<User> set = new TreeSet<User>(); set.add(u1); set.add(u2); } } class User implements Comparable <User > int id; String uname; int age; public User (int id, String uname, int age) this .id = id; this .uname = uname; this .age = age; } @Override public int compareTo (User o) if (this .id > o.id) { return 1 ; } else if (this .id < o.id) { return -1 ; } else { return 0 ; } } }
使用TreeSet要点:
由于是二叉树,需要对元素做内部排序。 如果要放入TreeSet中的类没有实现Comparable接口,则会抛出异常:java.lang.ClassCastException。
TreeSet中不能放入null元素。
使用Iterator迭代器遍历容器元素(List/Set/Map) 迭代器遍历List 1 2 3 4 5 6 7 8 9 10 11 12 13 14 15 16 17 18 19 20 21 22 23 24 25 26 27 28 29 30 import java.util.ArrayList;import java.util.Iterator;import java.util.List;public class student2 public static void main (String[] args) List<String> aList = new ArrayList<String>(); for (int i = 0 ; i < 5 ; i++) { aList.add("a" + i); } System.out.println(aList); for (Iterator<String> iter = aList.iterator(); iter.hasNext();) { String temp = iter.next(); System.out.print(temp + "\t" ); if (temp.endsWith("3" )) { iter.remove(); } } System.out.println(); System.out.println(aList); } }
迭代器遍历Set 1 2 3 4 5 6 7 8 9 10 11 12 13 14 15 16 17 18 19 20 21 22 23 24 25 26 27 import java.util.HashSet;import java.util.Iterator;import java.util.Set;public class student3 public static void main (String[] args) Set<String> set = new HashSet<String>(); for (int i = 0 ; i < 5 ; i++) { set.add("a" + i); } System.out.println(set); for (Iterator<String> iter = set.iterator(); iter.hasNext();) { String temp = iter.next(); System.out.print(temp + "\t" ); } System.out.println(); System.out.println(set); } }
迭代器遍历Map一 1 2 3 4 5 6 7 8 9 10 11 12 public class Test public static void main (String[] args) Map<String, String> map = new HashMap<String, String>(); map.put("A" , "高淇" ); map.put("B" , "高小七" ); Set<Entry<String, String>> ss = map.entrySet(); for (Iterator<Entry<String, String>> iterator = ss.iterator(); iterator.hasNext();) { Entry<String, String> e = iterator.next(); System.out.println(e.getKey() + "--" + e.getValue()); } } }
迭代器遍历Map二 1 2 3 4 5 6 7 8 9 10 11 12 13 public class Test public static void main (String[] args) Map<String, String> map = new HashMap<String, String>(); map.put("A" , "高淇" ); map.put("B" , "高小七" ); Set<String> ss = map.keySet(); for (Iterator<String> iterator = ss.iterator(); iterator.hasNext();) { String key = iterator.next(); System.out.println(key + "--" + map.get(key)); } } }
遍历集合的方法总结 遍历List方法一:普通for循环 1 2 3 4 for (int i=0 ;i<list.size();i++){ String temp = (String)list.get(i); System.out.println(temp); }
遍历List方法二:增强for循环(使用泛型!) 1 2 3 for (String temp : list) {System.out.println(temp); }
遍历List方法三:使用Iterator迭代器(1) 1 2 3 4 for (Iterator iter= list.iterator();iter.hasNext();){ String temp = (String)iter.next(); System.out.println(temp); }
遍历List方法四:使用Iterator迭代器(2) 1 2 3 4 5 6 Iterator iter =list.iterator(); while (iter.hasNext()){ Object obj = iter.next(); iter.remove(); System.out.println(obj); }
遍历Set方法一:增强for循环 1 2 3 for (String temp:set){System.out.println(temp); }
遍历Set方法二:使用Iterator迭代器 1 2 3 4 for (Iterator iter = set.iterator();iter.hasNext();){ String temp = (String)iter.next(); System.out.println(temp); }
遍历Map方法一:根据key获取value 1 2 3 4 5 Map<Integer, Man> maps = new HashMap<Integer, Man>(); Set<Integer> keySet = maps.keySet(); for (Integer id : keySet){ System.out.println(maps.get(id).name); }
遍历Map方法二:使用entrySet 1 2 3 4 5 Set<Entry<Integer, Man>> ss = maps.entrySet(); for (Iterator iterator = ss.iterator(); iterator.hasNext();) { Entry e = (Entry) iterator.next(); System.out.println(e.getKey()+"--" +e.getValue()); }
Collections工具类 类 java.util.Collections 提供了对Set、List、Map进行排序、填充、查找元素的辅助方法。
1 2 3 4 5 void sort (List) void shuffle (List) void reverse (List) void fill (List, Object) int binarySearch (List, Object)
1 2 3 4 5 6 7 8 9 10 11 12 13 14 15 16 17 18 public class Test public static void main (String[] args) List<String> aList = new ArrayList<String>(); for (int i = 0 ; i < 5 ; i++){ aList.add("a" + i); } System.out.println(aList); Collections.shuffle(aList); System.out.println(aList); Collections.reverse(aList); System.out.println(aList); Collections.sort(aList); System.out.println(aList); System.out.println(Collections.binarySearch(aList, "a2" )); Collections.fill(aList, "hello" ); System.out.println(aList); } }
总结
Collection 表示一组对象,它是集中、收集的意思,就是把一些数据收集起来。
Collection接口的两个子接口:
实现Map接口的类用来存储键(key)-值(value) 对。Map 接口的实现类有HashMap和TreeMap等。Map类中存储的键-值对通过键来标识,所以键值不能重复。
Iterator对象称作迭代器,用以方便的实现对容器内元素的遍历操作。
类 java.util.Collections 提供了对Set、List、Map操作的工具方法。
如下情况,可能需要我们重写equals/hashCode方法:
要将我们自定义的对象放入HashSet中处理。
要将我们自定义的对象作为HashMap的key处理。
放入Collection容器中的自定义对象后,可能会调用remove、contains等方法时。
JDK1.5以后增加了泛型。泛型的好处:
向集合添加数据时保证数据安全。
遍历集合元素时不需要强制转换。