用元素名称、id、class 定位元素
address:https://testerhome.com/topics/1047
步骤:
- 使用
adb shell uiautomator dump命令,执行 adb shell uiautomator dump /data/local/tmp/uidump.xml,
- 然后将该 xml 文件 pull 到本地,从里面可以看到手机上当前页面的布局,在 note 节点下可以找到这些属性:text,resource-id,class,bounds,知道这些内容后就可以使用 python 对该 xml 文件解析获取到对应的属性,取出 bounds 的值,计算出对应元素区域的中心坐标,
- 接着使用
adb shell input tap 命令就可以点击该坐标,如果有相同的属性值,那就需要得到一个坐标点的列表,
以应用 “1 号店 “为例,在桌面上通过应用名称 “1 号店”,点击进入应用,然后点击 “手机充值”用 python 简单实现:
1
2
3
4
5
6
7
8
9
10
11
12
13
14
15
16
17
18
19
20
21
22
23
24
25
26
27
28
29
30
31
32
33
34
35
36
37
38
39
40
41
42
43
44
45
46
47
48
49
50
51
52
53
54
55
56
57
58
59
60
61
62
63
64
65
66
67
68
69
70
71
72
73
74
75
76
77
78
79
80
81
82
83
84
85
86
87
88
89
90
91
92
93
94
95
96
97
98
99
100
101
102
103
104
105
106
107
108
109
110
111
112
|
import tempfile
import os
import re
import time
import xml.etree.cElementTree as ET
class Element(object):
"""
通过元素定位,需要Android 4.0以上
"""
def __init__(self):
"""
初始化,获取系统临时文件存储目录,定义匹配数字模式
"""
self.tempFile = tempfile.gettempdir()
self.pattern = re.compile(r"\d+")
def __uidump(self):
"""
获取当前Activity控件树
"""
os.popen("adb shell uiautomator dump /data/local/tmp/uidump.xml")
os.popen("adb pull /data/local/tmp/uidump.xml " + self.tempFile)
def __element(self, attrib, name):
"""
同属性单个元素,返回单个坐标元组
"""
self.__uidump()
tree = ET.ElementTree(file=self.tempFile + "\\uidump.xml")
treeIter = tree.iter(tag="node")
for elem in treeIter:
if elem.attrib[attrib] == name:
bounds = elem.attrib["bounds"]
coord = self.pattern.findall(bounds)
Xpoint = (int(coord[2]) - int(coord[0])) / 2.0 + int(coord[0])
Ypoint = (int(coord[3]) - int(coord[1])) / 2.0 + int(coord[1])
return Xpoint, Ypoint
def __elements(self, attrib, name):
"""
同属性多个元素,返回坐标元组列表
"""
list = []
self.__uidump()
tree = ET.ElementTree(file=self.tempFile + "\\uidump.xml")
treeIter = tree.iter(tag="node")
for elem in treeIter:
if elem.attrib[attrib] == name:
bounds = elem.attrib["bounds"]
coord = self.pattern.findall(bounds)
Xpoint = (int(coord[2]) - int(coord[0])) / 2.0 + int(coord[0])
Ypoint = (int(coord[3]) - int(coord[1])) / 2.0 + int(coord[1])
list.append((Xpoint, Ypoint))
return list
def findElementByName(self, name):
"""
通过元素名称定位
usage: findElementByName(u"相机")
"""
return self.__element("text", name)
def findElementsByName(self, name):
return self.__elements("text", name)
def findElementByClass(self, className):
"""
通过元素类名定位
usage: findElementByClass("android.widget.TextView")
"""
return self.__element("class", className)
def findElementsByClass(self, className):
return self.__elements("class", className)
def findElementById(self, id):
"""
通过元素的resource-id定位
usage: findElementsById("com.android.deskclock:id/imageview")
"""
return self.__element("resource-id",id)
def findElementsById(self, id):
return self.__elements("resource-id",id)
class Event(object):
def __init__(self):
os.popen("adb wait-for-device ")
def touch(self, dx, dy):
"""
触摸事件
usage: touch(500, 500)
"""
os.popen("adb shell input tap " + str(dx) + " " + str(dy))
time.sleep(0.5)
def test():
element = Element()
evevt = Event()
e1 = element.findElementByName(u"1号店")
evevt.touch(e1[0], e1[1])
time.sleep(2)
e2 = element.findElementByName(u"手机充值")
evevt.touch(e2[0], e2[1])
|
使用的前提是需要开启 view server,否则无法获取到 uidump.xml 这个文件。另外程序运行的时间会有点慢,可以有优化的方法。
另外如果属性值相同,使用 elements,返回的是含坐标元组的列表,如何使用,这里就不讲了。
将其进行修改:
1
2
3
4
5
6
7
8
9
10
11
12
13
14
15
16
17
18
19
20
21
22
23
24
25
26
27
28
29
30
31
32
33
34
35
36
37
38
39
40
41
42
43
44
45
46
47
48
49
50
51
52
53
54
55
56
57
58
59
60
61
62
63
64
65
66
67
68
69
70
71
72
73
74
75
76
77
78
79
80
81
82
83
84
85
86
87
88
89
90
91
92
93
94
95
96
97
98
99
100
101
102
103
104
105
106
107
108
109
110
111
112
113
114
115
116
117
118
119
120
121
122
123
| import os
import re
import time
import xml.etree.cElementTree as ET
def run_without_output(cmd):
os.popen(cmd)
def run_with_output(cmd):
with os.popen(cmd) as fp:
bf = fp._stream.buffer.read()
try:
return bf.decode()
except UnicodeDecodeError:
return bf.decode('gbk')
class Element:
ADB_UI_TREE_DUMP_CMD = "adb shell uiautomator dump /data/local/tmp/uidump.xml"
ADB_GET_UI_TREE_CMD = "adb shell cat /data/local/tmp/uidump.xml"
def __init__(self):
self.pattern = re.compile(r"\d+")
self.ui_tree = ""
def __uidump(self):
"""
获取当前Activity控件树
"""
run_with_output(self.ADB_UI_TREE_DUMP_CMD)
self.ui_tree = run_with_output(self.ADB_GET_UI_TREE_CMD)
def __element(self, attrib, name):
"""
同属性单个元素,返回单个坐标元组
"""
self.__uidump()
tree = ET.ElementTree(ET.fromstring(self.ui_tree))
treeIter = tree.iter(tag="node")
for elem in treeIter:
if elem.attrib[attrib] == name:
bounds = elem.attrib["bounds"]
coord = self.pattern.findall(bounds)
Xpoint = (int(coord[2]) - int(coord[0])) / 2.0 + int(coord[0])
Ypoint = (int(coord[3]) - int(coord[1])) / 2.0 + int(coord[1])
return Xpoint, Ypoint
def __elements(self, attrib, name):
"""
同属性多个元素,返回坐标元组列表
"""
self.__uidump()
tree = ET.ElementTree(ET.fromstring(self.ui_tree))
l = []
treeIter = tree.iter(tag="node")
for elem in treeIter:
if elem.attrib[attrib] == name:
bounds = elem.attrib["bounds"]
coord = self.pattern.findall(bounds)
Xpoint = (int(coord[2]) - int(coord[0])) / 2.0 + int(coord[0])
Ypoint = (int(coord[3]) - int(coord[1])) / 2.0 + int(coord[1])
l.append((Xpoint, Ypoint))
return l
def findElementByName(self, name):
"""
通过元素名称定位
usage: findElementByName(u"相机")
"""
return self.__element("text", name)
def findElementsByName(self, name):
return self.__elements("text", name)
def findElementByClass(self, className):
"""
通过元素类名定位
usage: findElementByClass("android.widget.TextView")
"""
return self.__element("class", className)
def findElementsByClass(self, className):
return self.__elements("class", className)
def findElementById(self, id):
"""
通过元素的resource-id定位
usage: findElementsById("com.android.deskclock:id/imageview")
"""
return self.__element("resource-id",id)
def findElementsById(self, id):
return self.__elements("resource-id",id)
class Event:
ADB_WAIT_DEVICE_CMD = "adb wait-for-device "
ADB_TOUCH_CMD = "adb shell input tap {} {}"
def __init__(self):
run_with_output(self.ADB_WAIT_DEVICE_CMD)
def touch(self, dx, dy):
"""
触摸事件
usage: touch(500, 500)
"""
run_with_output(self.ADB_TOUCH_CMD.format(dx, dy))
element = Element()
evevt = Event()
e1 = element.findElementByName(u"企业微信")
evevt.touch(e1[0], e1[1])
e2 = element.findElementByName(u"技术支持研发沟通")
evevt.touch(e2[0], e2[1])
|
钉钉打卡
1
2
3
4
5
6
7
8
9
10
11
12
13
14
15
16
17
18
19
20
21
22
23
24
25
26
27
28
29
30
31
32
33
34
35
36
37
38
39
40
41
42
43
44
45
46
47
48
49
50
51
52
53
54
55
56
57
58
59
60
61
62
63
64
65
66
67
68
69
70
71
72
73
74
75
76
77
78
79
80
81
82
| import time
import threading
import os,subprocess
import base64
import random
PATH = lambda p: os.path.abspath(p)
isScreenshoting = False
def onWork():
ts = threading.Thread(target=runLoopScreenshot, args=())
ts.setDaemon(True)
global isScreenshoting
isScreenshoting = True
ts.start()
os.system('adb shell input keyevent 26')
os.system('adb shell input keyevent 3')
os.system('adb shell am start -n com.alibaba.android.rimet/com.alibaba.android.rimet.biz.SplashActivity')
time.sleep(15)
os.system('adb shell input keyevent 3')
os.system('adb shell input keyevent 6')
isScreenshoting = False
tend = threading.Thread(target=enddk, args=())
tend.start()
def enddk():
print("end")
time.sleep(10)
def runLoopScreenshot():
global isScreenshoting
while isScreenshoting:
s = os.popen("adb shell screencap -p | base64").read()
print(s)
os.popen("adb shell screencap -p /data/local/tmp/tmp.png")
path = '/home/pi'
os.popen("adb pull /data/local/tmp/tmp.png " + PATH(path + "/s.png"))
with open(path + "/s.png", "rb") as f:
base64_data = base64.b64encode(f.read())
print('success')
def main():
dakaTime = ['08:49:40', '08:47:32', '08:53:25']
nextDakaTime = None
while True:
try:
device = os.popen('adb devices -l').read()
out = device.split(' ')
print('{"action":"device","data":"%s,%s,%s"}' % (out[11], out[12], out[13]))
currentTime = time.strftime("%H:%M:%S", time.localtime())
if nextDakaTime == None:
r = random.randint(0, len(dakaTime) - 1)
nextDakaTime = dakaTime[r]
print(currentTime,nextDakaTime)
if currentTime == nextDakaTime:
t = threading.Thread(target=onWork, args=())
t.setDaemon(True)
t.start()
except Exception as e:
print("something wrong:", e)
time.sleep(1)
if __name__ == '__main__':
main()
|
跳一跳辅助程序
address:https://www.cnblogs.com/dongkuo/p/8285162.html
- 每次跳跃之前,截取一下手机屏幕,并将截图保存到本地电脑中;
- 计算截图中人偶的位置与将要跳至的台面中心的距离𝑑;
- 将以上距离𝑑换算成相应的触摸时间𝑠;
- 发送模拟触摸的命令至手机,触摸时间为以上时间𝑠;
步骤1
1
2
3
4
5
|
adb shell screencap -p /mnt/sdcard/screencap.png
adb pull /mnt/sdcard/screencap.png C:/screencap.png
|
步骤2
要计算出人偶与将要跳至的台面中心的距离,需要分别识别出人偶的位置(坐标)和台面中心的位置(坐标)。
我们以人偶最底部的一行的中心作为人偶的位置,如下图所示:
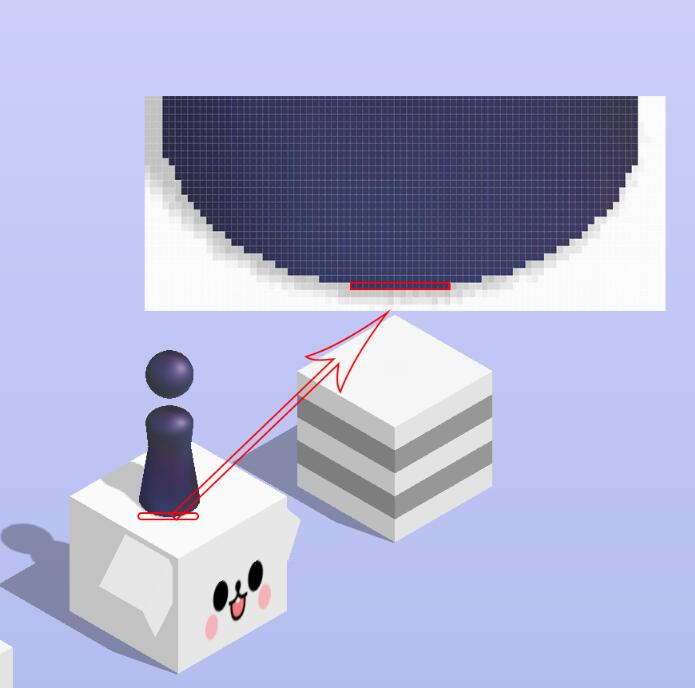
至于怎么识别出人偶的最底部,可以这样来操作。通过观察可发现,人偶底部的颜色的rgb值在(53, 57, 95)到(59, 61, 103)之间,因此我们逐行扫描各个像素点,找到rbg值在该区间的各行,最后一行即为人偶的底部了。得到了最底部的一行,自然就能算出该行的中心坐标。
接下来需要识别人偶将要跳至的平台的中心。要想得到该中心的坐标,我们只需要识别得到下图中的两个顶点vertex1和vertex2的坐标即可:
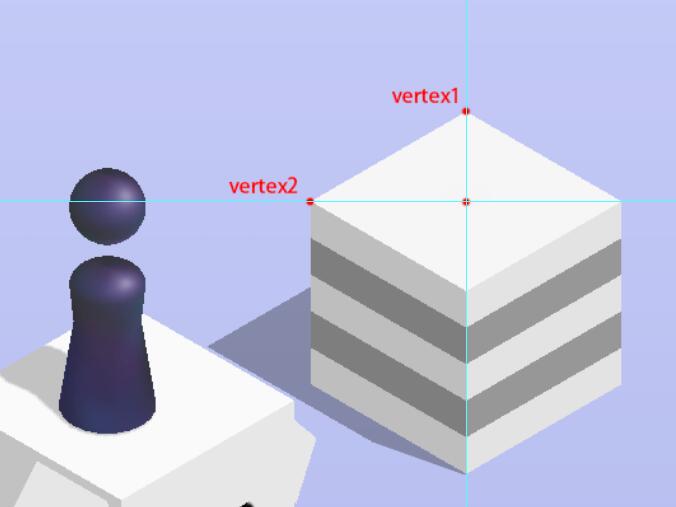
我们同样用从左往右,从上往下的顺序扫描各个像素点的方法来找出vertex1的坐标。扫描之前先获取整个背景的颜色的rgb值,取任意“空白”处即可(例如本人手机截图大小为1920x1080,可断定坐标为(40, 500)的点一定处于“空白”处。)。在扫描过程中一旦发现某处的颜色与背景色不一致,发生了“突变”,可断定该点即为vertex1。
我们把vertex1点的rgb值记录下来作为台面的背景色。在接下去的扫描过程中,我们开始关心当前扫描的点的rgb值是否和该记录值“相似”。“相似”则说明该点“属于”台面,而通过上图可发现,顶点vertex2是所有“属于”台面的点中,横坐标最小的点,这样vertex2的坐标也找到了。
显然,台面中心的横坐标等于vertex1的横坐标,而纵坐标等于vertex2的纵坐标。
步骤3
通过多次尝试,发现用如下公式转换距离𝑑(单位:px)为时间𝑠(单位:毫秒)比较合适:
步骤4
得到了触摸时间,我们还是借助adb工具来模拟触摸屏幕的行为,以下是相关命令:
1
| adb shell input swipe 0 0 0 0 1000
|
以上命令的最后一个参数即为需要模拟按压屏幕的时长,单位是毫秒。
完整代码
以下是完整代码,在本人手机(1920 * 1080 )下测试发现大多数情况都能正中靶心,少数情况不能命中靶心,极少数情况会跳出台面以外。其他分辨率的手机可能需要适当修改BACKGROUND_POS和DISTANCE_TO_TIME_RATIO参数大小。
1
2
3
4
5
6
7
8
9
10
11
12
13
14
15
16
17
18
19
20
21
22
23
24
25
26
27
28
29
30
31
32
33
34
35
36
37
38
39
40
41
42
43
44
45
46
47
48
49
50
51
52
53
54
55
56
57
58
59
60
61
62
63
64
65
66
67
68
69
70
71
72
73
74
75
76
77
78
79
80
81
82
83
84
85
86
87
88
89
90
91
92
93
| import math
import os
import tempfile
import time
from functools import reduce
from PIL import Image
BACKGROUND_POS = (40, 500)
DISTANCE_TO_TIME_RATIO = 1.35
SCREENSHOT_PATH = tempfile.gettempdir() + "/screenshot.png"
def calculate_jump_distance():
im = Image.open(SCREENSHOT_PATH)
background_rgb = im.getpixel(BACKGROUND_POS)
role_pos_list = None
vertex1_pos = None
vertex2_pos = None
block_background_rgb = None
role_line_flag = True
for y in range(BACKGROUND_POS[1], im.height):
if role_pos_list and role_line_flag:
break
role_line_flag = True
vertex2_line_flag = True
for x in range(BACKGROUND_POS[0], im.width):
current_rgb = im.getpixel((x, y))
next_rgb = im.getpixel((x + 1, y)) if x + 1 < im.width else (0, 0, 0)
if x > BACKGROUND_POS[0] and y > BACKGROUND_POS[1] and not vertex1_pos and not is_similar(background_rgb, current_rgb) and is_similar(current_rgb, next_rgb):
vertex1_pos = (x, y)
block_background_rgb = current_rgb
if block_background_rgb and vertex2_line_flag and is_similar(current_rgb, block_background_rgb, 5):
vertex2_line_flag = False
if vertex2_pos:
if x < vertex2_pos[0] and vertex2_pos[0] - x < 20 and y - vertex2_pos[1] < 20:
vertex2_pos = (x, y)
else:
vertex2_pos = (x, y)
if is_part_of_role(current_rgb):
if role_line_flag:
role_pos_list = []
role_line_flag = False
role_pos_list.append((x, y))
if len(role_pos_list) == 0:
raise Exception('无法识别小人位置!!!')
pos_sum = reduce((lambda o1, o2: (o1[0] + o2[0], o1[1] + o2[1])), role_pos_list)
role_pos = (int(pos_sum[0] / len(role_pos_list)), int(pos_sum[1] / len(role_pos_list)))
destination_pos = (vertex1_pos[0], vertex2_pos[1])
return int(linear_distance(role_pos, destination_pos))
def is_part_of_role(rgb):
return 53 < rgb[0] < 59 and 57 < rgb[1] < 61 and 95 < rgb[2] < 103
def linear_distance(xy1, xy2):
return math.sqrt(pow(xy1[0] - xy2[0], 2) + pow(xy1[1] - xy2[1], 2))
def is_similar(rgb1, rgb2, degree=10):
return abs(rgb1[0] - rgb2[0]) <= degree and abs(rgb1[1] - rgb2[1]) <= degree and abs(rgb1[2] - rgb2[2]) <= degree
def screenshot():
os.system("adb shell screencap -p /mnt/sdcard/screencap.png")
os.system("adb pull /mnt/sdcard/screencap.png {} >> {}/jump.out".format(SCREENSHOT_PATH, tempfile.gettempdir()))
def jump(touch_time):
os.system("adb shell input swipe 0 0 0 0 {}".format(touch_time))
def distance2time(distance):
return int(distance * DISTANCE_TO_TIME_RATIO)
def main():
count = 1
while True:
screenshot()
distance = calculate_jump_distance()
touch_time = distance2time(distance)
jump(touch_time)
print("#{}: distance={}, time={}".format(count, distance, touch_time))
count += 1
time.sleep(1)
if __name__ == '__main__':
main()
|
如果想使用框架,可以试试Appium和pocoui