官方文档:http://flask.pocoo.org/docs/
中文文档:http://docs.jinkan.org/docs/flask/
视频地址:https://www.bilibili.com/video/av67507215/
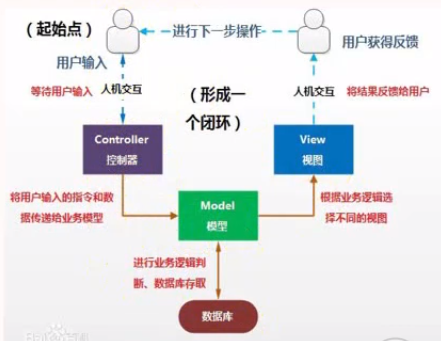
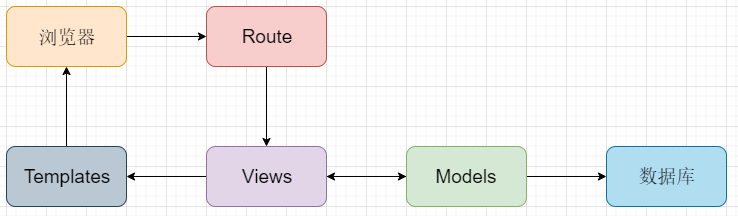
Flask一样是MVC的设计模式:
Model:用于封装与应用程序的业务逻辑相关的数据及对数据的处理方法,是Web应用程序中用于处理应用程序的数据逻辑部分,Model通常只提供功能性的接口,通过这些接口可以获取Model的所有功能。
View:负责数据的显示和呈现,view是对用户的直接输出。
Controller:负责从用户端收集用户的输入,可以看成提供view的反向功能,主要处理用户交互。
使用Flask
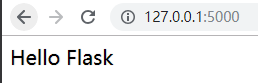
Flask的使用十分简易,不需要像Django一样创建project,分出apps,template,view,model等等,只需要创建一个py文件:
1 2 3 4 5 6 7 8 9 10 from flask import Flaskapp = Flask(__name__) @app.route('/' def index (): return 'Hello Flask' app.run()
运行得到:
1
2
3
4
5
6
7
8
* Serving Flask app "firstflask" (lazy loading) * Environment: production WARNING: Do not use the development server in a production environment. Use a production WSGI server instead. * Debug mode: off * Running on http://127.0.0.1:5000/ (Press CTRL+C to quit) 127.0.0.1 - - [13/Jun/2019 10:00:21] "GET / HTTP/1.1" 200 - 127.0.0.1 - - [13/Jun/2019 10:00:22] "GET /favicon.ico HTTP/1.1" 404 -
当然了,肯定不会真的就把一个项目写在一个py文件中,还是需要分开的.
Django里有Settings.py,那么Flask如何添加参数,一般是在run()里添加:
debug是否开启调试模式,开启后修改过python代码会自动重启
threaded是否开启多线程
port启动指定服务器的端口号
host主机,默认是127.0.0.1,指定为0.0.0.0代表本机所有ip
1
2
if __name__ == '__main__' : app.run(debug=True ,port=5000 ,host='0.0.0.0' )
flask-script插件:
1 pip install flask-script
可以实现命令行参数接收
1 2 3 4 5 6 7 8 9 10 11 12 13 14 from flask import Flaskfrom flask_script import Managerapp = Flask(__name__) manager = Manager(app=app) @app.route('/' def index (): return 'Hello Flask3' if __name__ == '__main__' : manager.run()
manage.py不能被其它文件导入!
之后执行python manage.py runserver即可,像极了Django
manage的参数使用:
-d : 是否开启调试模式-r : 是否自动重新加载文件-h,--host : 指定主机-p,--port : 指定端口--threaded : 是否使用多线程-? --help : 查看帮助
所以可以如下使用:
1 python manage.py runserver -d -r -h 0.0.0.0 -p 9000
manage可以进入flask的shell环境
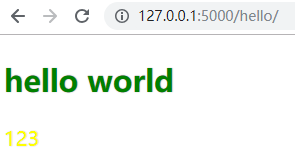
flask的简单应用:
1
2
3
4
5
6
7
webproject |-- static |-- css |-- hello.css |-- templates |-- hello.html |-- manage.py
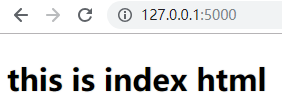
1 2 3 4 5 6 7 8 9 10 11 12 13 14 15 16 17 18 from flask import Flask,render_templatefrom flask_script import Managerapp = Flask(__name__) manager = Manager(app=app) @app.route('/' def index (): return 'index' @app.route('/hello/' def hello_world (): return render_template('hello.html' ) if __name__ == '__main__' : manager.run()
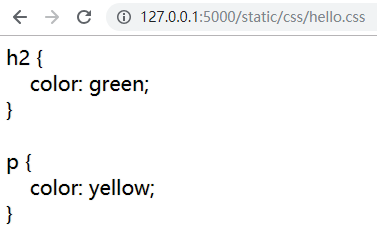
1 2 3 4 5 6 7 8 h2 { color : green; } p { color : yellow; }
1 2 3 4 5 6 7 8 9 10 11 12 13 14 <!DOCTYPE html > <html lang ='cn' > <head > <meta charset ="UTF-8" > <title > hello world</title > <link rel ="stylesheet" href ="/static/css/hello.css" > </head > <body > <h2 > hello world</h2 > <p > 123</p > </body > </html >
静态文件也是可以直接访问:
Flask的流程和Django基本一致
Django的url分发器是放在urls.py里面,Flask则是放在app.route装饰器里面:
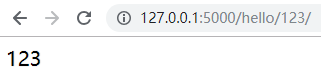
1 2 3 4 @app.route('/hello/<hehe>/' def params (hehe ): return hehe
Flask的请求参数:
都是关键字参数
默认标识是尖括号(如/hello/<name>/)
name需要和对应的视图函数的参数名宇保持一致
参数允许有默认值:
如果有默认值,那么在路由中,不传输参数也是ok的
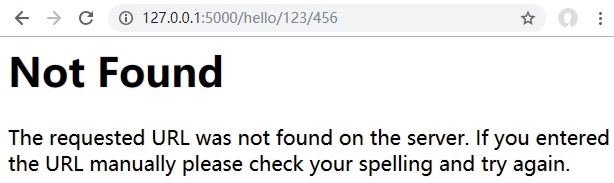
如果没有默认值,参数在路由中必须传递
和Django一样,url参数的默认类型是string,但是Flask可以手动修改:
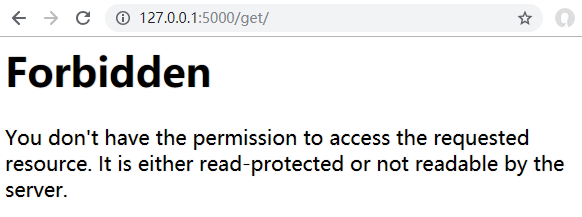
1 2 3 4 @app.route('/get/<int:num>/' def get (num ): print (type (num)) return '789'
除了int还有:
float
string(默认):
path :
1 2 3 4 5 6 @app.route('/get/<path:name>/' def get (name ): print ('----------' ) print (name) print (type (name)) return '789'
当输入url为http://127.0.0.1:5000/get/123/789/liangbo/heyingliang/得到:
1
2
print (name) print (type (name))
uuid:
any:
1 2 3 @app.route('/get/<any{c,d,e}:name>/' def get2 (name ): return '789'
限定路径必须为下面其中之一 :/get/c//get/d//get/e/
请求方法:
Flask请求方法并不像Django一样全部支持的,需要自己配置请求方法:
1 2 3 @app.route('/get/name>/' ,methods=['GET' ,'POST' ] def index (name ): return '789'
url for:
1 2 3 4 5 6 7 8 9 @app.route('/hello/' def hello_world (): return render_template('hello.html' ) @app.route('/get/<path:name>/' ,methods=['GET' ,'POST' ] def get (name ): url = url_for('hello_world' ) return '789'
如果反向解析带有参数,直接传入关键字参数即可 :
1 2 3 4 5 6 7 8 9 10 @app.route('/hello/<name1>/<name2>/' def hello_world (): return render_template('hello.html' ) @app.route('/get/<path:name>/' ,methods=['GET' ,'POST' ] def get (name ): url = url_for('hello_world' ,name1='hyl' ,name2='liangbo' ) print (url) return '789'
模板里的url反向解析,和Django差不多,不过使用url_for函数:
1 2 <a href ="{{ url_for('hello_world') }}" > </a >
总结:
Django的反向解析:
视图里:
1
2
def index (request ): return reverse("blog:article" , kwargs={"articleid" : self.pk})
模板里:
1 <a href="{{ url blog:article self.pk }}" ></a>
Flask的反向解析:
视图里:
1 2 3 4 5 6 @app.route('/get/<path:name>/' def get (name ): url = url_for('hello_world' ,name1='hyl' ,name2='liangbo' ) print (url) return '789'
模板里:
1 2 <a href ="{{ url_for('hello_world') }}" > </a >
request:
在Django中,每个视图函数的第一个参数都是request,
1
2
3
4
5
def index (request ): '显示首页' pageid = request.GET.get('page' ,1 ) context = {...} return render(request, 'blog/index.html' , context)
但是在Flask中,已经封装好了,需要的话直接使用即可:
1
2
3
4
5
6
7
8
from flask import request@app.route('/get/<path:name>/' ,methods=['GET' ,'POST' ] def get (name ): print ('----------------------------' ) print (request) return '789'
request的属性:
request.method
request.data:
request.args:
例如,使用post提交http://127.0.0.1/article?cate=python一样可以获取
request.form:
request.files
request.cookies
request.session
request.json
request.remote_addr
request.user_agent
request.host
request.url
如果传递的get参数中,有两个相同的参数,eg:
1 2 http://127.0 .0 .1 /?kw=h&page&kw=yl
这时可以使用request.getlist('pw')获取两个pw参数
回头看一下这个视图函数:
1 2 3 4 5 @app.route('/get/<path:name>/' ,methods=['GET' ,'POST' ] def get (name ): print ('----------------------------' ) print (request) return '789'
竟然可以返回string作为response,(而Django必须为HttpResponse)
实际上,Flask支持返回两个类型
1 2 3 4 5 6 @app.route('/get/<path:name>/' ,methods=['GET' ,'POST' ] def get (name ): result = render_template('hello.html' ) print (result) print (type (result)) return result
返回:
1
2
3
4
5
6
7
8
9
10
11
12
13
14
15
16
<!DOCTYPE html> <html lang='cn'> <head> <meta charset="UTF-8"> <title>hello world</title> <link rel="stylesheet" href="/static/css/hello.css"> </head> <body> <h2>hello world</h2> <p>123</p> </body> </html> <class 'str'>
说明result = render_template('hello.html')实际上就是渲染hello.html,然后返回一个字符串而已
所以我们可以直接返回一个string格式的html代码:
1 2 3 @app.route('/get/<path:name>/' ,methods=['GET' ,'POST' ] def get (name ): return '<h3>响应</h3>'
实际上,当返回字符串时,视图函数还可以返回第二的值(响应状态码)
1 2 3 @app.route('/get/<path:name>/' ,methods=['GET' ,'POST' ] def get (name ): return '<h3>响应</h3>' ,404
注意,这只会影响状态码,数据是不受影响的.
按照这种特性,我们可以用来做反爬.
除了让Flask后台帮我们制作response,我们还可以使用make_response来制作response
1 2 3 4 5 6 @app.route('/get/' ,methods=['GET' ,'POST' ] def get (): response = make_response('<h2>123</h2>' ) print (response) print (type (response)) return response
所以也可以这么做:
1 2 3 4 5 6 @app.route('/get/' ,methods=['GET' ,'POST' ] def get (): response = make_response(render_template('hello.html' ),404 ) print (response) print (type (response)) return response
第二种手动制作Response的方法:使用Response
1 2 3 4 5 6 @app.route('/get/' ,methods=['GET' ,'POST' ] def get (): response = Response(response='<h2>456</h2>' ,status=403 ) print (response) print (type (response)) return response
重定向:
1 2 3 @app.route('/get/' ,methods=['GET' ,'POST' ] def get (): return redirect(url_for('index' ))
遗弃request:
1 2 3 4 5 @app.route('/get/' ,methods=['GET' ,'POST' ] def get (): if ...: abort(403 ) return redirect(url_for('index' ))
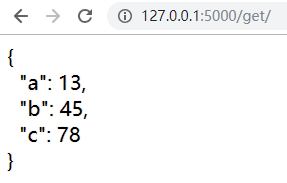
返回Json数据:return JsonResponse来返回Json数据,Flask使用jsonfy:
1
2
3
4
5
6
7
8
from flask import json@app.route('/get/' ,methods=['GET' ,'POST' ] def get (): result = json.jsonify({'a' :13 ,'b' :45 ,'c' :78 }) print (result) print (type (result)) return result
注意:jsonify可以传入字典,也可以使用关键字参数
1
2
result = json.jsonify({'a' :13 ,'b' :45 }) result = json.jsonify(a=18 ,b=20 )
其实也可以使用
1 2 3 4 from flask import jsonresult = json.dumps({'a' :13 ,'b' :45 })
注意json.jsonify和json.dumps的异同:
两者都会将数据格式化为Json格式
使用json.jsonify会自动将response的content-Type改为application/json.
而json.dumps将保留原来的content-Type为text/html不变
当然,这还是有解决方法的:使用Response:
1 2 3 4 @app.route('/get/' ,methods=['GET' ,'POST' ] def get (): result = json.dumps({'a' :18 ,'b' :20 }) return Response(response=result,content_type='application/json' )
实际上,Flask在真正开发的时候,文件结构和Django还是差不多的
1
2
3
4
5
6
7
8
9
10
webproject |-- app |-- models.py |-- views.py |-- static |-- css |-- js |-- templates |-- hello.html |-- manage.py
可见,在Flask中,其实Views基本就是Django里Views和urls.py的合并
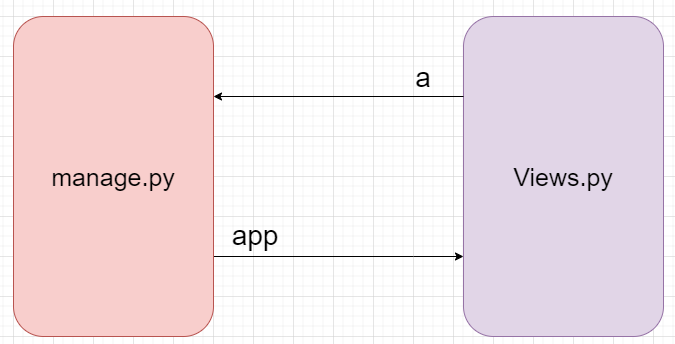
但是如果我们像上面这样存放文件,app.views会和manage.py循环引用:
1 2 3 4 5 6 7 8 9 10 11 12 13 14 15 16 from flask import Flaskfrom flask_script import Managerfrom app.views import aprint (a)app = Flask(__name__) manager = Manager(app=app) if __name__ == '__main__' : manager.run()
1 2 3 4 5 6 7 8 9 10 from manage import appa = 10 @app.route('/' def index (): return 'index'
问题就出在两个import中:from app.views import a,这句会让python去扫描app/views.py.但是在app/views.py中又有from manage import app这句又会让python去扫描manage.py
也就是说出现了互相导入的问题:
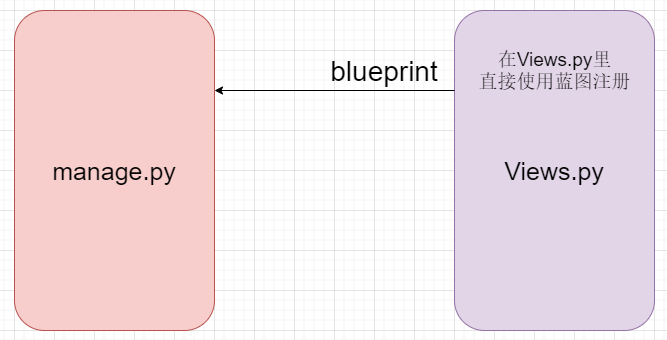
这时可以使用插件解决:支持对程序的规划
简单来说就是使用蓝图来代替@app.route(),使得view.py不再依赖manage.py
1 pip install flask-blueprint
1 2 3 4 5 6 7 8 9 10 11 12 13 14 15 from flask import Flaskfrom flask_script import Managerfrom app.views import blueapp = Flask(__name__) app.register_blueprint(blueprint=blue) manager = Manager(app=app) if __name__ == '__main__' : manager.run()
1 2 3 4 5 6 7 8 9 from flask import Blueprintblue = Blueprint('first_blue' ,__name__) @blue.route('/' def index (): return 'index'
所以我们就可以使用多个views.py文件了:
1 2 3 4 5 6 7 8 9 from flask import Blueprintblue = Blueprint('first_blue' ,__name__) @blue.route('/' def index (): return 'index'
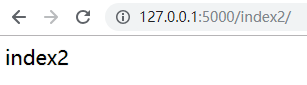
1 2 3 4 5 6 7 8 9 from flask import Blueprintblue2 = Blueprint('second_blue' ,__name__) @blue2.route('/index2/' def index2 (): return 'index2'
1 2 3 4 5 6 7 8 9 10 11 12 13 14 15 16 17 from flask import Flaskfrom flask_script import Managerfrom app.views import bluefrom app.views2 import blue2app = Flask(__name__) app.register_blueprint(blueprint=blue) app.register_blueprint(blueprint=blue2) manager = Manager(app=app) if __name__ == '__main__' : manager.run()
会话技术:
cookies:
客户端会话技术
数据都是存储在浏览器中
支持过期
不能跨域名
不能跨浏览
cookie是通过 Response来进行操作
flask中的cookie可以支持中文
session
服务端会话技术
对数据进行数据安全操作
默认在内存中
不容易管理
容易丢失
不能多台电脑协作
flask-session默认的有效期是31天
token
简单cookie的登录注册功能:
1 2 3 4 5 6 7 8 9 10 11 12 13 14 15 16 17 18 19 20 21 @blue.route('/home/' def home (): username = request.cookies.get('user' ) return render_template('home.html' ,username=username) @blue.route('/login/' ,methods=['GET' ,'POST' ] def login (): if request.method == 'GET' : return render_template('login.html' ) elif request.method == 'POST' : username = request.form.get('username' ) resp = Response(response= f'登录成功 {username} ' ) resp.set_cookie('user' ,username) return resp @blue.route('/logout/' def logout (): resp = redirect(url_for('first_blue.home' )) resp.delete_cookie('user' ) return resp
1 2 3 4 5 6 7 8 9 10 11 12 13 14 15 16 <!DOCTYPE html > <html lang ='cn' > <head > <meta charset ="UTF-8" > <title > home</title > </head > <body > <h2 > 欢迎回来:{{ username }}</h2 > <a href ="{{ url_for('first_blue.login') }}" > 登录</a > <a href ="{{ url_for('first_blue.logout') }}" > 登出</a > </body > </html >
1 2 3 4 5 6 7 8 9 10 11 12 13 14 15 16 17 18 <!DOCTYPE html > <html lang ='cn' > <head > <meta charset ="UTF-8" > <title > login</title > </head > <body > <form action ="{{ url_for('first_blue.login') }}" method ="post" > <span > 用户名:</span > <input type ="text" name ="username" placeholder ="请输入用户名" /> <br /> <input type ="submit" /> </form > </body > </html >
如果要将cookie改为session:不能像Django一样直接改动request.cookies.get(‘user’)
1 2 3 4 5 6 7 8 9 10 11 12 13 14 15 16 17 18 @blue.route('/home/' def home (): username = session.get('user' ) return render_template('home.html' ,username=username) @blue.route('/login/' ,methods=['GET' ,'POST' ] def login (): if request.method == 'GET' : return render_template('login.html' ) elif request.method == 'POST' : username = request.form.get('username' ) resp = Response(response= f'登录成功 {username} ' ) session['user' ] = username return resp
还需要在manage里配置SECRET_KEY:
1 app.config['SECRET_KEY' ] = '1234liangbo5679'
flask-session插件
1 pip install flask-session
使用,首先在manage.py里添加config设置
1 2 app.config['SESSION_TYPE' ] = 'redis' Session(app=app)
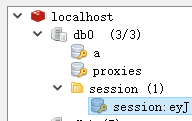
这样我们就将session储存到redis中了:
flask-session默认的有效期是31天
模板
路由器装饰器的叠用:这样这个视图函数就可以由多个路由url来调用
1 2 3 4 5 @blue.route('/home/' @blue.route('/index/' @blue.route('/' def logout (): return render_tempalte('hello.html' )
Fask中使用jinja2模板引擎
jinja2模板语法和Django差不多
jinja2可以使用
变量 :{{ var }}
标签 :{{ tag }}
jinja2一样支持block和extends标签:
1
2
3
# 父模板挖坑,子模板填坑 {% block {% endblock
1
2
3
4
5
# 继承模板 {% extend 'xxx' %} # 继承后保留块中的内容 {{ super() }}
保留继承块中的内容:{{ super() }}{{ block.super }}
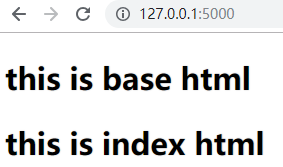
eg:base.html中有
1
2
3
{% block <h2 > this is base html</h2 > {% endblock
index.html中有:
1
2
3
4
5
{% extends {% block <h2 > this is index html</h2 > {% endblock
这时index.html中的h2会覆盖掉base.html中的h2,
现在想要双方都显示:
1
2
3
4
5
6
{% extends {% block {{ super() }} <h2 > this is index html</h2 > {% endblock
Flask的Static静态文件的反向解析:
1
2
3
{% block <link rel ="stylesheet" href =" {{ url_for('static',filename='css/hello.css') }} " >{% endblock
Flask中的inclue标签和Django的差不多,功能就是将其他的html包含进来
marco:宏定义在模板中 定义函数,在其他的地方调用,调用函数来生成html.
1
2
3
{% marco hello(name) %} {{ name }} {% endmarco %}
例如:
1 2 3 4 5 6 7 {% macro hello() %} <h4 > 该函数调用就能产生html代码</h4 > {% endmacro %} {{ hello() }}
1 2 3 4 5 6 7 8 {% macro say_hello(name,age) %} <h4 > 很高兴见到你 {{ name }} </h4 > <h4 > 听说你今年 {{ age }} 岁了</h4 > {% endmacro %} {{ say_hello('何应良',21) }}
可以导入其他页面的宏定义:
1 {% from 'xxx' import xxx %}
示例:
1
2
{% from 'mac.html' import say_hello %} {{ say_hello('何应良',21) }}
jinja2也可以使用Django的控制语句(for if等等),过滤器safe的顺序:
1 2 3 4 <h3 > {{ msg|safe |reverse }} </h3 > >2h<啊戏游啥玩们你>2h<
虽然safe放在前面,但是safe永远都是最后执行的,也就是说,会先执行reverse
反向解析总结:
url_for
在app中使用:
url_for(‘endpoint)
endpoint默认是函数的名字
在blueprint中使用:
url_for(‘bluename.endpoint’)
蓝图名字.函数名
获取静态资源路径:
url_for(‘static’,filename=’path’)
static:资源
path:相对资源的相对路径
四个结构标签:
block
extends
include
marco
使用flask-bootstrap插件:
使用Bootstrap 来美化页面
1 pip install flask-bootstrap
在manage.py添加配置:
1
2
from flask_bootstrap import BootstrapBootstrap(app=app)
使用:
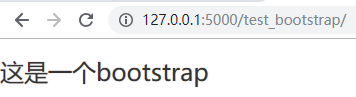
1 2 3 @blue.route('/test_bootstrap/' def test_bootstrap (): return render_template('test_bootstrap.html' )
1 2 3 4 5 6 {% extends {% block <h3 > 这是一个bootstrap</h3 > {% endblock
会话技术总结:
出现的场景:
原因:
实现机制:
cookies:
存储结构key-value,
支持过期时间:max-age,expires
不能跨域名,不能跨浏览器,默认会携带本网站的所有cookies,
默认明文传输,默认不支持中文(Flask可以支持中文)
session:
依赖于cookie
支持过期
key-value存储结构
session在flask默认没有实现持久化
实现持久化:flask-session
token:
服务端会话技术
手动实现的session
如果用在web中和session基本一致
在专用客户端中,不支持cookie
需要客户端自己为何token
消息闪现flash:
在视图中使用flash('message')
在template中使用get_flash_messages()
Flask模型
Flask默认并没有提供任何数据库操作的API
python有一个ORM:SQLAlchemy.
针对Flask的支持插件flask-sqlalchemy:
1 pip install flask-sqlalchemy
数据库连接:
1 dialect+driver: //username:password@host:port/database
dialect:数据库实现driver:数据库的驱动
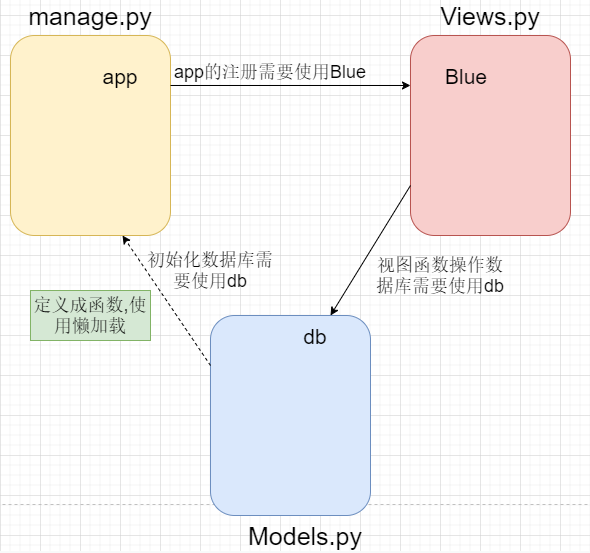
在manage.py里配置:
1 2 3 4 5 6 7 8 from app.models import init_dbapp.config['SQLALCHEMY_DATABASE_URI' ] = 'sqlite:///sqlite3.db' app.config['SQLALCHEMY_TRACK_MODIFICATIONS' ] = False init_db(app)
1 2 3 4 5 6 7 8 9 10 11 12 13 14 15 16 17 from app.models import db,Preson@blue.route('/createdb/' def create_db (): db.create_all() return 'DB Create Success' @blue.route('/addperson/' def add_person (): p = Person() p.p_name = 'liangbo' db.session.add(p) db.session.commit() return 'Person Add Success'
1 2 3 4 5 6 7 8 9 10 11 12 13 14 from flask_sqlalchemy import SQLAlchemydb = SQLAlchemy() def init_db (app ): db.init_app(app) class Preson (db.Model ): p_id = db.Column(db.Integer,primary_key=True ,autoincrement=True ) p_name= db.Column(db.String(16 ))
定义的这么复杂就是为了避免循环引用的问题:
当然上面把船创建数据库都制作成一个url,一般我们都是在shell里手动创建数据库的.db.create_all()即可.
数据库查询:
1 2 3 4 5 @blue.route('/getperson/' def get_person (): persons = Person.query.all () return render_template('personlist.html' ,person=persons)
1
2
3
4
5
6
7
8
9
10
11
12
13
14
15
16
17
18
<!DOCTYPE html > <html lang ='cn' > <head > <meta charset ="UTF-8" > <title > personlist</title > </head > <body > <ul > {% for in persons %} <li > {{ person.p_name }} </li > {% endfor </ul > </body > </html >
如果要使用mysql的话:
1 app.config['SQLALCHEMY_DATABASE_URI' ] = 'sqlite:///sqlite3.db'
改为
1 app.config['SQLALCHEMY_DATABASE_URI' ] = 'mysql+pymysql:///用户名:密码@主机:端口/数据库名'