一张表使用两个字段的时候就需要使用F函数.
OneToOneField其实就是ForeignKey多了一个unique=True的参数.
ForeignKey
正向查找:(一方查找多方)
反向查找:(多方查找一方)
ManyToManyField:ManyToManyField可以写在任意一方
1
2
class Article : tag = ManyToManyField(to=)
正向查找:
反向查找:(多方查找一方)
添加:
删除:
1 2 3 4 article.tags.remove(tag) article.tags.clear(tag)
media文件:文件上传存储的位置
FileField(upload_to='表示文件路径')
==此路径是基于media_root指明的路径==
1 2 MEDIA_URL = '/static/media/' MEDIA_ROOT = os.path.join(BASE_DIR,'static/media/' )
如果想在模板中引用上传的文件:
settings.py里的TEPLATES的OPTIONS字典里,添加:django.template.context_processors.media
使用{ MEDIA_URL }
1 2 3 4 5 6 7 8 9 10 11 12 13 14 15 16 17 TEMPLATES = [ { 'BACKEND' : 'django.template.backends.django.DjangoTemplates' , 'DIRS' : [os.path.join(BASE_DIR,'templates' )], 'APP_DIRS' : True , 'OPTIONS' : { 'context_processors' : [ 'django.template.context_processors.debug' , 'django.template.context_processors.request' , 'django.contrib.auth.context_processors.auth' , 'django.contrib.messages.context_processors.messages' , 'django.template.context_processors.meida' , ], }, }, ]
系统默认用户的继承使用:
继承AbstractUser
修改setting.py里的AUTH_USER_MODEL = ‘user.UserProfile’
重新执行迁移同步.
迁移数据库的时候,Django会自动生成auth_user
如果如果用户定义模板时继承了AbstractUser,就需要修改auth_user模型,具体操作是修改AUTH_USER_MODEL
1 2 3 4 5 6 7 8 9 10 11 class UserProfile (AbstractUser ): mobile = models.CharField(verbose_name='手机号码' , max_length=11 ,unique=True ) icon = models.ImageField(upload_to='uploads/' , height_field=None , width_field=None , max_length=None ) class Meta : db_table = 'userprofile' verbose_name = "用户表" verbose_name_plural = verbose_name def __str__ (self ): return self.name
需要在settings.py里修改AUTH_USER_MODEL:
1 2 3 4 AUTH_USER_MODEL = 'user.UserProfile'
auth_user变成了userfile
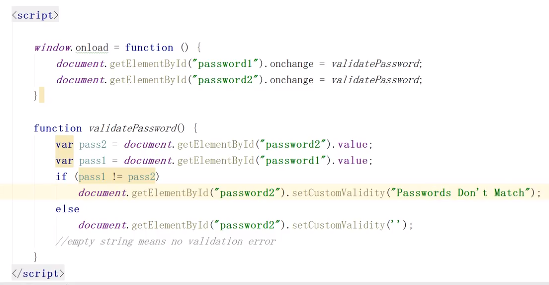
检验两次输入的密码:
一般而言,我们不使用form.py来创建表单,因为这样很难添加样式,一样都是==用form来处理表单数据==,
Django会处理涉及表单的三个不同部分:
准备并重组数据,以便下一步的渲染
为数据创建HTML表单
接收并处理客户端提交的表单及数据
Form类描述一张表单并决定它如何工作及呈现。
类似于模型类的字段映射到数据库孥段的方式,<input>元素。
==Modelform通过Form映射模型类的字段到HTML表单的<input>元素==
使用Form创建HTML表单:
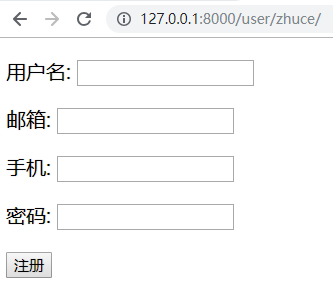
1 2 3 4 5 6 7 8 9 10 11 12 13 14 15 16 17 18 19 20 21 22 23 from django.forms import Formfrom django import formsclass UserRegisterForm (Form ): username = forms.CharField(min_length=6 , max_length=50 , required=False ,label='用户名' ,error_messages={'min_length' :'至少六位' ,'max_length' :'最多50位' }) email = forms.EmailField(label='邮箱' , required=True ,error_messages={'required' :'必须填邮箱' }) mobile = forms.CharField(label='手机' , required=True ,error_messages={'required' :'必须填手机' }) password = forms.CharField(label='密码' , required=True ,error_messages={'required' :'必须填密码' },widget=forms.widgets.PasswordInput) def zhuce (request ): if request.method == 'GET' : regform = UserRegisterForm() return render(request,'test.html' ,{'regform' :regform}) else : pass
1 2 3 4 5 6 7 8 9 10 11 12 13 14 15 16 <!DOCTYPE html > <html lang ="en" > <head > <meta carset "UTF-8 "> <title > 注册</title > </head > <body > <form action =" {% url " method ="post" > {{ regform.as_p }} <input type ="submit" value ="注册" > </form > </body > </html >
注意:
Django的form类创建HTML表单时不会为我们准备form标签和submit的input标签,这都是需要我们手动添加的
as_p的意思是:这些标签都使用p标签包裹住,
我们可以将form就当成是model来使用,所以不仅可以使用regform.as_p来渲染全部字段,还可以使用{{ regform.username }}来渲染单个字段
接收客户端提交的表单及数据:
1 2 3 4 5 6 7 8 9 10 11 def zhuce (request ): if request.method == 'GET' : regform = UserRegisterForm() print ('====>' ,regform) return render(request,'test.html' ,{'regform' :regform}) else : regform = UserRegisterForm(request.POST) print ('---->' ,regform) return HttpResponse('sadasd' )
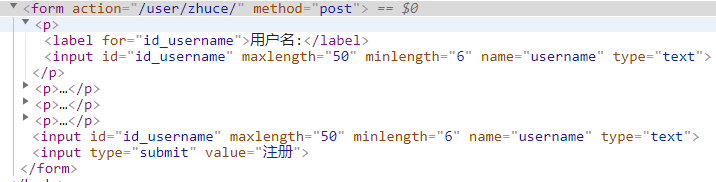
对比POST和GET两个regform
1 2 3 ====> <tr><th><label for="id_username">用户名:</label></th><td><input id="id_username" maxlength="50" minlength="6" name="username" type="text" /></td></tr> ----> <tr><th><label for="id_username">用户名:</label></th><td><input id="id_username" maxlength="50" minlength="6" name="username" type="text" value="2312123123" /></td></tr>
发现就只是多了一个value.
处理客户端提交的表单及数据:
我们通过在forms类里定义clean函数,==这些clean函数会被自动调用==.来验证表单的合法性
1 2 3 4 5 6 7 8 9 10 11 12 13 14 15 16 17 18 19 20 21 22 23 24 25 26 27 28 29 30 import refrom django import formsfrom django.core.exceptions import ValidationErrorfrom django.forms import Formclass UserRegisterForm (Form ): username = forms.CharField(min_length=6 , max_length=50 , required=False ,label='用户名' , error_messages={'min_length' :'至少六位' ,'max_length' :'最多50位' }) email = forms.EmailField(label='邮箱' , required=True ,error_messages={'required' :'必须填邮箱' }) mobile = forms.CharField(label='手机' , required=True ,error_messages={'required' :'必须填手机' }) password = forms.CharField(label='密码' , required=True ,error_messages={'required' :'必须填密码' }, widget=forms.widgets.PasswordInput) def clean_username (self ): username = self.cleaned_data.get('username' ) result = re.match(r'[a-zA-Z]\w{5,}' ,username) if not result: raise ValidationError('用户名必须字母开头' ) return username
1 2 3 4 5 6 7 8 9 10 11 12 13 def zhuce (request ): if request.method == 'GET' : regform = UserRegisterForm() return render(request,'test.html' ,{'regform' :regform}) else : regform = UserRegisterForm(request.POST) if not regform.is_valid(): print (regform.errors) return HttpResponse('sadasd' )
现在故意输入错误,regform.errors打印出:
1 <ul class ="errorlist" > <li > username<ul class ="errorlist" > <li > 用户名必须字母开头</li > </ul > </li > </ul >
正常使用:
1 2 3 4 5 6 7 8 9 10 11 12 13 14 15 def zhuce (request ): if request.method == 'GET' : regform = UserRegisterForm() return render(request,'test.html' ,{'regform' :regform}) else : regform = UserRegisterForm(request.POST) if regform.is_valid(): username = regform.clean_data.get('username' ) email = regform.clean_data.get('email' ) mobile = regform.clean_data.get('mobile' ) password = regform.clean_data.get('password' ) return render(...)
就像我之前说的,使用form来渲染表单很不方便,所以我们一般使用form来校验表单数据,所以我们就将视图函数里GET的判断全部砍掉:
1 2 3 4 5 6 7 8 9 10 11 12 13 14 15 16 17 18 19 20 21 22 23 24 25 26 27 class UserRegisterForm (Form ): username = forms.CharField(min_length=6 , max_length=50 , required=False ,label='用户名' ,error_messages={'min_length' :'至少六位' ,'max_length' :'最多50位' }) email = forms.EmailField(label='邮箱' , required=True ,error_messages={'required' :'必须填邮箱' }) mobile = forms.CharField(label='手机' , required=True ,error_messages={'required' :'必须填手机' }) password = forms.CharField(label='密码' , required=True ,error_messages={'required' :'必须填密码' },widget=forms.widgets.PasswordInput) def clean_username (self ): username = self.cleaned_data.get('username' ) result = re.match(r'[a-zA-Z]\w{5,}' ,username) if not result: raise ValidationError('用户名必须字母开头' ) return username def zhuce (request ): if request.method == 'POST' : regform = UserRegisterForm(request.POST) if regform.is_valid(): username = regform.clean_data.get('username' ) email = regform.clean_data.get('email' ) mobile = regform.clean_data.get('mobile' ) password = regform.clean_data.get('password' ) return HttpResponse(....)
但是上面的写法还是很麻烦,这时就需要使用Modelform:
1 2 3 4 5 6 7 8 9 10 11 12 13 14 15 16 17 from django import formsfrom .models import UserProfileclass RegisterForm (forms.ModelForm ): repassword = forms.CharField(label='确认密码' ,required=True ,error_messages={'required' :'必须填密码' },widget=forms.widgets.PasswordInput) class Meta : model = UserProfile fields = '__all__' exclude = ['first_name' ,'last_name' ,'date_joined' ]
我们可以在modelform里的Meta里的model定义要引用的模型类,然后使用fields定义引用模型类的哪些字段,还可以自行定义新的字段:
1 2 3 4 5 6 7 8 9 10 11 12 13 14 15 16 17 18 19 20 21 22 23 24 25 26 27 28 29 30 31 32 class RegisterForm (forms.ModelForm ): repassword = forms.CharField(label='确认密码' ,required=True ,error_messages={'required' :'必须填密码' },widget=forms.widgets.PasswordInput) class Meta : model = UserProfile fields = ("username" ,'email' ,'mobile' ,'password' ) def clean_username (self ): username = self.clean_data.get('username' ) result = re.match('...' ,username) if not result: raise ValidationError('用户名错误' ) return username def zhuce (request ): if request.method == 'GET' : regform = RegisterForm() return render(request,'test.html' ,{'regform' :regform}) else : regform = RegisterForm(request.POST) if regform.is_valid(): username = regform.clean_data.get('username' ) email = regform.clean_data.get('email' ) mobile = regform.clean_data.get('mobile' ) password = regform.clean_data.get('password' ) return HttpResponse('sadasd' )
总结一下forms和modelform的最大区别:
forms必须自行定义全部的字段
Modelform可以引用model里的字段,也可以定义新的字段
注意:filed填写的是需要验证的字段 ,也就是说不再filed里面的字段是不会被验证的
所以,我们最常用的注册视图函数 为:
1 2 3 4 5 6 7 8 9 10 11 12 13 14 15 16 17 18 19 20 21 22 23 24 25 def user_register (request ): if request.method == 'GET' : return render(request,'user/regiset.html' ) else : regform = RegisterForm(request.POST) if regform.is_valid(): username = regform.clean_data.get('username' ) email = regform.clean_data.get('email' ) mobile = regform.clean_data.get('mobile' ) password = regform.clean_data.get('password' ) if not UserProfile.objects.filter ((Q(username=username)|Q(mobile=mobile)).exists()): password = make_password(password) user = UserProfile.objects.create(username=username,password=password,email=email,mobile=mobile) if user: return HttpResponse('注册成功' ) else : return render(request,'user/regiset.html' ,{"msg" :'用户名或者手机密码已存在' }) return render(request,'user/regiset.html' ,{"msg" :'注册失败' })
登录的常用视图函数:
1 2 3 4 5 6 7 8 9 10 11 12 13 14 15 16 17 18 19 20 def user_login (request ): if request.method == 'GET' : return render(request,'user/login.html' ) else : lform = LoginForm(request.POST) if lform.is_valid(): username = lform.clean_data.get('username' ) password = lform.clean_data.get('password' ) user = UserProfile.objects.filter (username=username).first() psw_is_true = check_password(password,user.password) if psw_is_true: request.session['username' ] = username return redirect(reverse('index' )) else : return render(request,'user/login.html' ,{'errors' :lform.errors})
这样我们就把username放进了session里了..
那么如何在模板里使用session?
1 2 3 4 5 6 7 {% if 欢迎 <a href ="#" > {{ request.session.username }} </a > <a href ="#" > 注销</a > {% else <a href =" {% url " ></a > <a href =" {% url " ></a > {% endif
注销:
1 2 3 4 5 6 7 def user_logout (request ): request.session.flush() return redirect(reverse('index' ))
但是一般我们都不直接操作session,而是使用封装好的方法:
1 2 3 from django.contrib.auth import logoutdef user_logout (request ): logout(request)
注意,还有一个from django.contrib.auth.views import logout,不要用错了.
既然有logout,那么就有login,所以前面的login函数也可以修改:
1 2 3 4 5 6 7 8 9 10 11 12 13 14 15 16 17 18 19 20 def user_login (request ): if request.method == 'GET' : return render(request,'user/login.html' ) else : lform = LoginForm(request.POST) if lform.is_valid(): username = lform.clean_data.get('username' ) password = lform.clean_data.get('password' ) user = UserProfile.objects.filter (username=username).first() psw_is_true = check_password(password,user.password) if psw_is_true: request.session['username' ] = username return redirect(reverse('index' )) else : return render(request,'user/login.html' ,{'errors' :lform.errors})
修改成:
1 2 3 4 5 6 7 8 9 10 11 12 13 14 15 16 17 18 19 20 from django.contrib.auth import logout,login,authenticatedef user_login (request ): if request.method == 'GET' : return render(request,'user/login.html' ) else : lform = LoginForm(request.POST) if lform.is_valid(): username = lform.clean_data.get('username' ) password = lform.clean_data.get('password' ) user = authenticate(username=username,password=password) if user: login(request,user) return redirect(reverse('index' )) else : return render(request,'user/login.html' ,{'errors' :lform.errors})
使用了login的话,那么模板就不能简单的使用session来获取数据了:
1 2 3 4 5 6 7 8 {% if 欢迎 <a href ="#" > {{ request.user.username }} </a > <a href ="#" > 注销</a > {% else <a href =" {% url " ></a > <a href =" {% url " ></a > {% endif
总结:
make_password:将明文密码加密
check_password:检查用户的密码是否一致
request.session:设置/获取session的值
request.session.flush:删除django_session + cookies + 字典
request.session.clear:删除字典
del request.session[key]:删除指定的key
只有继承了abstractuser类的用户模型才能使用logout,login和authenticate.先验证后登录 :
先使用authenticate进行用户的数据库查询判断,如果有则返回用户对象
login(request,user):类似于request.session,但是不是使用session属性了,而是使用request.user
注意:将 request.user设置成匿名的User()
短信验证功能:
这时可以使用第三方的短信认证服务.比如说网易云信.
为了对接网易云信接口,我们需要写一个函数,为了功能拆分,我们在myapp目录下创建一个utils.py文件夹,里面存放工具类.在这里存放工具函数.
实现验证码刷新功能(点击即刷新验证码)
pip install django-simple-captcha
在setting.py的INSTALLED_APPS里面添加captcha
1 2 3 4 5 6 CAPTCHA_IMAGE_SIZE = (80 , 45 ) CAPTCHA_LENGTH = 4 CAPTCHA_TIMEOUT = 1
python manage.py migrate,创建一个新的captcha表.
在项目下的路由添加:url(r'^captcha/',include('captcha.urls'))
在forms.py添加:
1 2 3 4 5 6 from captcha.fields import CaptchaFieldclass CaptchaTestForm (forms.Form ): email = forms.EmailField() captcha = CaptchaField()
添加一个视图函数:
1 2 3 4 def forget_password (request ): if request.method = 'GET' : form = CaptchaTestForm() return render(request,'forget_pwd.html' ,context={'form' :form})
实际上captcha本身就是一个app ,我们上面的操作也是一个创建一个app的常用流程.而captcha就为我们准备了url路由了,直接调用即可
发送邮件:
1 2 3 4 5 6 7 8 9 10 11 12 EMAIL_HOST = 'smtp.qq.com' EMAIL_HOST_USER = 'xxx@qq.com' EMAIL_HOST_PASSWORD = 'p@ssw0rd' EMAIL_PORT = 25 EMAIL_USE_SSL = True EMAIL_USE_TLS = False
用户通过邮箱找回密码:
进入forget_pwd.html页面
填写表单,提交到forget_pwd
后台发送邮箱
用户进入邮箱,点击邮箱的链接,进入update_pwd.html
填写表单,提交到update_pwd
后台更新密码
上面流程对应:
进入forget_password视图函数的get方法
进入forget_password视图函数的post方法
post方法再调用send_email方法
进入update_pwd视图函数的get方法
进入update_pwd视图函数的post方法
post方法更新用户密码
1 2 3 4 5 6 7 8 9 10 11 12 13 14 15 16 17 18 19 20 21 22 23 24 25 26 27 28 29 30 31 32 33 34 35 36 37 38 39 40 41 42 43 44 45 46 47 48 49 50 51 52 53 54 55 56 57 58 59 60 61 62 63 64 65 66 67 68 69 70 71 72 url(r'^captcha/' ,include('captcha.urls' )) url(r'forget_pwd' ,views.forget_pwd,name='forget_pwd' ) url(r'update_pwd' ,views.update_pwd,name='update_pwd' ) from captcha.fields import CaptchaFieldclass CaptchaTestForm (forms.Form ): email = forms.EmailField() captcha = CaptchaField() from django.core.mail import send_maildef send_email (email,request ): '发送邮箱的工具方法' user = UserProfile.objects.filter (email=email).first() ran_code = uuid.uuid4() request.session[ran_code] = user.id subject = '个人博客找回密码' message = ''' 用户你好,此链接用户找回密码,请点击链接: <a href="http://107.0.0.1:8000/user/update_pwd?c=%s">更新密码</a> 如果链接不能点击,请复制: http://107.0.0.1:8000/user/update_pwd?c=%s ''' %(ran_code,ran_code) result = send_email(subject,message,EMAIL_HOST,[email,],html_message=message) return HttpResponse(result) def forget_password (request ): '点击"忘记密码"时,发送邮箱' if request.method = 'GET' : form = CaptchaTestForm() return render(request,'forget_pwd.html' ,context={'form' :form}) else : email = request.POST.get('email' ) send_email(email,request) def update_pwd (request ): if request.method = 'GET' : c = request.GET.get('c' ) return render(request,'updata_pwd.html' ,{'c' :c}) else : code = request.POST.get('c' ) uid =request.session.get(code) UserProfile.objects.get(pk=uid) pwd = request.POST.get('password' ) repwd = request.POST.get('repassword' ) if pwd==repwd and user: pwd = make_password(pwd) user.password = pwd user.save() return HttpResponse('用户密码更新成功' )
总结:
短信验证,第三方网易云信,调用它的接口即可
验证码验证:
captcha的Form
1 2 3 4 5 6 from captcha.fields import CaptchaFieldclass CaptchaTestForm (forms.Form ): email = forms.EmailField() captcha = CaptchaField()
captcha的视图:
1 2 3 if request.method = 'GET' : form = CaptchaTestForm() return render(request,'forget_pwd.html' ,context={'form' :form})
captcha的模板:
1 2 3 4 5 6 7 8 9 <div class ="" > <p > {{ msg }} {{ errors }} </p > <form action =" {% url " method ="post" > {% csrf_token {{ form.email }} {{ form.captcha }} <input type ="submit" value ="找回密码" > </form > <div >
captcha的Ajax验证请求:
1 2 3 4 5 6 7 8 9 10 11 12 13 14 15 16 <script > $('id_captcha_1' ).blur(function ( var $this = $(this ); var key = $('#id_captcha_0' ).val(); var code = $(this ).val(); $.getJSON(' {% url ',{key:key,code:code},function(data){ if (data.status==1){ $this.after('<span > 验证码正确</span > ') }else{ $this.after('<span > 验证码错误</span > ') } }) }) </script >
captcha的Ajax验证请求的视图函数:
1 2 3 4 5 6 7 8 9 10 11 12 13 14 def valid_code (request ): if request.is_ajax(): key = request.GET.get('key' ) code = request.GET.get('code' ) captcha = CaptchaStore.objects.filter (hashkey=key).first() if captcha.response = code.lower(): data = {'status' :1 } else : data = {'status' :0 } return JsonResponse(data)
邮箱验证
邮箱的配置
1 2 3 4 5 EMAIL_HOST = 'smtp.qq.com' EMAIL_HOST_USER = 'xxx@qq.com' EMAIL_HOST_PASSWORD = 'p@ssw0rd' EMAIL_PORT = 25 EMAIL_USE_SSL = True
send_email:
密码确认
1 2 3 4 5 6 7 8 9 10 11 12 13 14 15 code = request.POST.get('c' ) uid =request.session.get(code) UserProfile.objects.get(pk=uid) pwd = request.POST.get('password' ) repwd = request.POST.get('repassword' ) if pwd==repwd and user: pwd = make_password(pwd) user.password = pwd user.save() return HttpResponse('用户密码更新成功' )
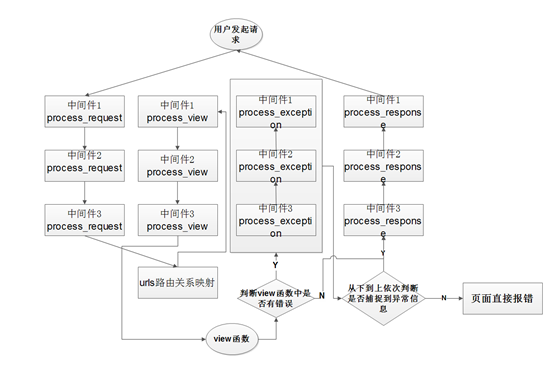
中间件:
中间件有一个常用的做法:
但是如果我们需要特定的链接跳转到登录页面,就可以定义一个login_list
1 2 3 4 5 6 7 8 9 10 11 12 13 login_list = ['/user/center' ,] class MiddleWare1 (MiddlewareMixin ): def process_request (self,request ): path = request.path if path in login_list: if request.user.is_authenticated: print (request.user.username) else : return redirect(reverse('user:login' ))
使用中间件的话就会拦截全部的request请求,如果想把登录验证加在特定的视图函数 的话,可以使用login_required装饰器,
1 2 3 4 5 6 7 8 9 10 @login_required def user_center (request ): return HttpResponse('用户中心' ) LOGIN_URL = '/user/login'
注意:login_required只能用于使用了login函数的user.也就是必须继承是abstractuser
中间件总结:
步骤:
创建middleware文件夹,创建XXmidelware.py文件
在setting.py的MIDDLEWARE里注册中间件
定义类继承MiddelwareMixin
重写方法
如果不想使用中间件,可以使用login_required装饰器:
使用媒体文件:
在setting.py里添加:
1 2 3 4 5 MEDIA_URL = '/media/' MEDIA_ROOT = os.path.join(BASE_DIR,'media' ) 'django.template.context_processors.media' ,
配置主路由 :
1 url(r'^media/(?<path>.*)$' ,server,{'document_root' :MEDIA_ROOT})
在模板中添加:
1 <img src =" {{ MEDIA_ROOT }} {{ user.icon }} " >
上传,保存文件:
1 2 3 4 5 6 7 8 9 10 11 12 13 14 15 16 17 18 19 20 21 22 23 @login_required def user_center (request ): if request.method == 'GET' : user = request.user return render(request,'center.html' ,{'user' :user}) else : username = request.POST.get('username' ) email = request.POST.get('email' ) mobile = request.POST.get('mobile' ) icon = request.FIELS.get('icon' ) request.user.username = username request.user.email = email request.user.mobile = mobile request.user.icon = icon request.user.save() return render(request,'center.html' ,{'user' :request.user})
注意:上面的代码中,user模型本身就有ImageField,这样可以我们可以直接保存,如果像下面的代码,我们就必须手动写保存的代码:
1 2 3 4 5 6 7 8 9 10 11 12 13 14 15 16 import osfrom django.conf import settingsdef savefile (request ): if request.method == 'POST' : f = request.FILES['file' ] filepath = os.path.join(settings.MEDIA_ROOT,f.name) with open (filepath,'wb' ) as fp: for info in f.chunks(): fp.write(info) return HttpResponse('上传成功' ) else : return HttpResponse('上传失败' )
Xadmin的使用:
安装Xadmin,注意不仅要pip install xadmin,还要pip install requirement.txt
Xadmin实际上也是一个app,但是我们一般不把自己创建的app和外部导入的app混在一起,所以,一般文件目录为:
1 2 3 4 5 6 7 8 9 blogproject |-- myblog |-- static |-- templates |-- apps |-- user |--article |-- extra_apps |-- xadmin
既然是app,那么就需要在settings.py里注册,但是xadmin比较特殊,需要注册两个:xadmin和crispy_forms
修改主路由,原先的admin路由为:url(admin/,admin.site.urls),现在修改为url('xadmin',xadmin.site.urls)
因为xadmin需要用到数据库,所以还需要执行迁移和同步
在需要用到xadmin的app下创建adminx.py文件:
1 2 3 4 5 6 7 8 9 from django.contrib import adminfrom .models import Articleadmin.site.register(Article) import xadminfrom .models import Articleadmin.site.register(Article)
xadmin可以除了list_display等,还可以使用list_editable,可以在列表页直接编辑数据,不必到详情页编辑
编辑Xadmin:
1 2 3 4 5 6 7 8 9 10 11 12 13 14 15 16 17 18 import xadminfrom xadmin import viewsfrom .models import Articleclass BaseSettings : enable_themes = True use_bootswatch = True class GlobalSettings : site_title = '博客后台管理' site_footer = 'powered by liangbo' xadmin.site.register(views.BaseAdminView,BaseSettings) xadmin.site.register(views.CommAdminView,GlobalSettings)
带参数的url反向解析:
1 2 3 4 5 6 7 8 <a href =" {% url ?id= {{ article.id | add:"1" }} " ></a > <a href =" {% url ?id= {{ article.id | add:"1" }} &tid= {{ tid }} " ></a > <a href =" {% url ?page= {% if {{ page.previous_page_number }} {% else 1 {% endif " > 文本 </a >
在视图函数就写:
1 2 page = request.GET.get('page' ,1 )
富文本编辑器
使用ckeditor:pip install django-ckeditor
ckeditor也是app,所以也要注册到INSTALL_APPS中,需要注册两种:
ckeditor:
ckeditor_uploder:
在setting.py添加:CKEDITOR_UPLOAD_PATH="uploads/"表示使用ckeditor上传文件时的存储路径.CKEDITOR_UPLOAD_PATH是依赖于MEDIA_ROOT的.(上面的uploads表示:将文件存储到MEDIA_ROOT/uploads目录下)
ckeditor还可以在setting.py里面设置ckeditor相关的配置:CKEDITOR_CONFIGS
收集静态文件:python manage.py collectstatic
在主路由添加:url(r'ckeditor/',include('ckeditor_uploader.urls'))
ckeditor本身就是app,ckeditor内部有upload和browse两个路由.upload负责上传,browse负责预览
让Django的后台使用富文本:
比如博客的Article模型,我们希望在后台写文章的时候,直接就能使用富文本编写.content=model.TextFiled(verbose_name="内容")改为content=RichTextUploadingField(verbose_name="内容")from ckeditor_uploader.fileds import RichTextUploadeingField)
简单来说,希望哪个字段在后台是富文本格式,就将这个字段改为RichTextUploadingField
最后迁移和同步即可.
上面的步骤是在后台使用富文本,那么如何在前台使用?
Model里定义:content=RichTextUploadingField(verbose_name="内容")
定义一个forms:
1 2 3 4 5 class ArticleForm (forms.ModelForm ): class Meta : model = Article fields = '__all__'
在模板里:
1 2 3 4 5 <form action ="#" method ="post" > {% csrf_token {{ regform.as_p }} <input type ="submit" value ="发表文章" > </form >
现在的写法:
1 2 3 4 5 6 <form action ="#" method ="post" > {% csrf_token {{ regform.media }} {{ regform.as_p }} <input type ="submit" value ="发表文章" > </form >
就只是多了一个