链接:https://juejin.im/post/6844903602926927880
1. 目录
redux简介
案例
react-redux核心介绍
2. redux简介
redux是react全家桶的一员,它试图为 React 应用提供「可预测化的状态管理」机制。
Redux是将整个应用状态存储到到一个地方,称为store
里面保存一棵状态树(state tree)
组件可以派发(dispatch)行为(action)给store,而不是直接通知其它组件
其它组件可以通过订阅store中的状态(state)来刷新自己的视图
3. 安装 1 npm install --save redux
4. redux核心 4.1 State
state是数据集合
可以理解为工厂加工商品所需的原材料
4.2 action
State的变化,会导致View的变化。但是,用户接触不到 State,只能接触到View 所以,State的变化必须是 View导致的。
action就是改变state的指令,有多少操作state的动作就会有多少action。
可以将action理解为描述发生了什么的指示器
4.3 reducer 加工函数
action发出命令后将state放入reucer加工函数中,返回新的state。 可以理解为加工的机器
4.4 store
store 可以理解为有多个加工机器的总工厂
1 let store = createStore(reducers);
Store 就是把它们联系到一起的对象。Store 有以下职责:
1
2
3
4
5
维持应用的 state; 提供 getState() 方法获取 state; 提供 dispatch(action) 方法更新 state; 通过 subscribe(listener) 注册监听器; 通过 subscribe(listener) 返回的函数注销监听器。
我们可以通过store.getState()来了解工厂中商品的状态, 使用store.dispatch发送action指令。
5. 经典案例 这是一个redux的经典案例
定义reducer函数根据action的类型改变state
actions 定义指令
通过createStore创建store
调用store.dispatch()发出修改state的命令
1
2
3
4
5
6
7
8
9
10
11
12
13
14
15
16
17
18
19
20
21
22
23
24
import { createStore } from 'redux' const reducer = (state = {count: 0}, action) => { switch (action.type){ case 'INCREASE': return {count: state.count + 1}; case 'DECREASE': return {count: state.count - 1}; default: return state; } } const actions = { increase: () => ({type: 'INCREASE'}), decrease: () => ({type: 'DECREASE'}) } const store = createStore(reducer); store.subscribe(() => console.log(store.getState()) ); store.dispatch(actions.increase()) // {count: 1} store.dispatch(actions.increase()) // {count: 2} store.dispatch(actions.increase()) // {count: 3}
我们可以直接在react component上使用store.dispatch,但是这样不太方便,这个时候我们需要react-redux
1
2
3
4
5
6
7
class Todos extends Component { render(){ return( <div onCLick={()=>store.dispatch(actions.delTodo()) }>test</div> ) } }
6. react-redux Redux 官方提供的 React 绑定库。 具有高效且灵活的特性。
6.1 安装
1 npm install --save react-redux
6.2 核心
< Provider store>
connect([mapStateToProps], [mapDispatchToProps], [mergeProps], [options])
Provider 内的任何一个组件(比如这里的 Comp),如果需要使用 state 中的数据,就必须是「被 connect 过的」组件——使用 connect 方法对「你编写的组件(MyComp)」进行包装后的产物。
这个函数允许我们将 store 中的数据作为 props 绑定到组件上。
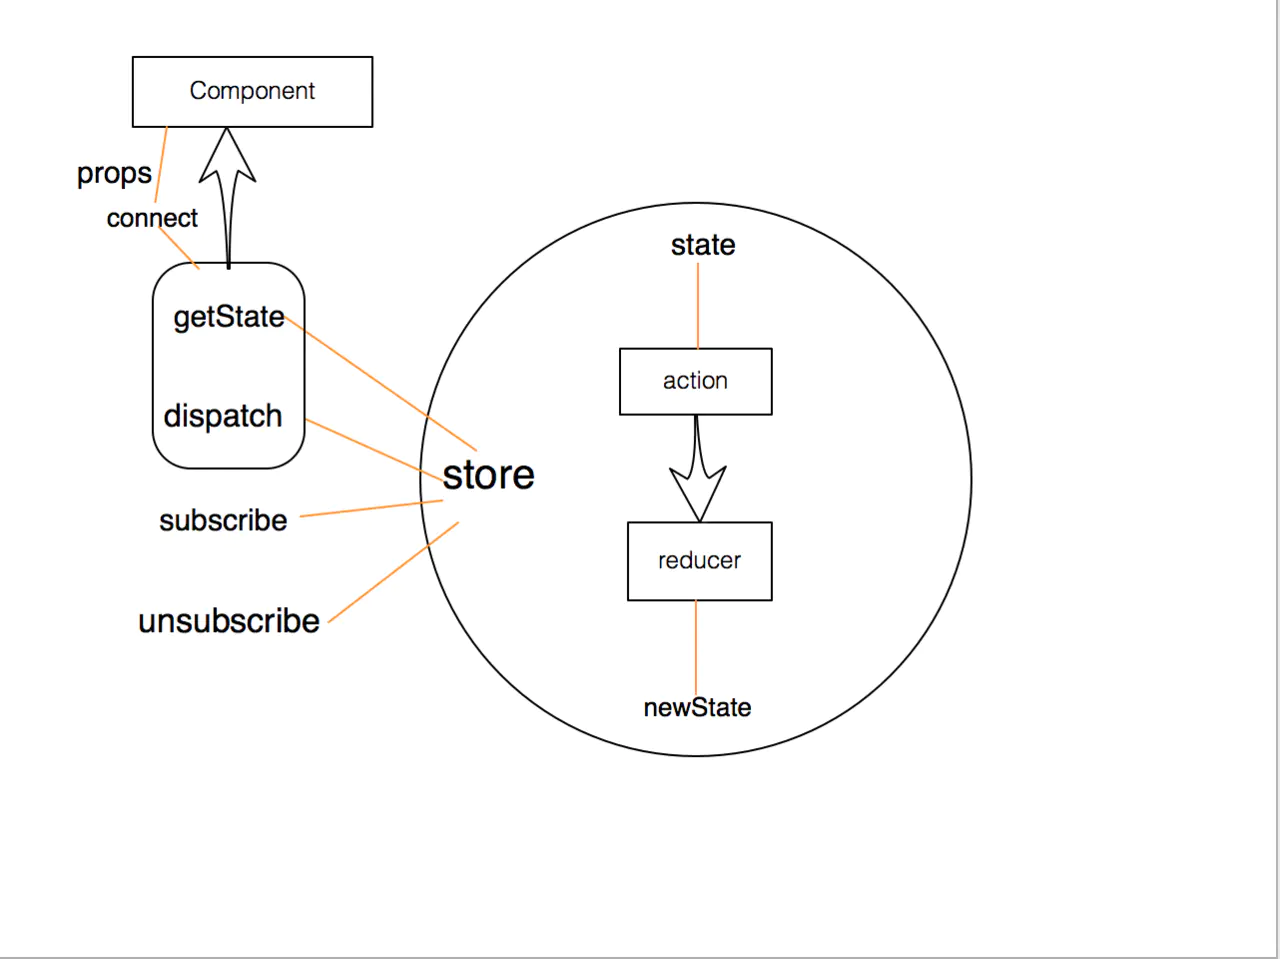
简单的流程如下图所示:
react-redux中的connect方法将store上的getState 和 dispatch 包装成组件的props。
将之前直接在组件上dispatch的代码修改为如下:
index.js
1
2
3
4
5
6
7
8
9
10
11
12
13
14
15
16
17
import React, { Component } from 'react'; import store from '../store'; import actions from '../store/actions/list'; import {connect} from 'react-redux'; class Todos extends Component { render(){ return( <div onCLick={()=>this.props.del_todo() }>test</div> ) } } export default connect( state=>state, actions )(Todos);
Provider 能拿到关键的store并传递给每个子组件
7. connect如何工作的? connect() 接收四个参数,它们分别是 mapStateToProps , mapDispatchToProps, mergeProps 和 options 。
7.1 mapStateToProps这个函数允许我们将 store 中的数据作为 props 绑定到组件上。
reducer.js
1
2
3
4
5
6
7
8
9
10
11
12
13
14
15
16
17
18
19
20
export default function (state = { lists: [{text:'移动端计划'}],newType:'all'}, action) { switch (action.type) { case types.ADD_TODO: return {...state,lists:[...state.lists,{text:action.text}]} case types.TOGGLE_TODO: return {...state,lists:state.lists.map((item,index)=>{ if(index == action.index){ item.completed = !item.completed } return item })} case types.DEL_TODO: return {...state,lists:[...state.lists.slice(0,action.index),...state.lists.slice(action.index+1)]} case types.SWITCH_TYPE: console.log({...state,newType:action.newType}) return {...state,newType:action.newType} default: return state; } }
在reducer.js中,定义了初始化的state,通过connect方法,我们就能使用this.props.lists拿到初始化的state。
1
2
3
4
5
6
7
8
9
10
11
12
13
14
15
16
17
18
19
20
21
22
23
24
import React, { Component } from 'react'; import store from '../store'; import actions from '../store/actions/list'; import {connect} from 'react-redux'; class Todos extends Component { render(){ return( { + <ul> + this.props.state.lists.map(list =>( + <li>{list.text}</li> + )) + </ul> } <div onCLick={()=>this.props.del_todo() }>test</div> ) } } export default connect( state=>state, actions )(Todos);
当 state 变化,或者 ownProps 变化的时候,mapStateToProps 都会被调用,计算出一个新的 stateProps,(在与 ownProps merge 后)更新给 MyComp。
7.2 mapDispatchToProps(dispatch, ownProps): dispatchProps connect 的第二个参数是 mapDispatchToProps,它的功能是,将 action 作为 props 绑定到 MyComp 上。
action.js
1
2
3
4
5
6
7
8
9
10
11
12
13
14
15
16
17
18
19
import * as types from "../action-types"; export default{ add_todo(text){ return { type: types.ADD_TODO, text: text} }, del_todo(idx){ return {type:types.DEL_TODO, index: idx} }, toggle_todo(index){ return {type:types.TOGGLE_TODO, index} }, del_todo(index){ return {type:types.DEL_TODO, index} }, switch_type(newType){ return {type:types.SWITCH_TYPE, newType} } }
我在action.js中定义的修改状态的命令,会通过connect 的 mapDispatchToProps方法变为props绑定在reac组件上。
我们可以方便得使用去调用
1 <div onCLick={()=>this.props.del_todo() }>test</div>
8. 深入 了解到这里,我们会发现并没有使用store.dispatch方法去发出命令,但是state已经修改,view也变化了,那么到底发生了什么?
1 store.dispatch(actions.increase())
关键的是connect()
connect原理简化版
1
2
3
4
5
6
7
8
9
10
11
12
13
14
15
16
17
18
19
20
21
22
23
24
25
26
27
28
29
30
31
32
33
34
35
36
37
import React,{Component} from 'react'; import {bindActionCreators} from 'redux'; import propTypes from 'prop-types'; export default function(mapStateToProps,mapDispatchToProps){ return function(WrapedComponent){ class ProxyComponent extends Component{ static contextTypes = { store:propTypes.object } constructor(props,context){ super(props,context); this.store = context.store; this.state = mapStateToProps(this.store.getState()); } componentWillMount(){ this.unsubscribe = this.store.subscribe(()=>{ this.setState(mapStateToProps(this.store.getState())); }); } componentWillUnmount(){ this.unsubscribe(); } render(){ let actions= {}; if(typeof mapDispatchToProps == 'function'){ actions = mapDispatchToProps(this.store.disaptch); }else if(typeof mapDispatchToProps == 'object'){ console.log('object', mapDispatchToProps) actions = bindActionCreators(mapDispatchToProps,this.store.dispatch); } return <WrapedComponent {...this.state} {...actions}/> } } return ProxyComponent; } }
1.state的返回 connect中对于Provided父组件上传来的store,通过将状态返回
1 mapStateToProps(this.store.getState());
通过 Redux 的辅助函数 bindActionCreators(),用dispatch监听每一个action。
1 bindActionCreators(mapDispatchToProps,this.store.dispatch);
所以调用props上的方法时,会自动发起store.dispach(XXX)事件,发出命令