单文件组件
在很多 Vue 项目中,我们使用 Vue.component 来定义全局组件,紧接着用 new Vue({ el: '#container '}) 在每个页面内指定一个容器元素。
这种方式在很多中小规模的项目中运作的很好,在这些项目里 JavaScript 只被用来加强特定的视图。但当在更复杂的项目中,或者你的前端完全由 JavaScript 驱动的时候,下面这些缺点将变得非常明显:
- 全局定义 (Global definitions) 强制要求每个 component 中的命名不得重复
- 字符串模板 (String templates) 缺乏语法高亮,在 HTML 有多行的时候,需要用到丑陋的
\ - 不支持 CSS (No CSS support) 意味着当 HTML 和 JavaScript 组件化时,CSS 明显被遗漏
- 没有构建步骤 (No build step) 限制只能使用 HTML 和 ES5 JavaScript, 而不能使用预处理器,如 Pug (formerly Jade) 和 Babel
文件扩展名为 .vue 的 single-file components(单文件组件) 为以上所有问题提供了解决方法
1 | new Vue({ |
等同于
1 | new Vue({ |
运行项目
1 | npm run serve |
初步使用
1 | <!-- App.vue --> |
1 | // main.js |
<template>html代码 , 最多可以包含一个<script>js代码 , 最多可以包含一个<style>css代码,可以包含多个 , src路径是相对的- 加上scoped属性 , css局部生效 (这样局部不会覆盖全局 , 全局也不会覆盖局部)
- 加上lang=”scss” , 可以支持scss
scoped的本质 :添加完
scoped
发现多了一个属性 , 这个属性就是
scoped添加的 . 也就是说 , 此时的component是根据这个唯一的属性设置的样式 , 此时的css选择器是
2
3
}这样 , 局部不会影响全局 , 全局也不会影响局部
使用component
在component目录创建两个文件navibar和sidebar
1 | <template> |
1 | <template> |
全局组件
App.vue
1 | <template> |
局部组件
1 | <script> |
vue.config.js
vue.config.js 是一个可选的配置文件,如果项目的 (和 package.json 同级的) 根目录中存在这个文件,那么它会被 @vue/cli-service 自动加载。
devServer.proxy
支持跨域请求
1 | module.exports = { |
上面的配置和nginx的差不多
1 | module.exports = { |
将路径为/ajax代理到http://m.maoyan.com/
这样就可以使用反向代理了 :
1 | axios.get('/ajax/movieOnInfoList').then(ret => { console.log(ret) }) |
Vue.router
功能 : 构建单页面应用(SPA)
初步使用
Vue.router是标准的MVC模式 :
router/index.js
1 | import Vue from 'vue' |
views/Home.vue , views/Film.vue
1 | <template> |
App.vue
1 | <template> |
<router-view> 为路由容器
main.js
1 | import Vue from 'vue' |
接下来访问<http://localhost:8080/#/film> 即可访问firm页面
简单使用
HTML
1 | <script src="https://unpkg.com/vue/dist/vue.js"></script> |
JS
1 | // 0. 如果使用模块化机制编程,导入Vue和VueRouter,要调用 Vue.use(VueRouter) |
通过注入路由器,我们可以在任何组件内通过 this.$router 访问路由器,也可以通过 this.$route 访问当前路由:
1 | // Home.vue |
url-for的反向解析
- 声明式导航 : 使用
<a>或<router-link>更换路径 - 编程式导航 : 使用js的
location.url='XXX'或this.$router.push(XXX)更换路径
1 | const router = new VueRouter({ |
中 :
1 | <router-link to="/film">film</router-link> |
等同于
1 | <a href="/#/film">film</a> |
<router-link>的额外功能
当
<router-link>对应的路由匹配成功,将自动设置 class 属性值.router-link-activetag : 将这个组件渲染成某个标签
1
<router-link to="/film" tag="li" >film</router-link>
将film这个组件渲染成li标签
activeClass : 自动添加
激活class, 方便添加高亮显示1
2
3
4
5
6
7<router-link to="/film" activeClass ="myactiveClass" >film</router-link>
<style>
.myactiveClass {
cloor: red;
}
</style>
二级路由
1 | const router = new VueRouter({ |
之后可以在views文件夹路创建一个Film文件夹 , 存放Nowplaying.vue和Comingsoon.vue
反向解析
1 | <router-link to="/film/nowplaying">nowplayingr</router-link> |
url重定向
访问/film的时候自动重定向到/film/nowplaying
1 | const router = new VueRouter({ |
动态路由
编程式导航
1 | export default { |
所谓的动态路由就类似于
1 |
|
中的<string:record_type>
detail_id 类似于 record_type
1 | const router = new VueRouter({ |
然后我们就可以在views/detail.vue里使用
1 | export default { |
命名路由
就是给一个name
1 | const router = new VueRouter({ |
所以我们就可以以更加方便的形式进行url的反向解析
1 | export default { |
history 模式
<http://localhost:8080/#/film> , 发现有一个很丑的/#/ , 如果想取消这个/#/ , 只要设置history模式即可
1 | const router = new VueRouter({ |
vue-router默认 hash 模式 —— 使用 URL 的 hash 来模拟一个完整的 URL,于是当 URL 改变时,页面不会重新加载。如果不想要很丑的 hash,我们可以用路由的 history 模式,这种模式充分利用
history.pushStateAPI 来完成 URL 跳转而无须重新加载页面。对于vue这类渐进式前端开发框架,为了构建 SPA(单页面应用),需要引入
前端路由系统,这也就是 Vue-Router 存在的意义。前端路由的核心,就在于改变视图的同时不会向后端发出请求。简单来说:
- hash(#)是URL 的锚点,代表的是网页中的一个位置,单单改变#后的部分,浏览器只会滚动到相应位置,不会重新加载网页,
- 也就是说 hash 出现在 URL 中,但不会被包含在 http 请求中,对后端完全没有影响,因此改变 hash 不会重新加载页面;
- 同时每一次改变#后的部分,都会在浏览器的访问历史中增加一个记录,使用”后退”按钮,就可以回到上一个位置;所以说Hash模式通过锚点值的改变,根据不同的值,渲染指定DOM位置的不同数据。
路由守卫(路由拦截)
比如说 : 访问个人中心页面 , 如果你未登录 , 就会拦截本次路由 , 将其重定向到注册页面.
全局
在router.index.js添加以下内容 :
1 | const router = new VueRouter({ |
- to: Route: 即将要进入的目标 路由对象
- from: Route: 当前导航正要离开的路由
- next: Function: 一定要调用该方法来 resolve 这个钩子。执行效果依赖 next 方法的调用参数。
- next(): 进行管道中的下一个钩子。如果全部钩子执行完了,则导航的状态就是 confirmed (确认的)。
- next(false): 中断当前的导航。如果浏览器的 URL 改变了 (可能是用户手动或者浏览器后退按钮),那么 URL 地址会重置到 from 路由对应的地址。
- next(‘/‘) 或者 next({ path: ‘/‘ }): 跳转到一个不同的地址。当前的导航被中断,然后进行一个新的导航。你可以向 next 传递任意位置对象,且允许设置诸如 replace: true、name: ‘home’ 之类的选项以及任何用在 router-link 的 to prop 或 router.push 中的选项。
- next(error): (2.4.0+) 如果传入 next 的参数是一个 Error 实例,则导航会被终止且该错误会被传递给 router.onError() 注册过的回调。
局部(某个路由独享的守卫)
1 | const router = new VueRouter({ |
这些守卫与全局前置守卫的方法参数是一样的。
组件内的守卫
在路由组件内直接定义以下路由导航守卫:
beforeRouteEnterbeforeRouteUpdatebeforeRouteLeave
1 | const Foo = { |
所以前面拦截进入用户中心的功能 , 可以在user.vue你添加
1 | <script> |
beforeRouteEnter 守卫 不能 访问 this,因为守卫在导航确认前被调用,因此即将登场的新组件还没被创建。
完整的导航解析流程
- 导航被触发。
- 在失活的组件里调用离开守卫。
- 调用全局的
beforeEach守卫。 - 在重用的组件里调用
beforeRouteUpdate守卫 。 - 在路由配置里调用
beforeEnter。 - 解析异步路由组件。
- 在被激活的组件里调用
beforeRouteEnter。 - 调用全局的
beforeResolve守卫 。 - 导航被确认。
- 调用全局的
afterEach钩子。 - 触发 DOM 更新。
- 用创建好的实例调用
beforeRouteEnter守卫中传给next的回调函数。
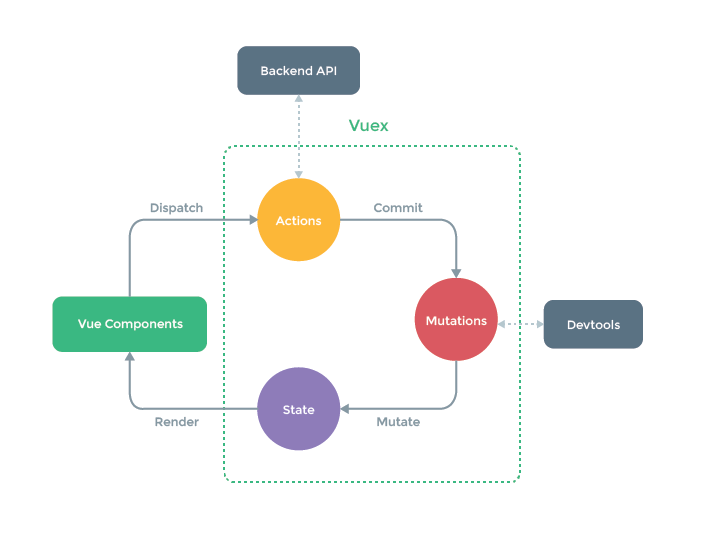
状态管理 Vuex
- Vuex 是一个专为 Vue.js 应用程序开发的状态管理模式。
- 它采用集中式存储管理应用的所有组件的状态,并以相应的规则保证状态以一种可预测的方式发生变化。
- 简单来说 , Vuex就类似于python的全局命名空间 , 用于存储各个变量 . 接着我们就可以管理这些变量了
state
使用Vuex, 需要创建一个store/store.js文件
1 | import Vue from 'vue' |
然后在main.js里初始化
1 | import Vue from 'vue' |
最后我们就可以使用$store.state.isTabbarshow来获取了 , 这是属性是可读可写的
Mutations
上面的操作有效 , 但是危险 . 因为state是全局的 , 而且是可读可写的 , 一旦有谁修改 , 就很难追踪 . 所以必须使用Mutations来间接修改 , 因为Mutations可以用Devtools来监控 .
所以 , 上面的操作可以修改为
1 | import Vue from 'vue' |
接着我们就可以调用this.$store.commit('getTabbarShow',false)来修改
actions
异步处理
1 | import Vue from 'vue' |
接着 , 就可以使用this.$store.dispatch('GetcomingListAction')来执行异步操作
目前看到 https://www.bilibili.com/video/av81318072?p=85 , 来年继续
常见问题及其解决方案
取消全局监听事件
因为是单页面应用 , 所以监听事件是全局的 , 如果希望监听事件只存在于某个router , 可以使用beforeDestory
1 | mouted(){ |
异步请求数据渲染错误
1 | <h1>{{ film.name }}</h1> |
上面操作会引发错误 , 一开始异步数据还没请求到 , 此时的film是null , 渲染{{film.name}}出错
解决方法 , 使用v-if
1 | <h1 v-if="film">{{ film.name }}</h1> |
在模块化开发使用中央事件总线
所有的router必须共用一个bus , 因此我们不能在APP.vue里定义bus .
正确的做法是创建一个bus/bus.js , 然后export bus , 有谁需要就导入谁