Nginx+Lua

  1. Lua脚本基础语法
  2. Nginx加载Lua环境
  3. Nginx调⽤Lua指令
  4. Nginx+Lua实现代码灰度发布
  5. Nginx+Lua实现WAF应⽤防⽕墙

Nginx+Lua优势

充分的结合Nginx的并发处理epool优势和Lua的轻量实现简单的功能高并发的场景

应用场景 :

  • 统计IP
  • 统计⽤户信息
  • 安全WAF

lua脚本

就像bash一样 , 需要在首行使用#! /usr/bin/lua说明解释器的位置

  1. 创建文件

    1
    touch test.lua
  2. 编辑文件

    1
    #! /usr/bin/lua
  3. 执行文件

    1
    lua test.lua

Lua的基础语法复习

变量定义

1
2
3
4
a = 123
-- 布尔类型只有nil和false
-- 数字0,空字符串都是true
-- lua中的变量如果没有特殊说明, 全是全局变量

while 循环语句

1
2
3
4
5
6
7
8
sum = 0
num = 1
while num <= 100 do
sum = sum + num
num = num + 1
end
print("sum=",sum)
-- /Lua没有++或是+=这样的操作

for 循环语句

1
2
3
4
5
sum = 0
for i = 1,100 do
sum = sum + 1
end
print("sum=", sum)

if 判断语句

1
2
3
4
5
6
7
8
9
10
11
if age == 40 and sex == "Man"  then
print("男⼈⼤于40")
elseif age > 60 and sex ~= "Woman" then
print("⾮⼥⼈⽽且⼤于60")
else
local age = io.read()
print("Your age is" .. age)
end
-- ~=是不等于
-- 字符串的拼接操作符".."
-- io库的分别从stdin和stdout读写,read和write函数

Nginx加载Lua环境

默认情况下 Nginx 不⽀持 Lua 模块, 需要安装 LuaJIT 解释器, 并且需要重新编译 Nginx , 建议使⽤ openrestry

1
2
3
4
5
6
7
8
9
10
11
12
13
14
15
16
17
yum install -y readline-devel pcre-devel openssl-devel

cd /soft/src

wget https://openresty.org/download/ngx_openresty-1.9.3.2.tar.gz

tar zxf ngx_openresty-1.9.3.2.tar.gz

cd ngx_openresty-1.9.3.2

./configure --prefix=/soft/openresty-1.9.3.2 \
--with-luajit --with-http_stub_status_module \
--with-pcre --with-pcre-jit

gmake && gmake install

ln -s /soft/openresty-1.9.3.2/soft/openresty

测试openresty安装

1
vim	/soft/openresty/nginx/conf/nginx.conf
1
2
3
4
5
6
7
8
server {
location /hello {
default_type text/html;
content_by_lua_block {
ngx.say("HelloWorld")
}
}
}

Nginx调⽤Lua指令

Nginx 调⽤ Lua 模块指令, Nginx的可插拔模块加载执⾏, 共11个处理阶段

语法
set_by_lua , set_by_lua_file 设置Nginx变量,可以实现负载的赋值逻辑
access_by_lua , access_by_lua_file 请求访问阶段处理, ⽤于访问控制
content_by_lua , content_by_lua_file 内容处理器, 接受请求处理并输出响应

Nginx 调⽤ Lua API

变量
ngx.var nginx变量
ngx.req.get_headers 获取请求头
ngx.req.get_uri_args 获取url请求参数
ngx.redirect 重定向
ngx.print 输出响应内容体
ngx.say 输出响应内容体,最后输出⼀个换⾏符
ngx.header 输出响应头

Nginx+Lua实现代码灰度发布

  • 灰度发布是指在黑与白之间,能够平滑过渡的一种发布方式。
  • AB test就是一种灰度发布方式,让一部分用户继续用A,一部分用户开始用B,如果用户对B没有什么反对意见,那么逐步扩大范围,把所有用户都迁移到B上面来。
  • 灰度发布可以保证整体系统的稳定,在初始灰度的时候就可以发现、调整问题,以保证其影响度。

按照⼀定的关系做区别,分不同的代码进行上线,使代码的发布能平滑过渡上线

  1. ⽤户的信息cookie等信息区别
  2. 根据⽤户的ip地址, 颗粒度更⼴

实践架构图

用于WEB系统新代码的测试发布,让一部分IP访问新版本,一部分IP仍然访问正常版本,其原理如图

1575809712262

执行过程:

  1. 用户请求到达前端代理Nginx, 内嵌的lua模块会解析Nginx配置⽂件中Lua脚本
  2. Lua脚本会获取客户端IP地址,查看Memcached缓存中是否存在该键值
  3. 如果存在则执⾏@java_test(测试版本),否则执行@java_prod(稳定版本)
    • 如果是@java_test, 那么location会将请求转发⾄新版代码的集群组
    • 如果是@java_prod, 那么location会将请求转发⾄原始版代码集群组
  4. 最后整个过程执⾏后结束

1.配置 Memcached 并让其⽀持 Lua 调⽤

1
2
3
4
5
6
7
8
9
10
11
12
# 安装memcached服务
yum install memcached -y

# 配置memcached⽀持lua
cd /soft/src
wget https://github.com/agentzh/lua-resty-memcached/archive/v0.11.tar.gz
tar xf v0.11.tar.gz
cp -r lua-resty-memcached-0.11/lib/resty/memcached.lua /etc/nginx/lua/

# 启动memcached
systemctl start memcached
systemctl enable memcached

2.配置负载均衡调度

1
2
3
4
5
6
7
8
9
10
11
12
13
14
15
16
17
18
19
20
21
22
23
24
25
26
27
28
29
30
31
32
33
34
35
36
37
38
39
40
41
42
#必须在http层
lua_package_path "/etc/nginx/lua/memcached.lua";

# 稳定版本的服务器
upstream java_prod {
server 192.168.56.12:8080;
}
# 测试版本的服务器
upstream java_test {
server 192.168.56.13:9090;
}
server {
listen 80;
server_name 47.104.250.169;
location /hello {
default_type 'text/plain';
content_by_lua 'ngx.say("hello ,lua scripts")';
}
location /myip {
default_type 'text/plain';
content_by_lua
# 获取客户端IP
clientIP = ngx.req.get_headers()["x_forwarded_for"]
if clientIP == nil then
clientIP = ngx.var.remote_addr
ngx.say("Remote_IP:",clientIP)
end;
}
# 重要,灰度发布 Lua 脚本
location / {
default_type 'text/plain';
content_by_lua_file /etc/nginx/lua/dep.lua;
}
location @java_prod {
proxy_pass http://java_prod;
include proxy_params;
}
location @java_test {
proxy_pass http://java_test;
include proxy_params;
}
}

nginx反向代理tomcat,必须配置头部信息否则返回400错误

开启代理必须添加proxy_params

1
cat	../proxy_params	
1
2
3
4
5
6
7
8
9
10
11
12
proxy_redirect default;
proxy_set_header Host $http_host;
proxy_set_header X-Real-IP $remote_addr;
proxy_set_header X-Forwarded-For $proxy_add_x_forwarded_for;
proxy_connect_timeout 30;
proxy_send_timeout 60;
proxy_read_timeout 60;
proxy_buffer_size 32k;
proxy_buffering on;
proxy_buffers 4 128k;
proxy_busy_buffers_size 256k;
proxy_max_temp_file_size 256k;

3.编写 Nginx 调⽤灰度发布 Lua 脚本

1
cat	/etc/nginx/lua/dep.lua
1
2
3
4
5
6
7
8
9
10
11
12
13
14
15
16
17
18
19
20
21
22
23
24
25
26
27
28
29
30
31
32
33
34
35
36
37
38
39
40
41
42
43
44
45
46
47
48
--获取x-real-ip
clientIP = ngx.req.get_headers()["X-Real-IP"]

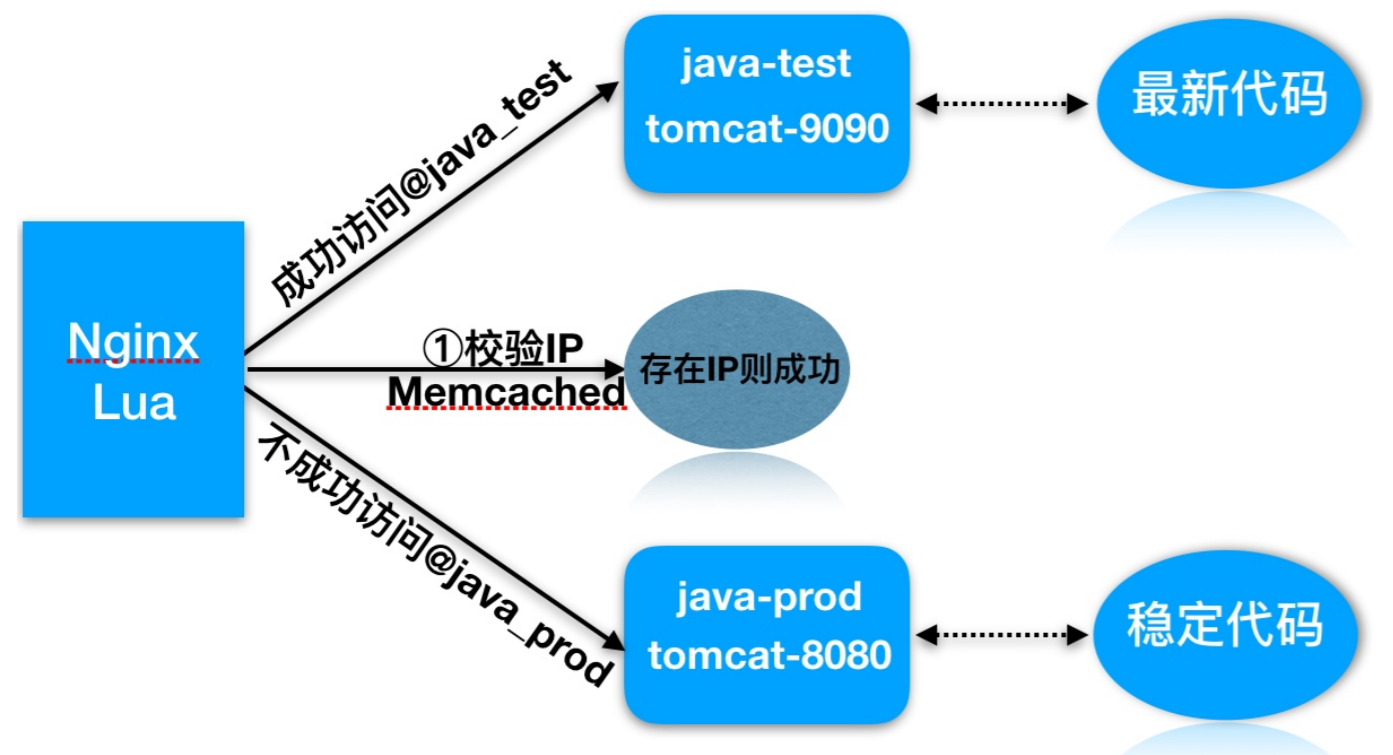
--如果IP为空-取x_forwarded_for
if clientIP == nil then
clientIP = ngx.req.get_headers()["x_forwarded_for"]
end

--如果IP为空-取remote_addr
if clientIP == nil then
clientIP = ngx.var.remote_addr
end

--定义本地的memcached对象,加载memcached
local memcached = require "resty.memcached"
--实例化对象
local memc, err = memcached:new()

--判断连接是否存在错误
if not memc then
ngx.say("failed to instantiate memc: ", err)
return
end

--建⽴memcache连接
local ok, err = memc:connect("127.0.0.1", 11211)
--⽆法连接往前端抛出错误信息
if not ok then
ngx.say("failed to connect: ", err)
return
end

--获取对象中的ip-存在值赋给res
local res, flags, err = memc:get(clientIP)

--ngx.say("value key: ",res,clientIP)
if err then
ngx.say("failed to get clientIP ", err)
return
end
--如果值为1则调⽤local-@java_test
if res == "1" then
ngx.exec("@java_test")
return
end
--否则调⽤local-@java_prod
ngx.exec("@java_prod")
return

Nginx+Lua实现WAF应⽤防⽕墙

爬⾍⾏为和恶意抓取,资源盗取

防护⼿段

  • 基础防盗链功能不让恶意⽤户能够轻易的爬取⽹站对外数据
  • access_moudle->对后台,部分⽤户服务的数据提供IP防护(普通用户不允许访问/admin路径)
1
2
3
4
5
6
7
8
9
10
11
12
13
14
15
16
17
18
19
server {
listen 80;
server_name localhost;
set $ip 0;
if ($http_x_forward_for ~ 211.161.160.201){
set $ip 1;
}
if ($remote_addr ~ 211.161.160.201){
set $ip 1;
}
# 如果$ip值为0,则返回403, 否则允许访问
location /hello {
if ($ip = "0"){
return 403;
}
default_type application/json;
return 200 '{"status":"success"}';
}
}

后台密码撞库,XRF攻击

  • 后台密码撞库,通过猜测密码字典不断对后台系统登陆性尝试,获取后台登陆密码
  • XRF攻击 : ⽂件上传漏洞,利⽤上传接⼝将恶意代码植⼊到服务器中,再通过url去访问执⾏代码 , 执⾏⽅式bgx.com/1.jpg/1.php

防护⼿段

  • 后台登陆密码复杂度
  • 使⽤access_module , 对后台提供IP防控
  • 预警机制
1
2
3
4
5
6
location ^~ /upload {
root /soft/code/upload;
if ($request_filename ~* (.*)\.php){
return 403;
}
}

Sql注⼊

防护⼿段

  1. php配置开启安全相关限制
  2. 开发⼈员对sql提交进⾏审核,屏蔽常⻅的注⼊⼿段
  3. Nginx+Lua构建WAF应⽤层防⽕墙, 防⽌Sql注⼊

1575812230671

使⽤lua解决此类安全问题

1575812341593

详见 : ngx_lua_waf

1
2
3
4
5
6
7
8
9
10
11
12
13
14
15
16
17
18
19
20
21
22
23
24
25
26
27
28
29
30
31
32
33
34
35
36
37
38
39
40
41
42
43
44
45
46
47
48
49
50
51
52
53
54
55
56
57
58
59
60
61
62
63
64
65
66
67
68
69
70
71
72
73
74
75
76
77
78
79
80
81
82
83
84
85
86
87
88
89
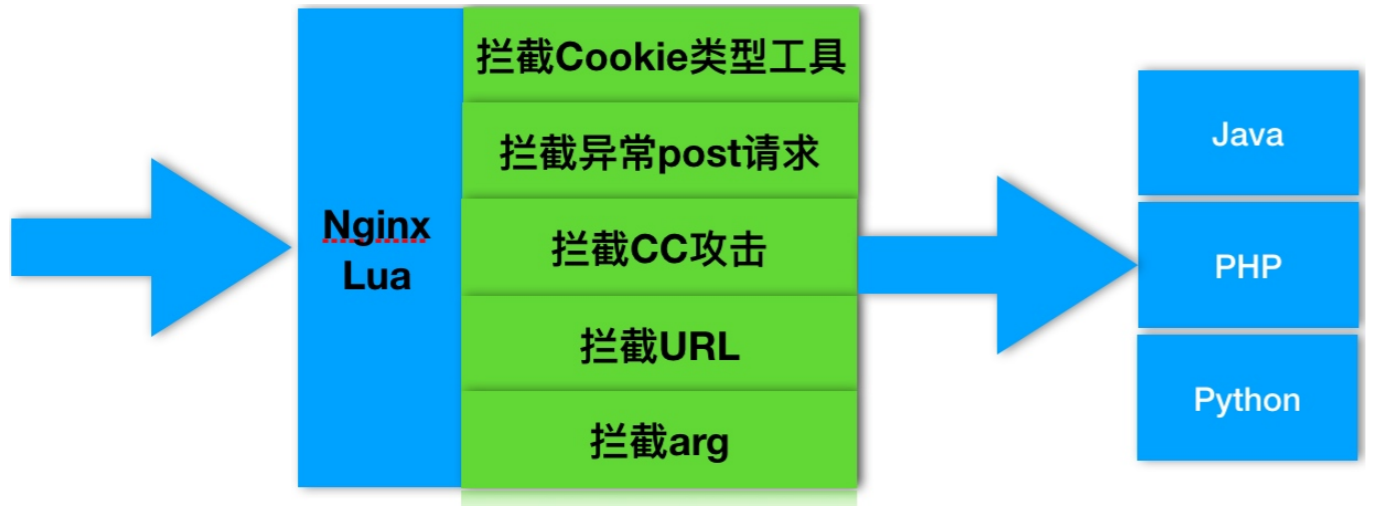
-- waf.lua :
local content_length=tonumber(ngx.req.get_headers()['content-length'])
local method=ngx.req.get_method()
local ngxmatch=ngx.re.match
if whiteip() then
elseif blockip() then
elseif denycc() then
elseif ngx.var.http_Acunetix_Aspect then
ngx.exit(444)
elseif ngx.var.http_X_Scan_Memo then
ngx.exit(444)
elseif whiteurl() then
elseif ua() then
elseif url() then
elseif args() then
elseif cookie() then
elseif PostCheck then
if method=="POST" then
local boundary = get_boundary()
if boundary then
local len = string.len
local sock, err = ngx.req.socket()
if not sock then
return
end
ngx.req.init_body(128 * 1024)
sock:settimeout(0)
local content_length = nil
content_length=tonumber(ngx.req.get_headers()['content-length'])
local chunk_size = 4096
if content_length < chunk_size then
chunk_size = content_length
end
local size = 0
while size < content_length do
local data, err, partial = sock:receive(chunk_size)
data = data or partial
if not data then
return
end
ngx.req.append_body(data)
if body(data) then
return true
end
size = size + len(data)
local m = ngxmatch(data,[[Content-Disposition: form-data;(.+)filename="(.+)\\.(.*)"]],'ijo')
if m then
fileExtCheck(m[3])
filetranslate = true
else
if ngxmatch(data,"Content-Disposition:",'isjo') then
filetranslate = false
end
if filetranslate==false then
if body(data) then
return true
end
end
end
local less = content_length - size
if less < chunk_size then
chunk_size = less
end
end
ngx.req.finish_body()
else
ngx.req.read_body()
local args = ngx.req.get_post_args()
if not args then
return
end
for key, val in pairs(args) do
if type(val) == "table" then
if type(val[1]) == "boolean" then
return
end
data=table.concat(val, ", ")
else
data=val
end
if data and type(data) ~= "boolean" and body(data) then
body(key)
end
end
end
end
else
return
end

在nginx.conf的http段添加

1
2
3
4
5
6
7
8
lua_package_path "/etc/waf/?.lua";
lua_shared_dict limit 10m;
init_by_lua_file /etc/waf/init.lua;
access_by_lua_file /etc/waf/waf.lua;

# 配置config.lua⾥的waf规则⽬录(⼀般在waf/conf/⽬录下)
# 绝对路径如有变动,需对应修改, 然后重启nginx即可
RulePath = "/etc/nginx/waf/wafconf/"

防⽌ CC 攻击

攻击者借助代理服务器生成指向受害主机的合法请求,实现DDOS和伪装就叫:CC(Challenge Collapsar)。

CC攻击是DDoS攻击的一种类型,使用代理服务器向受害服务器发送大量貌似合法的请求。

1
vim /etc/nginx/waf/config.lua
1
2
-- 60秒只允许100个请求
CCrate="100/60"