HTML中插入script标签:
1 2 3 <script type ="text/javascript" > ... </script >
1 <script src ="js/test.js" type ="text/javascript" charset ="utf-8" > </script >
对于导入的JS文件来说,导入即执行 .也就是说,js在导入后马上就执行了.
注意:如果script标签带有src属性,那么该标签内部的语句直接失效.
1 2 3 4 <script src ="js/test.js" type ="text/javascript" charset ="utf-8" > console .log("****" ) </script >
Undefined:
Null与undefined最大的不同在于,==被赋予Null的变量通常被认为是已经定义了的,只不过他不代表任何东西.==
Infinity:他不是无穷大 .
NaN:依然属于数字类型. NaN具有传染性 :只要表达式含有NaN,那么最终结果就是NaN
1
2
3
4
5
6
var num = 10 var a = num++var b = ++num
==:值相等,允许类型不相等===:值相等,类型也要相等
三目运算符:
var是定义全局 变量.==js在函数里可以直接修改全局变量:==
1 2 3 4 5 6 7 var num = 10 function func ( num = 20 } func() console .log(num)
函数中定义的变量时如果没有var,那么就是全局变量
1 2 3 4 5 6 7 function func ( num = 20 } func() console .log(num);
1
2
3
4
5
6
7
function func ( var num = 20 } func() console .log(num);
1 2 3 4 5 6 7 var num = 10 function func ( var num = 20 } func() console .log(num)
简单来说:
js变量提升:提升的是定义,不是提升赋值 :
1 2 3 4 5 6 7 function func ( console .log(num) var num = 20 console .log(num) }
1 2 3 4 5 6 7 8 9 10 11 12 function func ( var num console .log(num) num = 20 console .log(num) } function func ( console .log(num) }
即使函数:
1 2 3 function (a,b ) return a + b }(1 ,2 )
js的console.log也可以使用%:
1 2 3 4 arr = [1 ,2 ,3 ,4 ,5 ,6 ] for (var i=0 ;i<arr.length;i++){ console .log("arr[%d] = %d" ,i,arr[i]) }
1 2 3 4 5 arr = [1 ,2 ,3 ,4 ,5 ,6 ] for (var i in arr){ console .log(i) }
js遍历数组一般都使用forEach函数:
1 2 3 4 5 var arr1 = new Array (1 ,2 ,3 )arr.forEach(function (item ) console .log(item) })
创建对象:
1 var arr1 = new Array (1 ,2 ,3 )
arr插入/弹出元素的方法:
push:在最后添加
unshift:在前面添加
pop:弹出最后
shift:弹出最前
arr的切片一样是上限不在内
1 2 3 4 5 6 var arr1 = new Array (1 ,2 ,3 )arr.splice(1 ,3 ) arr.splice(1 ,3 ,100 ,200 ,300 )
1 2 3 4 arr.sort(function (x,y ) return x.length > y.length })
字符串的charAt方法:就是普通的索引:
1 2 3 4 5 6 7 8 9 10 11 var str1 = 'hyl' console .log(str1.charAt(9 ))console .log(str1[9 ])console .log(str1.charCodeAt(9 ))console .log(String .fromCharCode(9 ))
JS与浏览器 BOM:浏览器对象模型(Browser Object Model):用于访问浏览器和计算机屏幕的对象集合
document:
frames:
navigator:
location:
history:
1 2 3 4 <body > <button onclick ="func()" > to red</button > </body >
1 2 3 4 function func ( window .location.href="red.html" }
1 2 3 4 5 6 7 8 9 function func ( window .location.reload() } function func ( window .location.reload(true ) }
1 2 3 4 5 6 7 8 9 function func ( window .location.assign("red.html" ) } function func ( window .location.replace() }
1 2 <button onclick ="func1()" > 上一页</button > <button onclick ="func2()" > 下一页</button >
1 2 3 4 5 6 function func1 ( window .history.back() } function func2 ( window .history.forward() }
1 2 3 4 function func3 ( window .history.go(-2 ) }
1 2 3 4 function func3 (window .open("red.html" ,"blank" , "width=400px,height=400px,left=20px,top=0" ) }
1 2 3 4 5 6 <script type ="text/javascript" > window .onload = function ( alert('页面加载成功' ) } </script >
1 2 3 4 5 6 <script type ="text/javascript" > window .onscroll = function ( ... } </script >
滚动条改变事件可以用于像知乎那样的ajax加载:当滚动条下滑到最底下就调用函数。
1 2 3 4 5 6 7 8 9 10 11 <script type ="text/javascript" > window .onscroll = function ( var a = document .documentElement.scrollTop || document .body.scrollTop if (a===500 ){ } } </script >
1 2 3 4 5 6 <script type ="text/javascript" > window .onresize = function ( ... } </script >
定义器:
间歇性定时器:
延时定时器:
1 2 3 4 5 6 <script type ="text/javascript" > var time = window .setInterval(function ( ... },2000 ) </script >
1 2 3 4 5 6 <script type ="text/javascript" > function func ( window .clearInterval(time) } </script >
定时器没有暂停,只能开始和清除.
1 2 3 4 5 6 <script type ="text/javascript" > var time = window .setTimeout(function ( ... },2000 ) </script >
DOM
1 2 3 4 5 6 7 8 9 10 11 12 13 <script type ="text/javascript" > var a = document .getElementById("id1" ) var a = document .getElementByClassName("class1" ) var a = document .getElementsByName("inputText" ) var a = document .getElementsByTagName("div" ) </script >
1 2 3 4 5 6 7 8 9 10 11 12 <input type ="text" id ="in" placeholder ="hyl" my ="我的" > <script type ="text/javascript" > var a = document .getElementById("in" ) console .log(a.placeholder) </script >
1 2 3 4 5 6 7 8 9 <input type ="text" id ="in" placeholder ="hyl" my ="我的" > <script type ="text/javascript" > var a = document .getElementById("in" ) a.getAttribute('my' ) </script >
1 2 3 4 5 6 7 8 9 10 11 <button onclick ="func()" > 修改属性节点</button > <input type ="text" id ="in" placeholder ="hyl" my ="我的" > <script type ="text/javascript" > var a = document .getElementById('in' ) function ( a.placeholder="xxx" } </script >
或者:
1 2 3 4 5 6 <script type ="text/javascript" > var a = document .getElementById('in' ) function ( a.setAttribute('my' ,'xxx' ) } </script >
注意使用setAttribute(),当这个属性不存在的时候就是增加,当这个属性存在的时候就是修改.
1 2 3 4 5 6 7 <script type ="text/javascript" > var a = document .getElementById('in' ) function ( a.removeAttribute('my' ,'xxx' ) } </script >
获取文本:
1 2 3 4 5 6 7 8 9 10 11 12 <div id ="box" > this is a box </div > <script type ="text/javascript" > var a = document .getElementById('box' ) console .log(a.innerHTML) console .log(a.innerText) </script >
其实还有一个outerHTML:
1 2 3 4 5 6 7 8 9 <script type ="text/javascript" > var a = document .getElementById('box' ) console .log(a.outerHTML) </script >
还有使用innerHTML来修改HTML:
1 2 3 4 <script type ="text/javascript" > var a = document .getElementById('box' ) a.innerHTML = '<h1>goog</ h1>' </script >
行间样式属性的修改<div style="...">的style属性
1 2 3 4 5 6 7 8 9 10 11 <div id ="box" style ="background-color: red; width=200px" > text</div > <script type ="text/javascript" > var a = document .getElementById('box' ) a.style.backgroundColor = "yellow" a.sytle.width = '200px' a.style.height = '500px' </script >
a.style.backgroundColor只能==获取==行间样式表的style属性.
对于具有外部的style的标签,我们可以使用getComputeStyle
1 2 3 4 5 6 7 8 9 10 11 <div id ="box" > text</div > <button onclick ="func()" > to blue</button > <script type ="text/javascript" > function func ( var xx = document .getElementById('box' ); var c = window .getComputedStyle(xx,null )["backgroundColor" ]; console .log(c); } </script >
1 2 3 #box { background-color : brown; }
简单的js动态:
1 2 3 4 5 6 7 8 9 10 11 12 13 14 15 16 17 18 19 20 21 22 23 24 25 26 27 28 29 30 31 32 33 34 35 36 37 <!DOCTYPE html > <html > <head > <meta charset ="UTF-8" > <title > </title > <style type ="text/css" > #box { width : 100px ; height : 100px ; background-color : red; position : absolute; left : 0 ; top : 0 ; } </style > </head > <body style ="height: 1000px;position: relative" > <div id ="box" > </div > <button onclick ="fly()" style ="left: 200px; top: 200px;position: absolute;" > 走你</button > <script type ="text/javascript" > function fly ( target = document .getElementById('box' ); setInterval ( function ( var a = parseInt (window .getComputedStyle(target,null ).left) var b = parseInt (window .getComputedStyle(target,null ).top) target.style.left = a + 10 + 'px' target.style.top = b + 10 + 'px' },100 ) } </script > </body > </html >
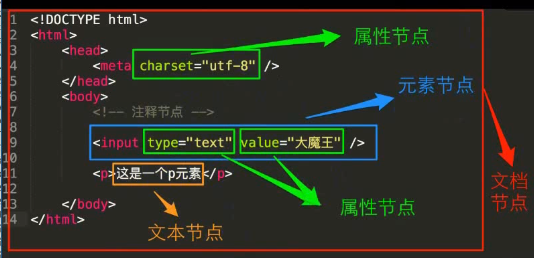
节点:
节点类型
nodeName
nodeType
nodeValue
元素节点
元素名称
1
null
属性节点
属性名称
2
属性值
文本节点
#text
2
文本内容不包括html
注释节点
#comments
8
注释内容
1 2 3 4 5 6 7 <div id ="box" > </div > <script type ="text/javascript" > var s = document .getElementById('box' ) console .log(s.nodeName) </script >
现在想拿下面四个p节点的文本(123)
1 2 3 4 <p > 123</p > <p > 123</p > <p > 123</p > <p > 123</p >
1 2 3 4 5 6 7 8 9 10 11 12 13 14 15 16 17 var allChilren = s.childNodesvar ChildNodeChildNode = s.firstChildvar lastchildNode = s.lastChildvar rootNode = s.ownerDocumentvar parentNode = s.parentNodevar previousSibling = s.previousSiblingvar nextNode = s.nextNodeSiblingvar nextNode = s.attributes
节点操作:
1 2 3 4 5 6 7 8 9 10 11 12 13 14 <script type ="text/javascript" > var div = document .getElementById('box' ) var a = document .createElement('p' ) a.innerHTML = 'wenben' a.style.backgroundColor='red' div.appendChild(a) div.insertBefore(a,div.lastChild) div.replaceChild(a,div.lastChild) </script >
1 2 3 4 5 6 7 8 <script type ="text/javascript" > div.removeChild(a) var x = div.cloneNode var x = div.cloneNode(true ) </script >
事件处理 实现HTML代码和js代码的分离:
1 2 3 4 5 6 <div id ="box" onclick ="func()" > </div > <script type ="text/javascript" > function func ( alert('hello world' ) } </script >
1 2 3 4 5 6 7 8 9 <div id ="box" > </div > <script type ="text/javascript" > var div = document .getElementById('box' ) div.onclick = function ( alert('hello world' ) } </script >
或者为一个标签添加一个事件监听 :
1 2 3 4 5 6 7 8 9 10 <div id ="box" > </div > <script type ="text/javascript" > var div = document .getElementById('box' ) div.addEventListener('click' ,function func ( alert('hello world' ) },false ) </script >
添加事件监听可以添加多个同类型事件(如click):
1 2 3 4 5 6 7 8 9 10 11 12 <div id ="box" > </div > <script type ="text/javascript" > var div = document .getElementById('box' ) div.addEventListener('click' ,function func ( alert('hello world' ) },false ) div.addEventListener('click' ,function func ( alert('hello world2222222' ) },false ) </script >
事件监听的取消:
1 2 3 4 5 6 7 8 9 10 11 12 <div id ="box" > </div > <script type ="text/javascript" > var div = document .getElementById('box' ) function f ( alert('hello world' ) } div.addEventListener('click' ,f,false ) div.removeEventListener('click' ,f,false ) </script >
可以使用this来获取标签
1 2 3 4 5 6 7 8 <div id ="box" onclick ='func(this)' > </div > <script type ="text/javascript" > function func (self ) self.style.backgroundColor = 'red' } </script >
1 2 3 4 5 6 7 8 9 10 <div id ="box" > </div > <script type ="text/javascript" > var div = document .getElementById('box' ) div.onclick = function ( console .log(this ) } </script >
1 2 3 4 5 6 7 8 9 10 11 12 13 <div id ="box" > </div > <script type ="text/javascript" > var div = document .getElementById('box' ) function f ( alert('hello world' ) console .log(this ) } div.addEventListener('click' ,f,false ) </script >
焦点事件:
1 2 3 4 5 6 7 8 9 10 11 12 13 <input type ="text" name ="in" id ="in" value ="" /> <script type ="text/javascript" > var inp = document .getElementById('in' ) inp.addEventListener('focus' ,function ( console .log('聚焦事件' ) },false ) inp.addEventListener('blur' ,function ( console .log('离焦事件' ) }) </script >
鼠标事件:单击和双击:
1 2 3 4 5 6 7 8 9 10 11 <script type ="text/javascript" > var inp = document .getElementById('in' ) inp.addEventListener('click' ,function ( console .log('单击' ) },false ) inp.addEventListener('dblclick' ,function ( console .log('双击' ) }) </script >
注意,单击双击不可同时使用 .不然你在双击的时候就会同时触发两个单击和一次双击.
如果真的要单击和双击同时使用的话,就要使用定时器Timeout/clearTimeout:
1 2 3 4 5 6 7 8 9 10 11 12 13 14 15 16 17 18 19 20 21 <input type ="text" name ="in" id ="in" value ="" /> <script type ="text/javascript" > var inp = document .getElementById('in' ) var time inp.addEventListener('click' ,function ( clearTimeout (time) time = setTimeout (function ( console .log('单击' ) },300 ) },false ) inp.addEventListener('dblclick' ,function ( clearTimeout (time) console .log('双击' ) }) </script >
鼠标进入,移出,按下,松开:
1 2 3 4 5 6 7 8 9 10 11 12 13 14 15 16 17 18 19 20 21 22 23 24 25 26 27 28 29 30 31 32 33 34 <ul > <li > 鼠标进入变红色</li > <li > 鼠标离开变蓝色</li > <li > 鼠标按下字体大2倍</li > <li > 鼠标抬起字体小2倍</li > </ul > <script type ="text/javascript" > var lis = document .getElementsByTagName('li' ) for (var i = 0 ;i<lis.length;i++) { lis[i].addEventListener('mouseover' ,function ( this .style.backgroundColor = 'red' },false ) lis[i].addEventListener('mouseout' ,function ( this .style.backgroundColor = 'blue' },false ) lis[i].addEventListener('mousedown' ,function ( this .style.fontSize = parseInt (getComputedStyle(this ,null ).fontSize)* 2 + 'px' },false ) lis[i].addEventListener('mouseup' ,function ( this .style.fontSize = parseInt (getComputedStyle(this ,null ).fontSize)/ 2 + 'px' },false ) } document .addEventListener('mousemove' ,function ( console .log('鼠标在移动' ) }) </script >
键盘事件
1 2 3 4 5 6 7 8 9 10 11 12 13 14 15 16 <script type ="text/javascript" > var lis = document .getElementsByTagName('li' ) document .addEventListener('keydown' ,function (e ) var event = e || window .event console .log(event.altKey,event.ctrlKey,event.shiftKey,event.key,event.KeyCode) },false ) document .addEventListener('keyup' ,function (e ) var event = e || window .event console .log(event.altKey,event.ctrlKey,event.shiftKey,event.key,event.KeyCode) },false ) </script >
注意:
为什么分event.altKey,event.ctrlKey,event.shiftKey,event.key这么多:
event.KeyCode就是指每一个按钮对应的编号
如果一直按着键盘不松开,就会一直触发keydown事件.
其实鼠标点击事件也有event对象:
1 2 3 4 5 6 7 8 9 <script type ="text/javascript" > var inp = document .getElementById('in' ) inp.addEventListener('click' ,function (e ) var ev = e || window .event console .log(ev) },false ) </script >
属性/方法
说明
ClientX
浏览器可视窗口水平方向的坐标
ClientY
浏览器可视窗口垂直方向的坐标
pageX
页面中水平方向的坐标
pageY
页面中垂直方向的坐标
screenX
电脑屏幕水平方向的坐标
screenY
电脑屏幕垂直方向的坐标
button
0:左键,1:滚轮键,2:右键
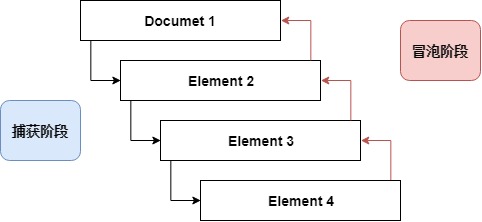
事件流:
有一个同心圆,鼠标点击圆心.那么鼠标点击的不是某个特定的圆,而是所有的圆。那么哪个圆应该最先享用这个事件?
我们把事件流分为3个阶段:
捕获阶段和冒泡阶段都可以响应事件.true为捕获阶段,false为冒泡阶段
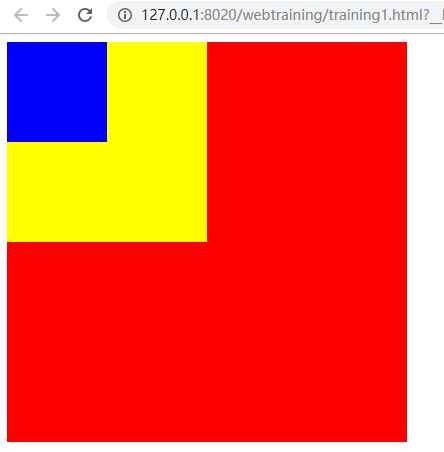
1 2 3 4 5 6 7 8 9 10 11 12 13 14 15 16 17 18 19 20 21 22 23 24 25 26 27 28 29 30 31 32 33 34 35 36 37 38 39 40 41 42 43 44 45 46 47 48 49 <!DOCTYPE html > <html > <head > <meta charset ="UTF-8" > <title > </title > <style type ="text/css" > #box1 { width : 400px ; height : 400px ; background-color : red; } #box2 { width : 200px ; height : 200px ; background-color : yellow; } #box3 { width : 100px ; height : 100px ; background-color : blue; } </style > </head > <body > <div id ="box1" > <div id ="box2" > <div id ="box3" > </div > </div > </div > <script type ="text/javascript" > var div1 = document .getElementById('box1' ) var div2 = document .getElementById('box2' ) var div3 = document .getElementById('box3' ) div1.addEventListener('click' ,function (e ) console .log('点击了div1' ) },false ) div2.addEventListener('click' ,function (e ) console .log('点击了div2' ) },false ) div3.addEventListener('click' ,function (e ) console .log('点击了div3' ) },false ) </script > </body > </html >
单击蓝色div:
把三个函数的第三参数的false都改为true:
1 2 3 4 5 6 7 8 div1.addEventListener('click' ,function (e ) console .log('点击了div1' ) },false ) div1.addEventListener('click' ,function (e ) console .log('点击了div1' ) },true )
单击蓝色div:
使用监听函数确实可以确定在捕获阶段还是在冒泡阶段调用函数,但是如果没有使用监听函数怎么办?
1 2 3 4 5 6 7 8 9 10 11 12 13 14 15 <script type ="text/javascript" > document .body.onclick = function ( this .style.backgroundColor = 'yellow' } document .getElementById('box' ).onclick = function (e ) var ev = e || window .event ev.stopPropagation() this .style.backgroundColor='blue' } </script >
默认行为:
点击a标签默认行为就是跳转到其他页面,现在我们要添加一个弹窗,当用户点击取消的时候不发生跳转.这时候就需要用到阻止默认行为
1 2 3 4 5 6 7 8 9 <script type ="text/javascript" > document .getElementById('link' ).onclick = function (e ) var info = window .confirm('是否跳转?' ) if (info == false ){ ev.preventDefault() } } </script >
轮播效果:
1 2 3 4 5 6 7 8 9 10 11 12 13 14 15 16 17 18 19 20 21 22 23 24 25 26 <!DOCTYPE html > <html > <head > <meta charset ="UTF-8" > <title > </title > <link rel ="stylesheet" type ="text/css" href ="css/test.css" /> </head > <body > <div id ="box" > <img src ="img/1.jpg" id ="pic" /> <ul id ="list" > <li > 1</li > <li > 2</li > <li > 3</li > <li > 4</li > <li > 5</li > <li > 6</li > <li > 7</li > <li > 8</li > </ul > <div id ="left" class ='bt' > <</div > <div id ="right" class ='bt' > ></div > </div > </body > <script src ="js/loop.js" type ="text/javascript" charset ="utf-8" > </script > </html >
1 2 3 4 5 6 7 8 9 10 11 12 13 14 15 16 17 18 19 20 21 22 23 24 25 26 27 28 29 30 31 32 33 34 35 36 37 38 39 40 41 42 43 44 45 46 47 48 49 50 51 52 53 54 55 56 57 58 59 60 61 62 63 64 65 66 67 68 69 70 71 72 73 74 75 76 77 78 79 80 81 82 83 84 85 86 87 88 89 90 var box = document .getElementById('box' )var pic = document .getElementById('pic' )var left = document .getElementById('left' )var right = document .getElementById('right' )var list = document .getElementsByTagName('li' )list[0 ].style.backgroundColor = 'red' var currentPage = 1 var timer = setInterval (startloop,1000 )function startloop ( currentPage++ changePage() } function changePage ( if (currentPage == 9 ){ currentPage = 1 }else if (currentPage == 0 ){ currentPage = 8 } pic.src = 'img/' +currentPage+'.jpg' for (var i=0 ;i<list.length;i++){ list[i].style.backgroundColor = '#aaa' } list[currentPage-1 ].style.backgroundColor = 'red' } box.addEventListener('mouseover' ,overfunc,false ) function overfunc ( clearInterval (timer) left.style.display='block' right.style.display='block' } box.addEventListener('mouseout' ,outfunc,false ) function outfunc ( timer = setInterval (startloop,1000 ) left.style.display='none' right.style.display='none' } left.addEventListener('mouseover' ,deep,false ) right.addEventListener('mouseover' ,deep,false ) function deep ( this .style.backgroundColor = 'rgba(0,0,0,0.8)' } left.addEventListener('mouseout' ,nodeep,false ) right.addEventListener('mouseout' ,nodeep,false ) function nodeep ( this .style.backgroundColor = 'rgba(0,0,0,0.2)' } right.addEventListener('click' ,function ( currentPage++ changePage() },false ) left.addEventListener('click' ,function ( currentPage-- changePage() },false ) for (var i=0 ;i<list.length;i++){ list[i].index = i + 1 list[i].addEventListener('mousemove' ,function ( currentPage = parseInt (this .index) changePage() },false ) }
1 2 3 4 5 6 7 8 9 10 11 12 13 14 15 16 17 18 19 20 21 22 23 24 25 26 27 28 29 30 31 32 33 34 35 36 37 38 39 40 41 42 43 44 45 46 47 48 49 50 51 *{ padding : 0 ; margin : 0 ; } #box { width : 290px ; height : 220px ; margin : 0 auto; position : relative; } .bt { width : 50px ; height : 80px ; background-color : rgba (0 ,0 ,0 ,0.2 ); color : #fff ; font-size : 30px ; line-height : 80px ; text-align : center; position : absolute; top : 60px ; display : none; } #left { left : 0 ; } #right { right : 0 ; } #list { list-style : none; position : absolute; bottom : 20px ; left : 48px ; font-size : 10px ; } #list li { float : left; width : 20px ; height : 20px ; background-color : #aaa ; margin-left : 5px ; border-radius : 50% ; text-align : center; line-height : 20px ; }